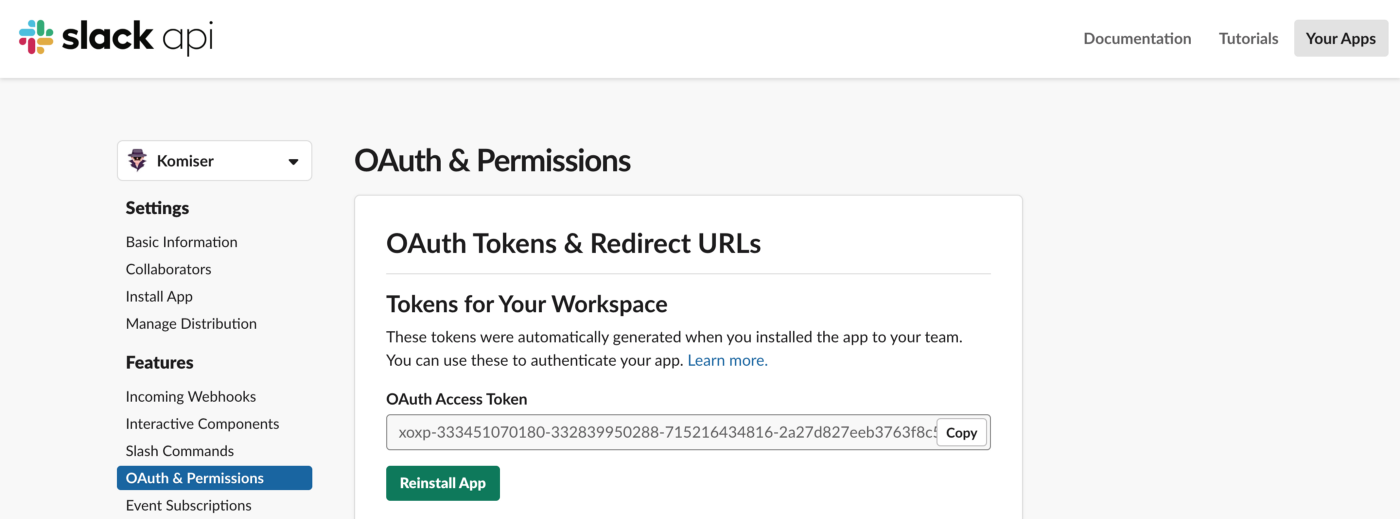
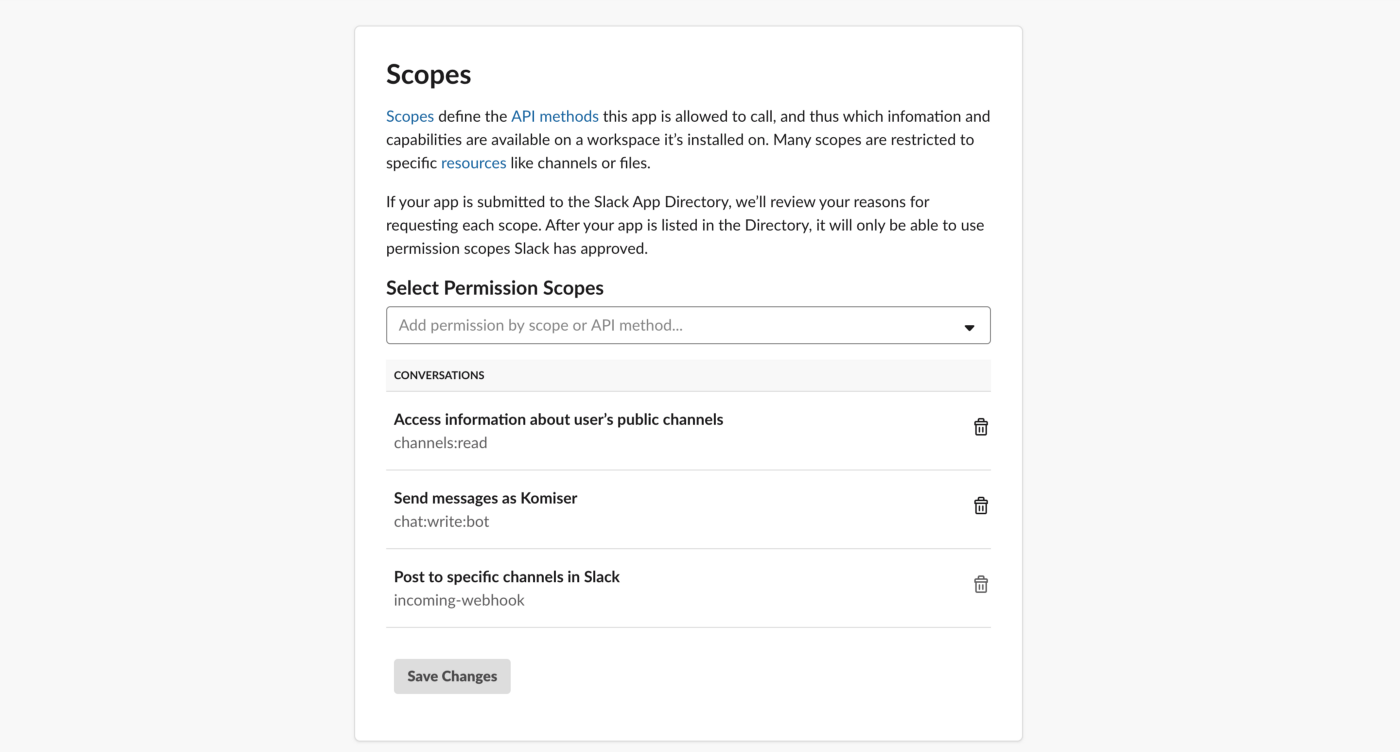
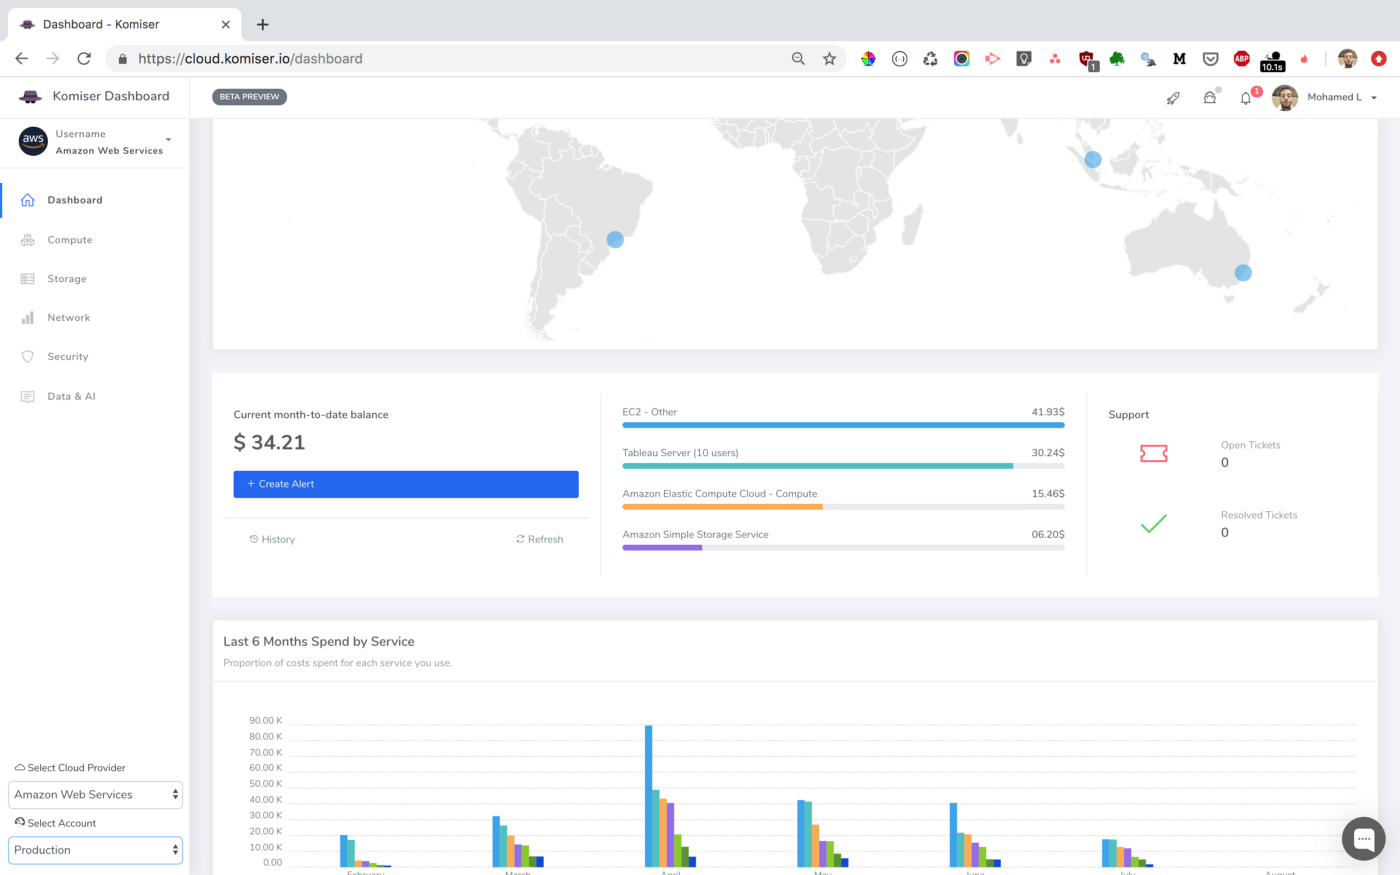
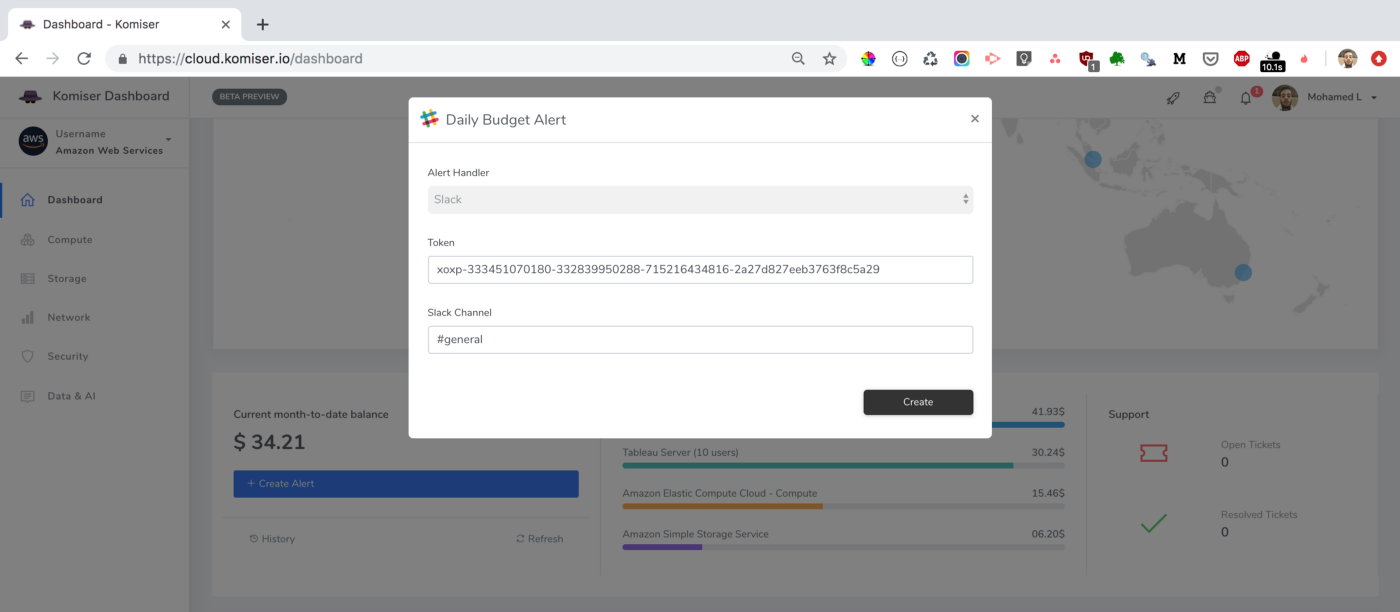
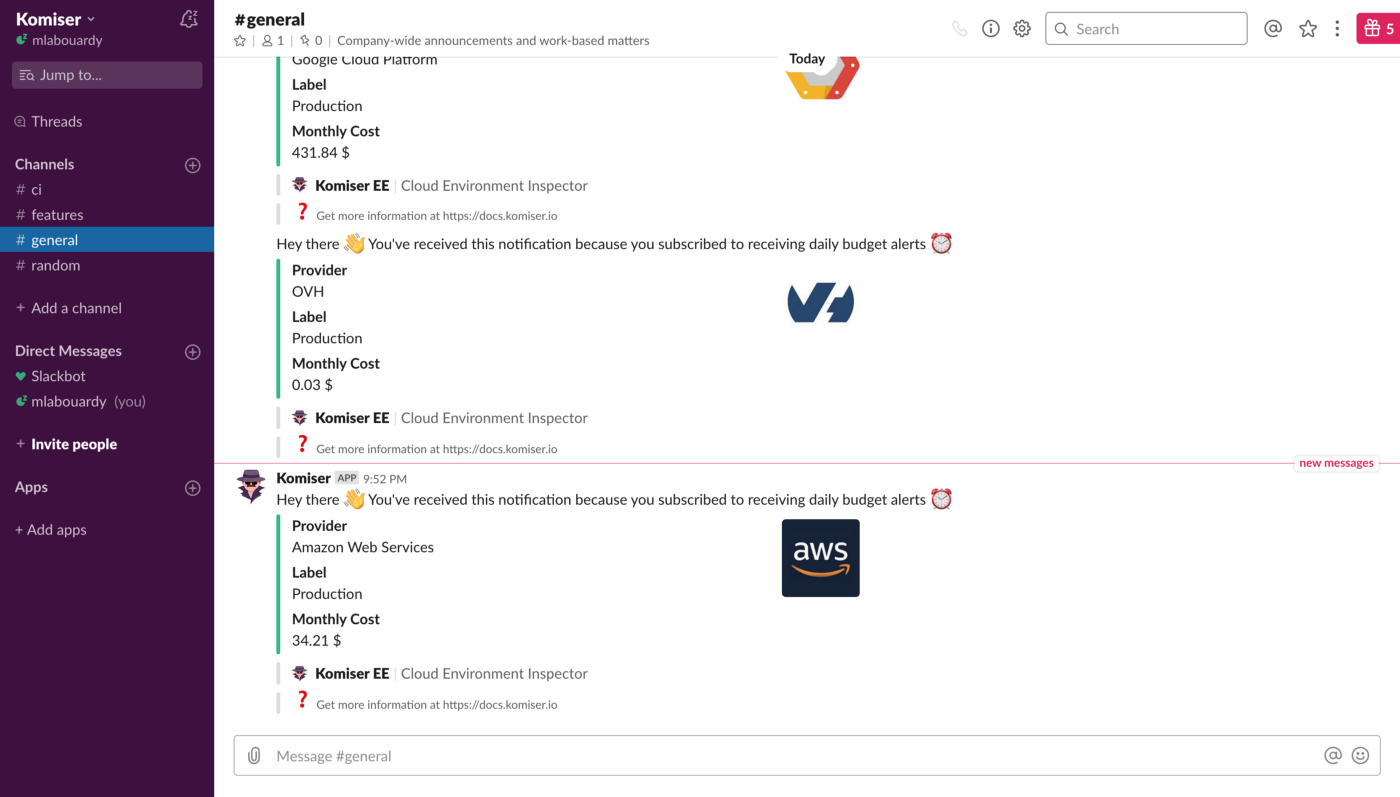
That’s it, you will receive everyday (at 9am GMT) a slack notification with the current monthly cost of each cloud account configured on your Komiser EE account:
Drop your comments, feedback, or suggestions below — or connect with me directly on Twitter @mlabouardy.
Komiser Stays Open
Komiser EE is built on top of Komiser CE, that means that Komiser continues to evolve and will stay open source. Nothing changes! We are firm believers in open source, and Komiser will continue to be our main priority and a community-driven project.
Releases keep rolling ! I’m thrilled to announce the release of Komiser:2.2.0 with support of multiple AWS accounts 🎊 🎉
But that’s not all, check the whole changelog to get an idea of the awesome work that has been done on this release. Lots of bugs have been fixed and we also have been working on adding amazing features.
Highlights
Komiser support multiple AWS accounts through named profiles that are stored in the config and credentials files. You can configure additional profiles by using aws configure with the --profile option, or by adding entries to the config and credentials files.
The following example shows a credentials file with 3 profiles (production, staging & sandbox accounts):
Komiser is written in Golang and is MIT licensed — contributions are welcomed whether that means providing feedback or testing existing and new features.
Drop your comments, feedback, or suggestions below — or connect with me directly on Twitter @mlabouardy.
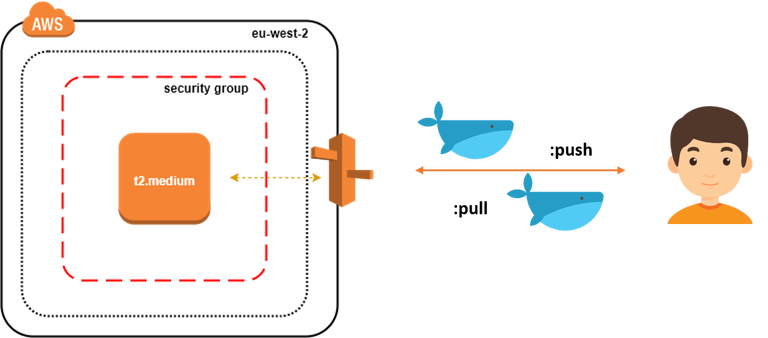
Have you ever wondered how you can build a highly available & resilient Docker Repository to store your Docker Images ?
In this post, we will setup an EC2 instance inside a Security Group and create an A record pointing to the server Elastic IP address as follow:
To provision the infrastructure, we will use Terraform as IaC (Infrastructure as Code) tool. The advantage of using this kind of tools is the ability to spin up a new environment quickly in different AWS region (or different IaaS provider) in case of incident (Disaster recovery).
I specified a shell script to be used as user_data when launching the instance. It will simply install the latest version of Docker CE and turn the instance to Docker Swarm Mode (to benefit from replication & high availability of Nexus container)
Note: Surely, you can use a Configuration Management Tools like Ansible or Chef to provision the server once created.
Then, issue the following command to create the infrastructure:
1
terraform apply -var-file=variables.tfvars
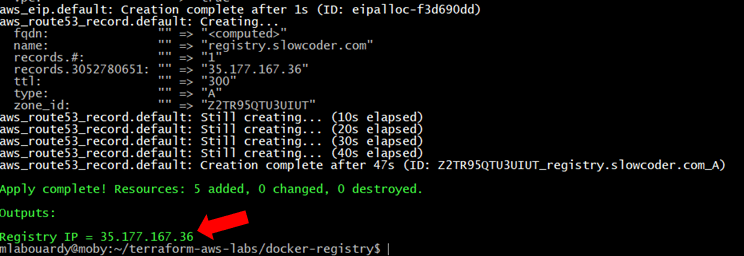
Once created, you should see the Elastic IP of your instance:
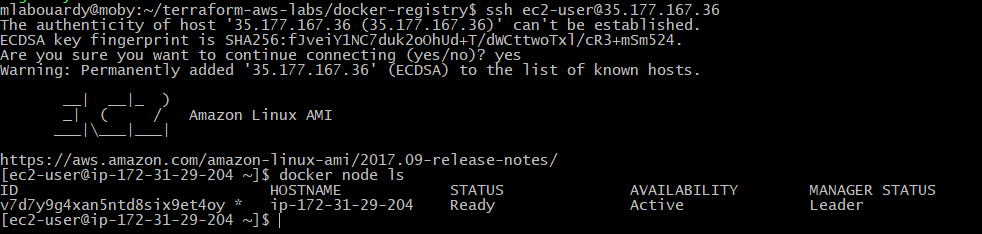
Connect to your instance via SSH:
1
ssh ec2-user@35.177.167.36
Verify that the Docker Engine is running in Swarm Mode:
Check if Nexus service is running:
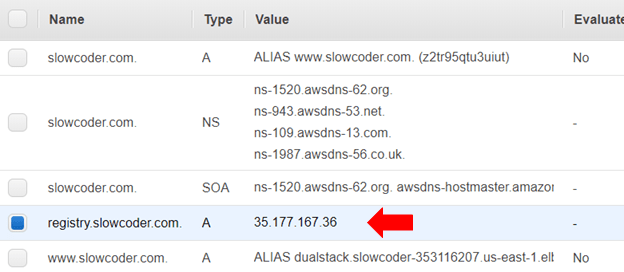
If you go back to your AWS Management Console. Then, navigate to Route53 Dashboard, you should see a new A record has been created which points to the instance IP address.
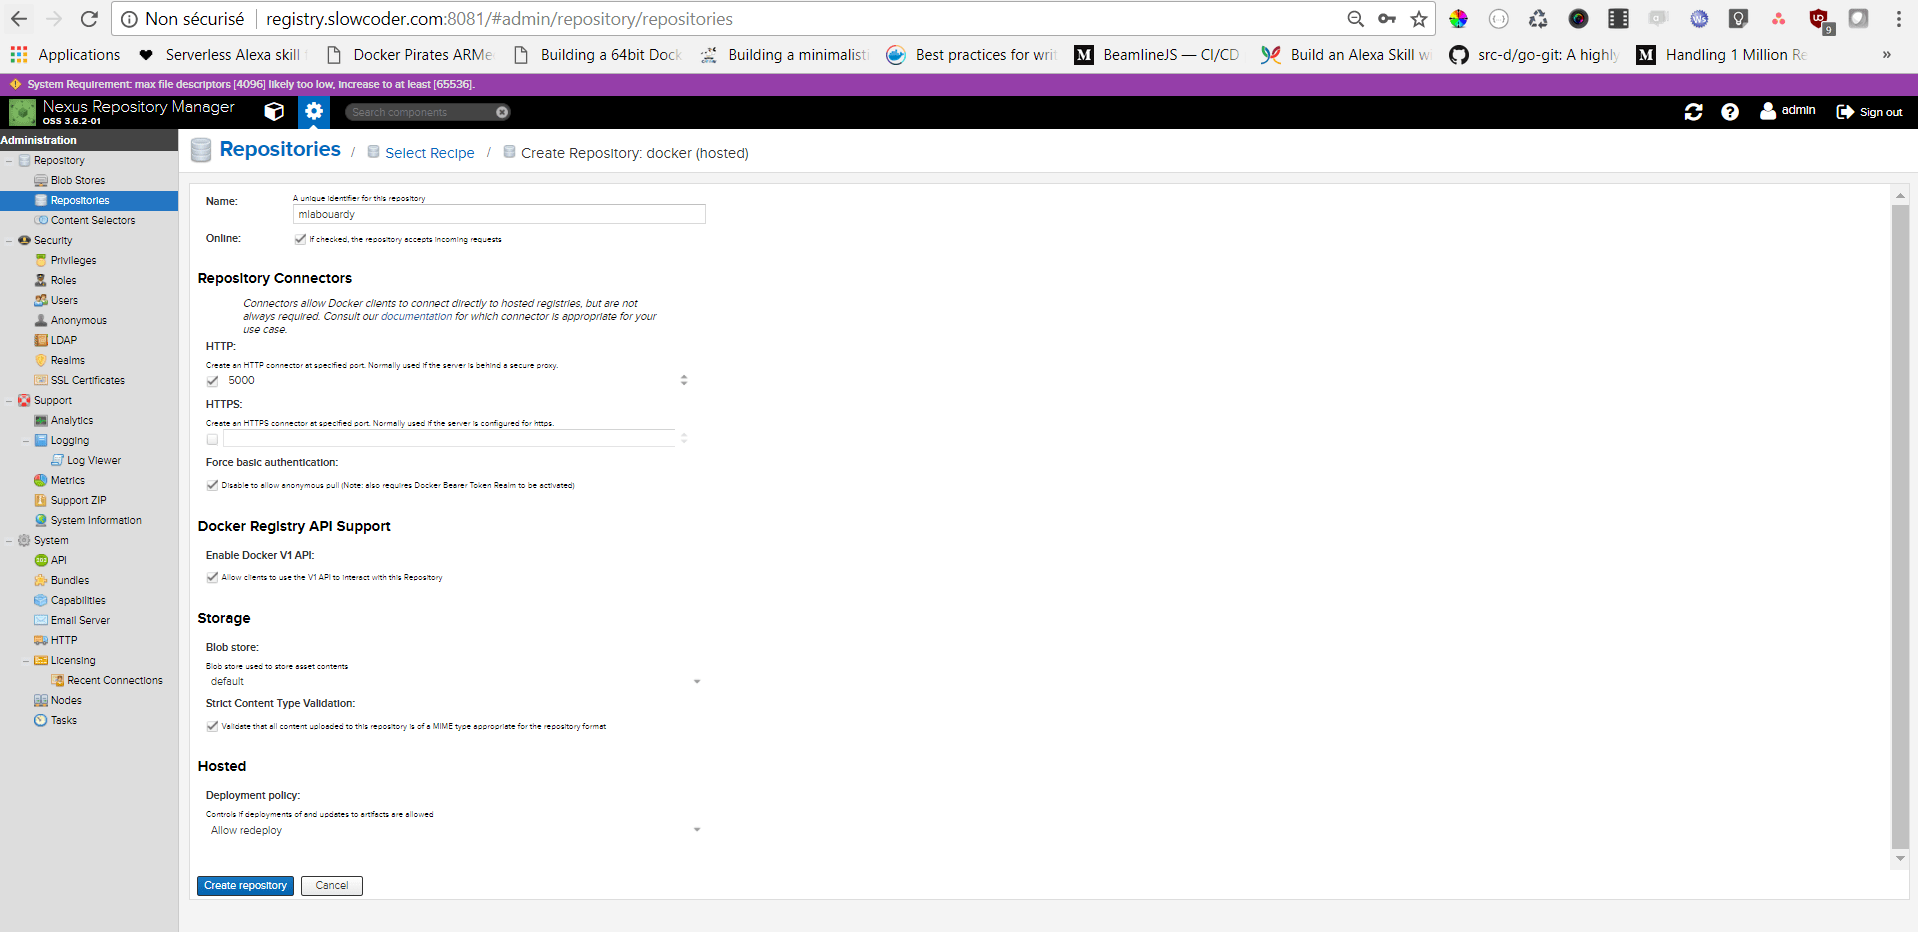
Point your favorite browser to the Nexus Dashboard URL (registry.slowcoder.com:8081). Login and create a Docker hosted registry as below:
Edit the /etc/docker/daemon.json file, it should have the following content:
This guide walks you through setting up a free bucket to serve a static website through a custom domain name using Google Cloud Platform services.
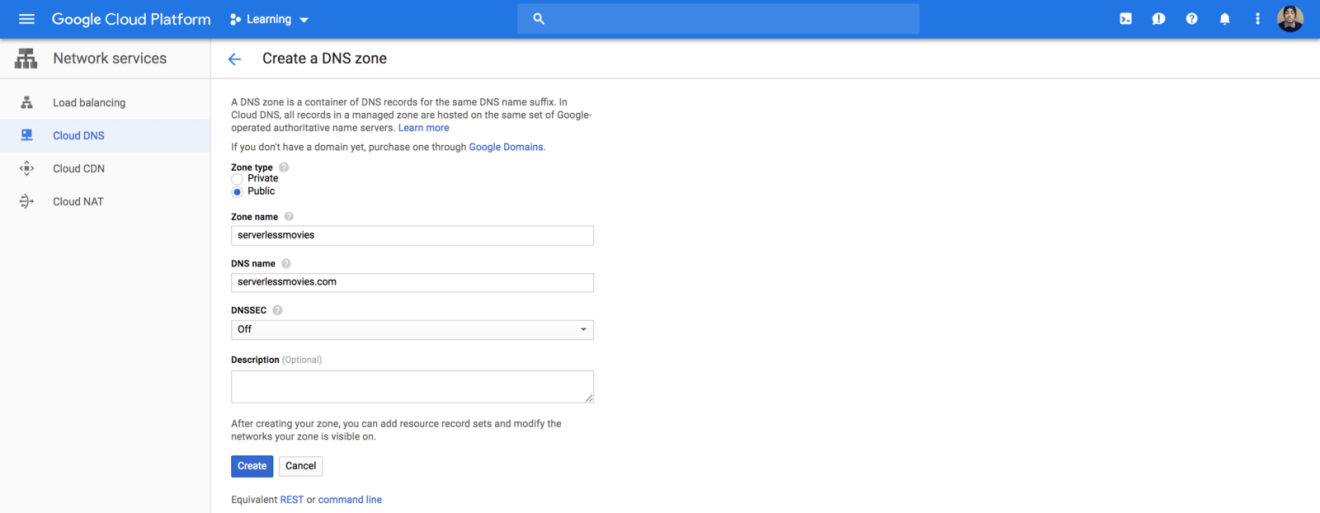
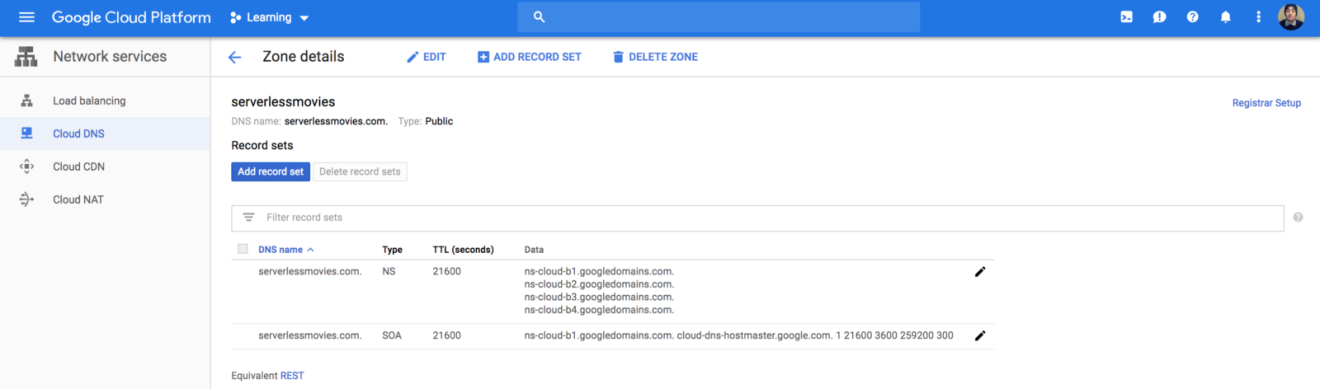
Sign in to Google Cloud Platform, navigate to Cloud DNS service and create a new public DNS zone:
By default it will have a NS (Nameserver) and a SOA (Start of Authority) records:
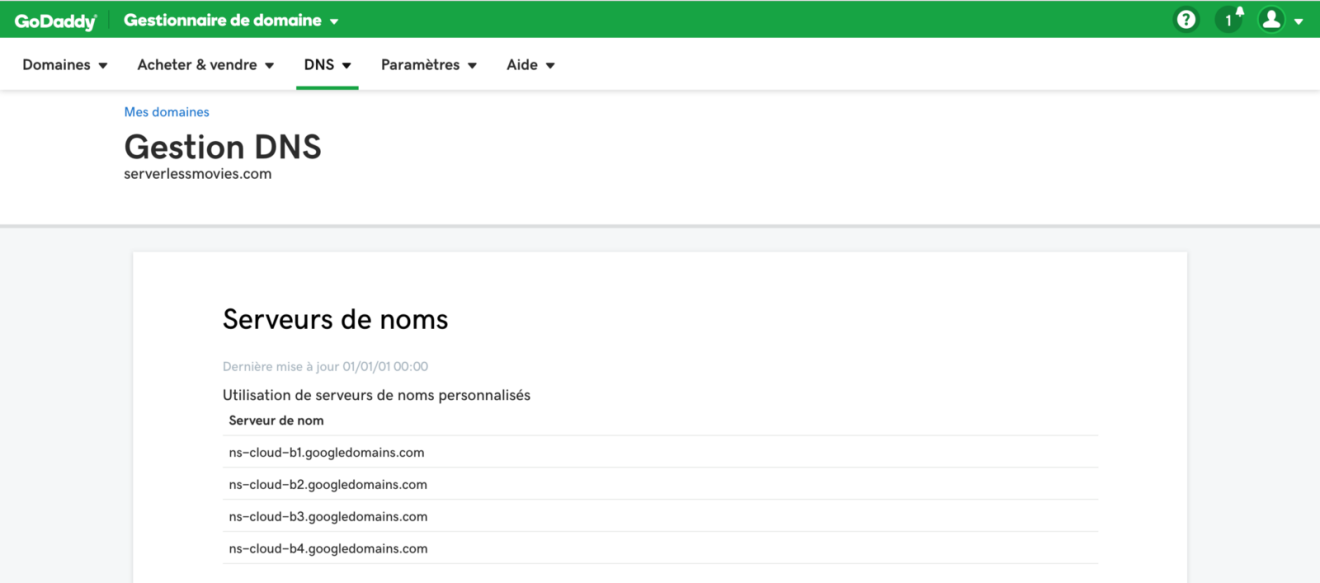
Go to you domain registrar, in my case I purchased a domain name from GoDaddy (super cheap). Add the nameserver names that were listed in your NS record:
PS: It can take some time for the changes on GoDaddy to propagate through to Google Cloud DNS.
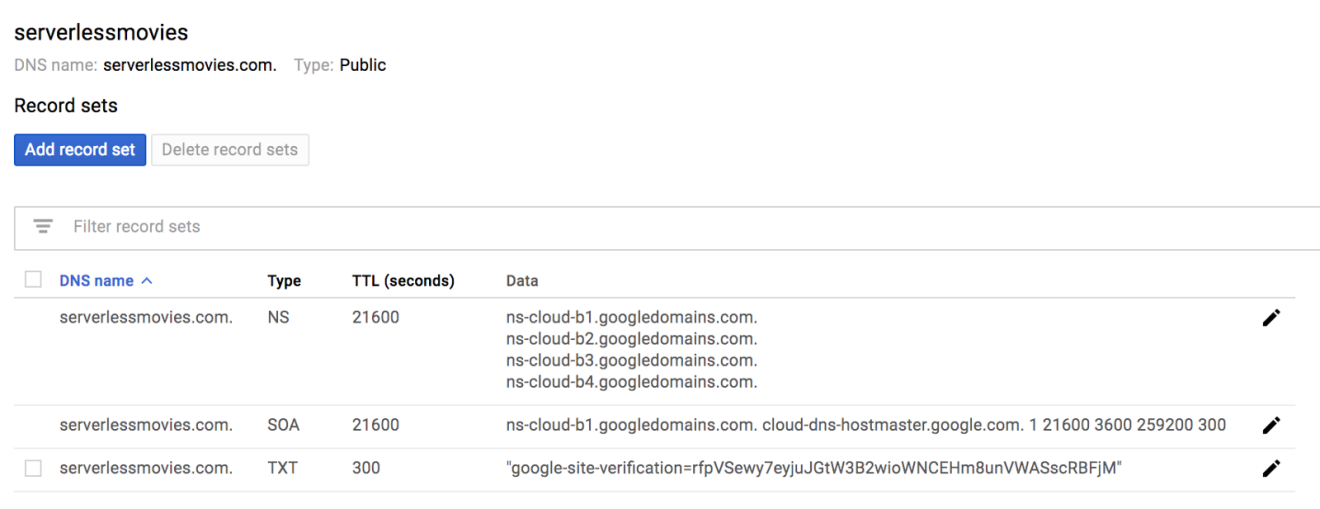
Next, verify you own the domain name using the Open Search Console. Many methods are available (HTML Meta data, Google Analytics, etc). The easiest one is DNS verification through a TXT record:
Add the TXT record to your DNS zone created earlier:
DNS changes might take some time to propagate:
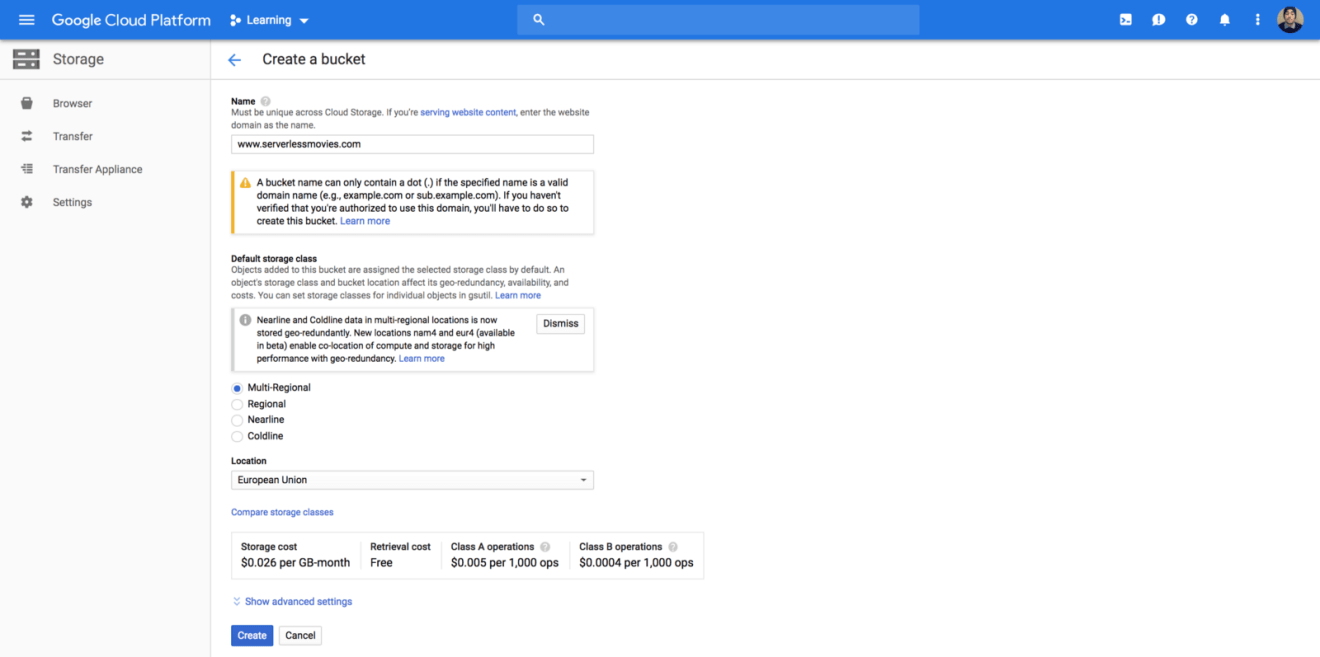
Once you have verified domain, you can create a bucket with Cloud Storage under the verified domain name. The storage class should be “Multi-Regional” (geo redundant bucket, in case of outage) :
Copy the website static files to the bucket using the following command:
1
gsutil rsync -R . gs://www.serverlessmovies.com/
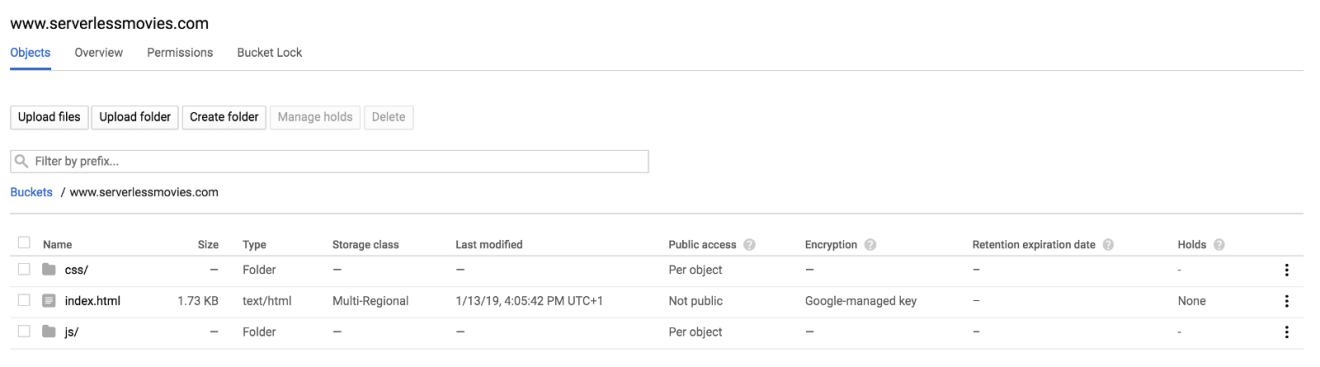
After the upload completes, your static files should be available on the bucket as follows:
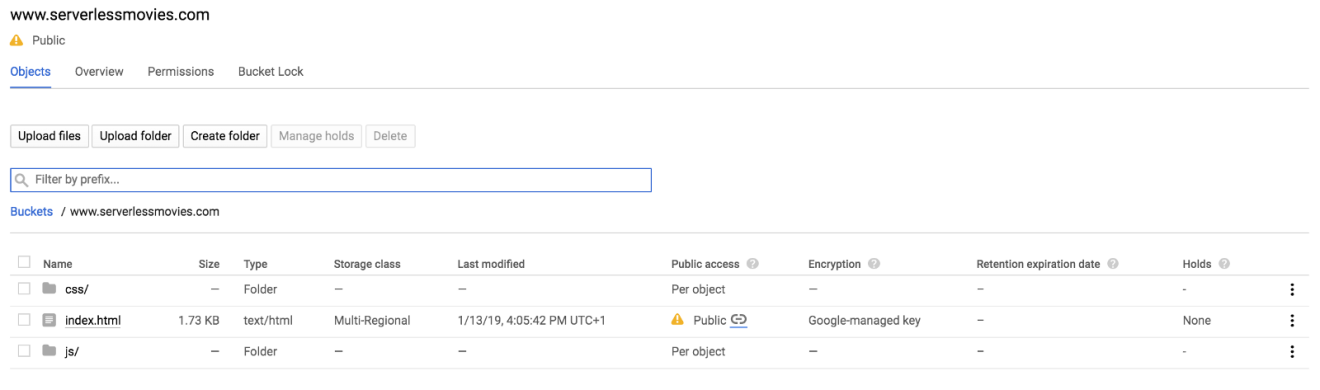
Next, make the files publicly accessible by adding allUsers entity with Object Viewer role to the bucket permissions:
Once shared publicly, a link icon appears for each object in the public access column. You can click on this icon to get the URL for the object:
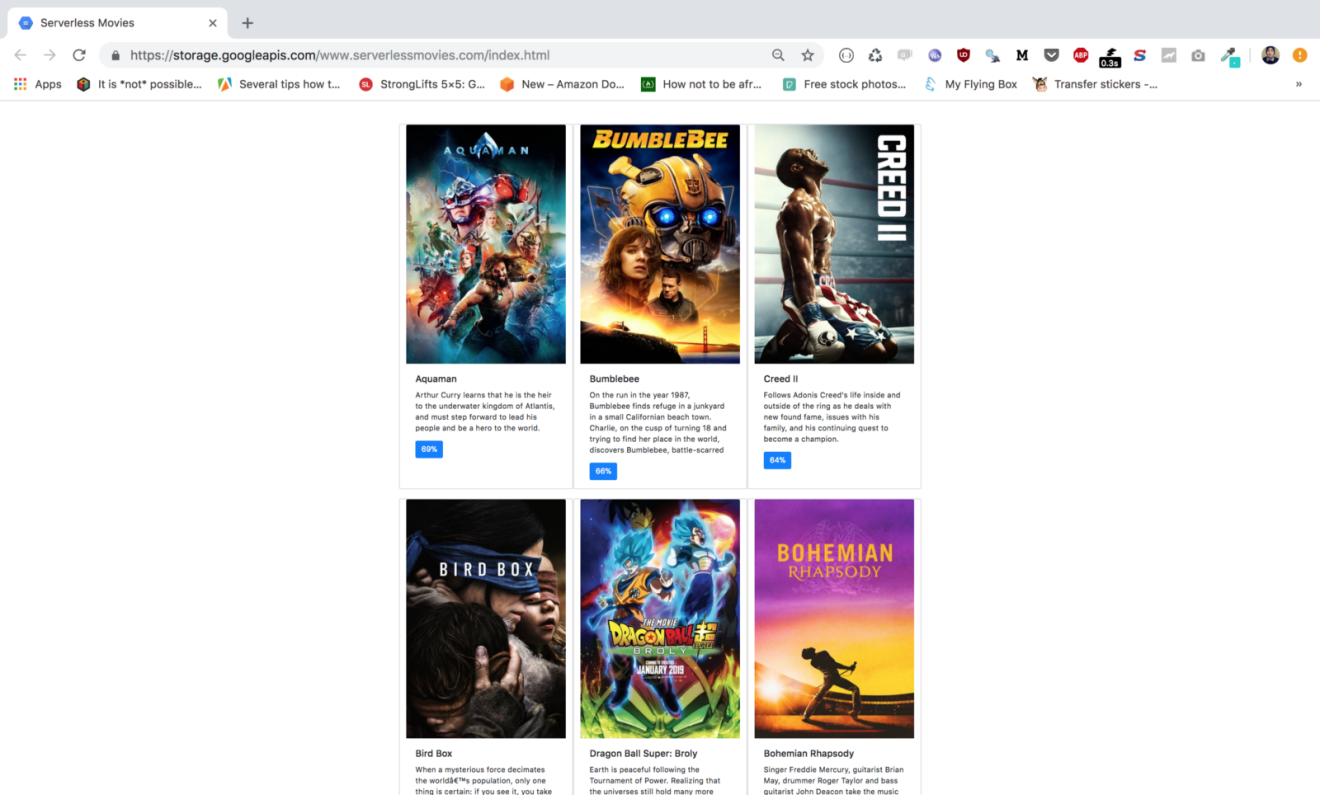
Verify that content is served from the bucket by requesting the index.html link in you browser:
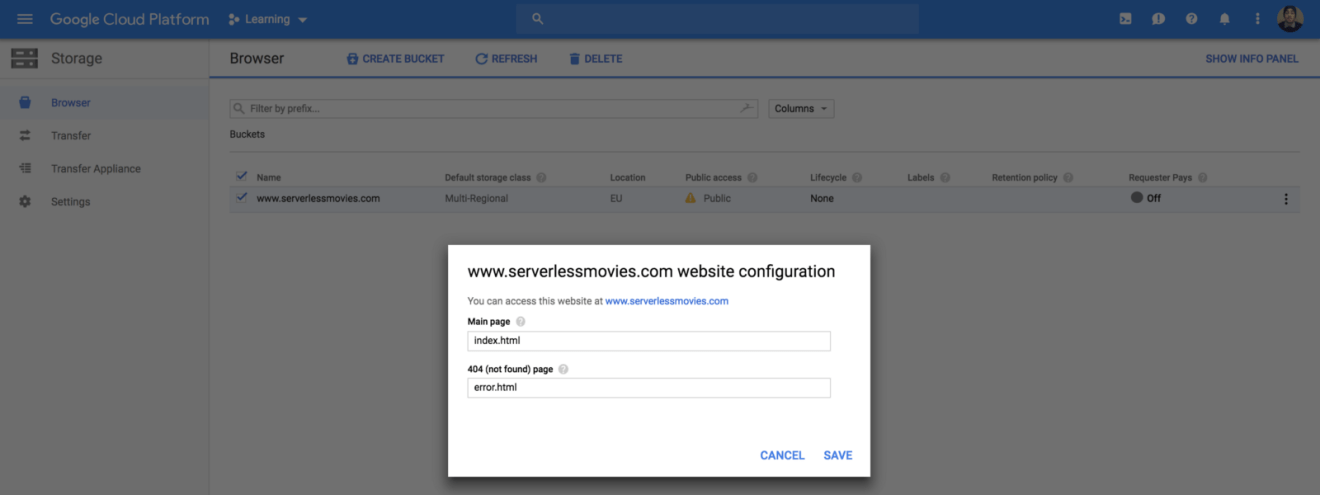
Next, set the main page to be index.html from “Edit website configuration” section:
Now, we need to map our domain name with the bucket we created earlier. Create a CNAME record that points to c.storage.googleapis.com:
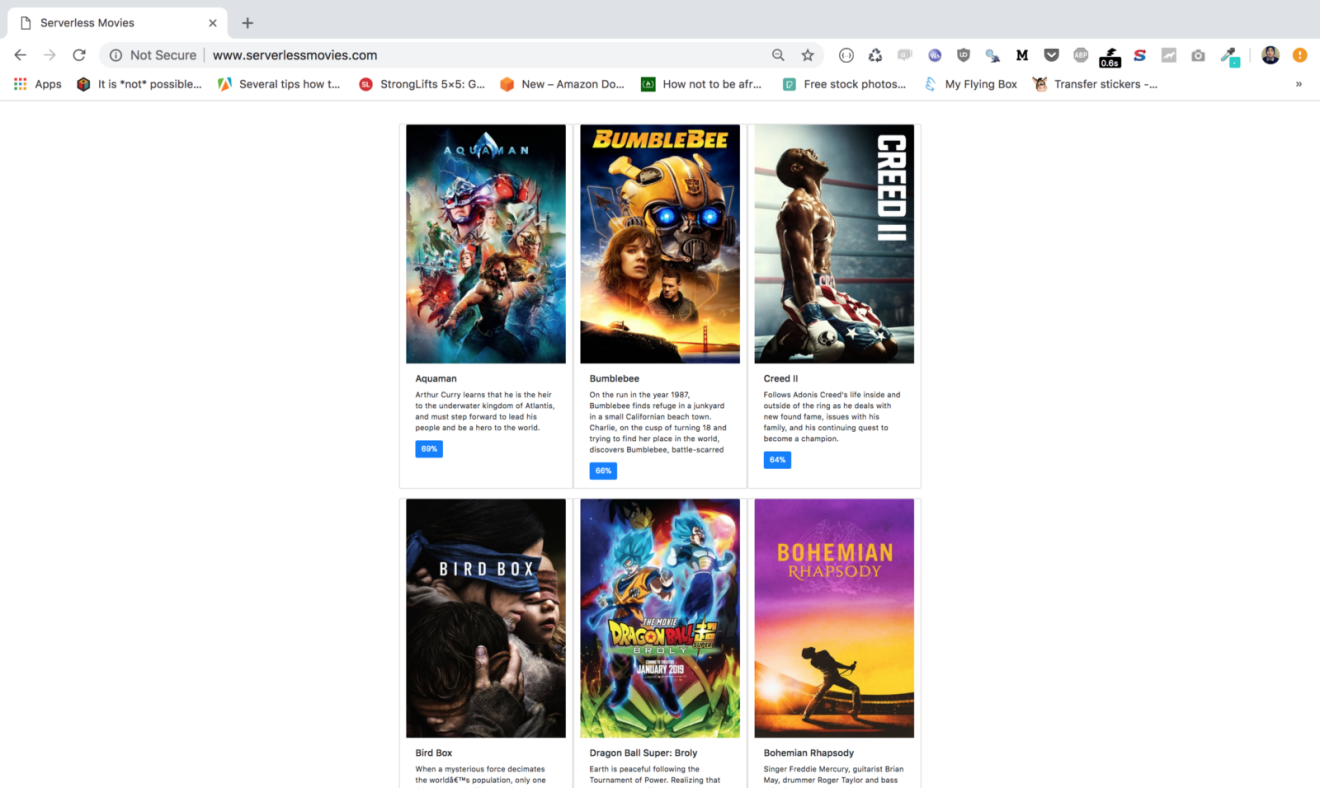
Point your browser to your domain name, your website should be served:
While our solution works like a charm, we can access our content through HTTP only (Google Cloud Storage only supports HTTP when using it through a CNAME record). In the next post, we will serve our content through a custom domain over SSL using a Content Delivery Network (CDN).
Drop your comments, feedback, or suggestions below — or connect with me directly on Twitter @mlabouardy.
Kubernetes might be the ultimate choice when deploying heavy workloads on Google Cloud Platform. However, Docker Swarm has always been quite popular among developers who prefer fast deployments and simplicity— and among ops who are learning to get comfortable with an orchestrated environment.
In this post, we will walk through how to deploy a Docker Swarm cluster on GCP using Terraform from scratch. Let’s do it!
All the templates and playbooks used in this tutorial, can be found on my GitHub.
Get Started
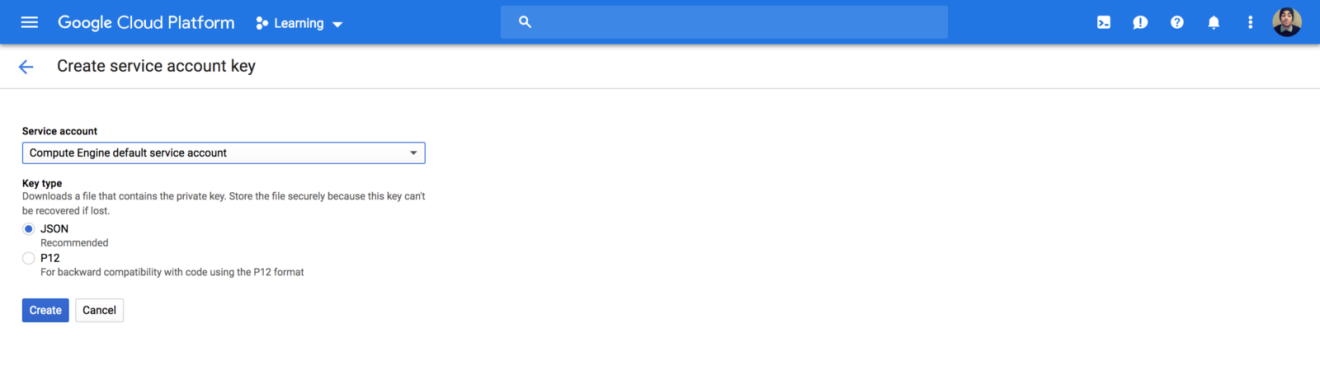
To get started, sign in to your Google Cloud Platform console and create a service account private key from IAM:
Download the JSON file and store it in a secure folder.
For simplicity, I have divided my Swarm cluster components to multiple template files — each file is responsible for creating a specific Google Compute resource.
1. Setup your swarm managers
In this example, I have defined the Docker Swarm managers based on the CoreOS image:
Similarly, a set of Swarm workers based on CoreOS image, and I have used the resource dependencies feature of Terraform to ensure the Swarm managers are deployed first. Please note the usage of depends_on keyword:
Also, I have defined a network interface with a list of firewall rules that allows inbound traffic for cluster management, raft sync communications, docker overlay network traffic and ssh from anywhere:
resource "google_compute_network" "swarm" { name = "swarm-network" }
4. Automate your inventory with Terraform
In order to take automation to the next level, let’s use Terraform template_file data source to generate a dynamic Ansible inventory from Terraform state file:
Once the templates are defined, we will use Ansible to provision our instances and turn them to a Swarm cluster. Hence, I created 3 Ansible roles:
python: as its name implies, it will install Python on the machine. CoreOS ships only with the basics, it’s a minimal linux distribution without much except tools centered around running containers.
swarm-init: execute the docker swarm init command on the first manager and store the swarm join tokens.
swarm-join: join the node to the cluster using the token generated previously.
By now, your main playbook will look something like:
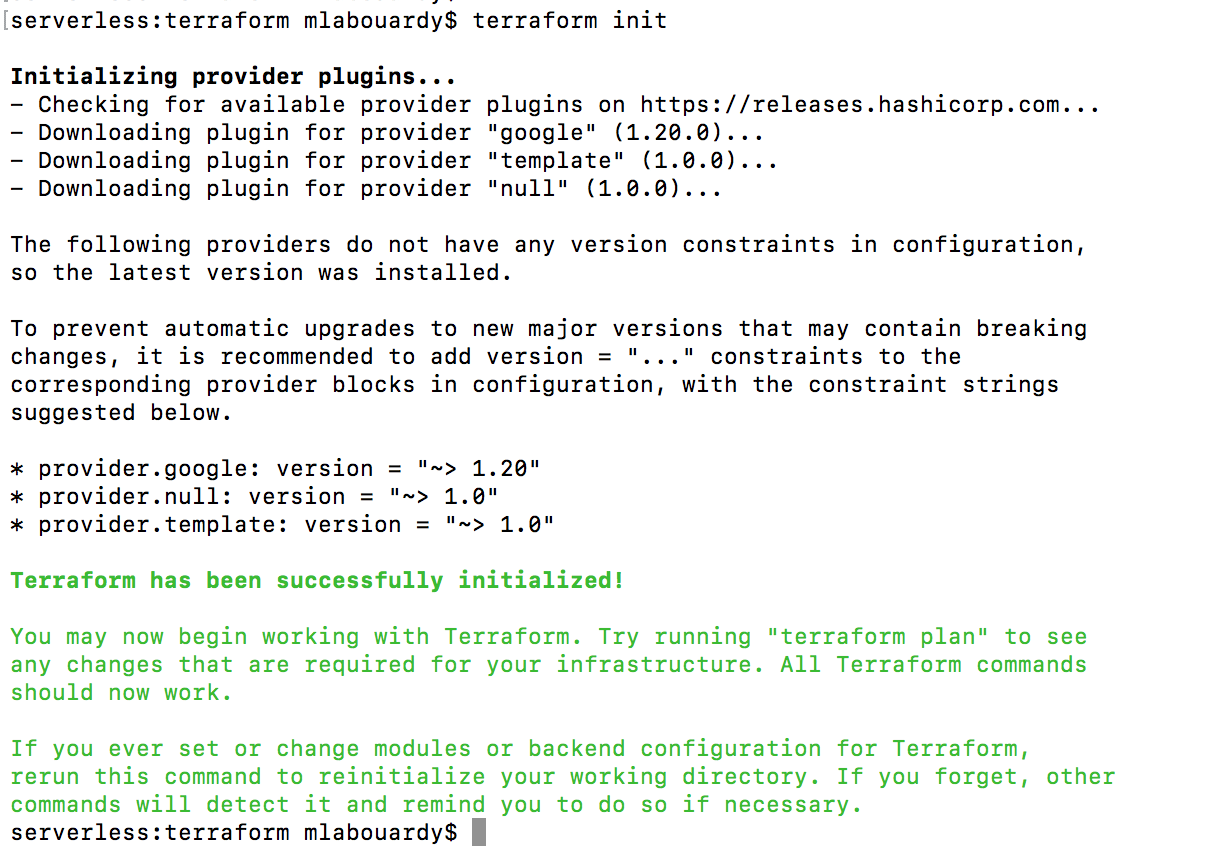
To test it out, open a new terminal session and issue terraform init command to download the google provider:
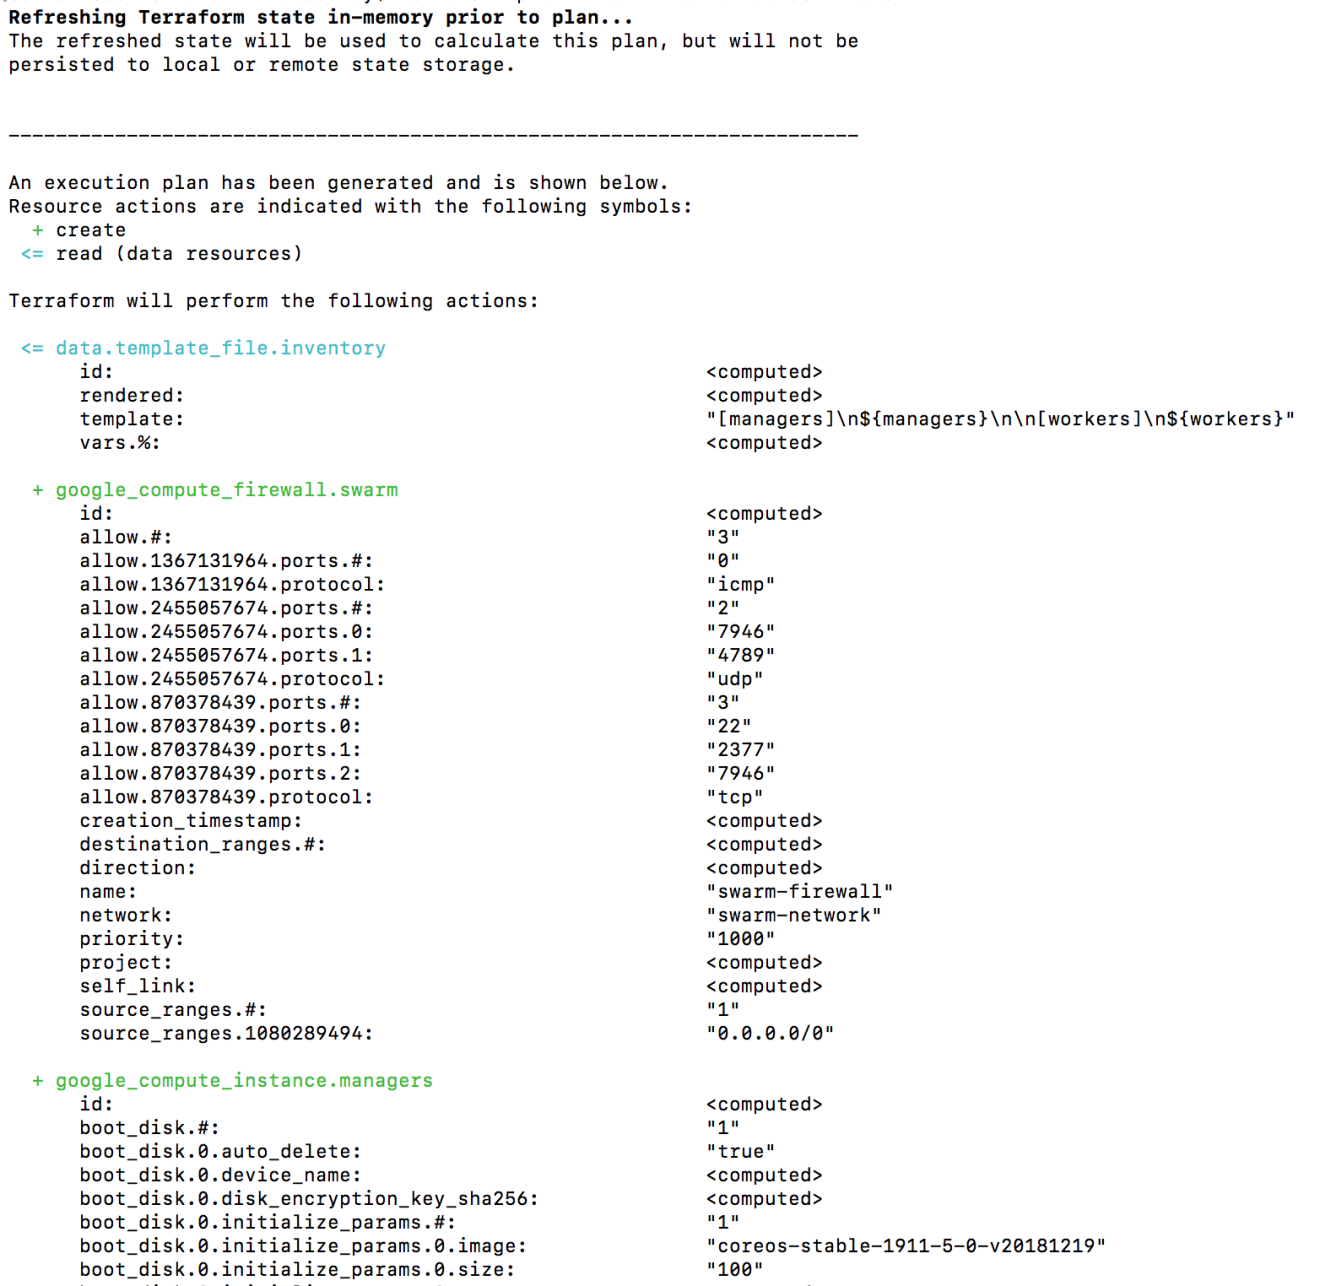
Create an execution plan (dry run) with the terraform plan command. It shows you things that will be created in advance, which is good for debugging and ensuring that you’re not doing anything wrong, as shown in the next screenshot:
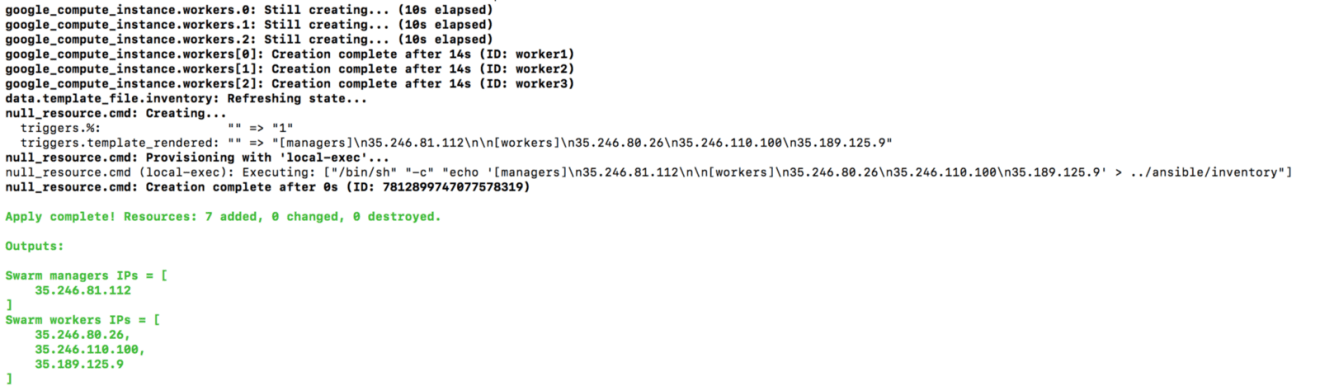
You will be able to examine Terraform’s execution plan before you deploy it to GCP. When you’re ready, go ahead and apply the changes by issuing terraform apply command.
The following output will be displayed (some parts were cropped for brevity):
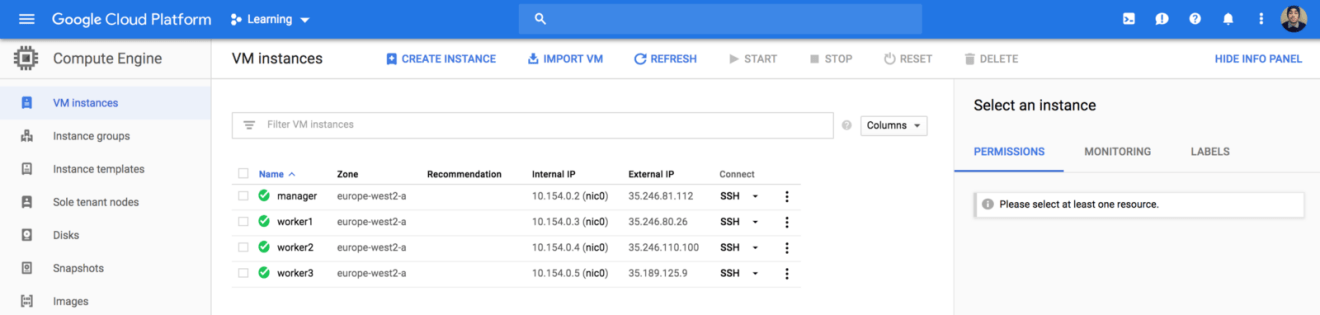
If you head back to Compute Engine Dashboard, your instances should be successfully created:
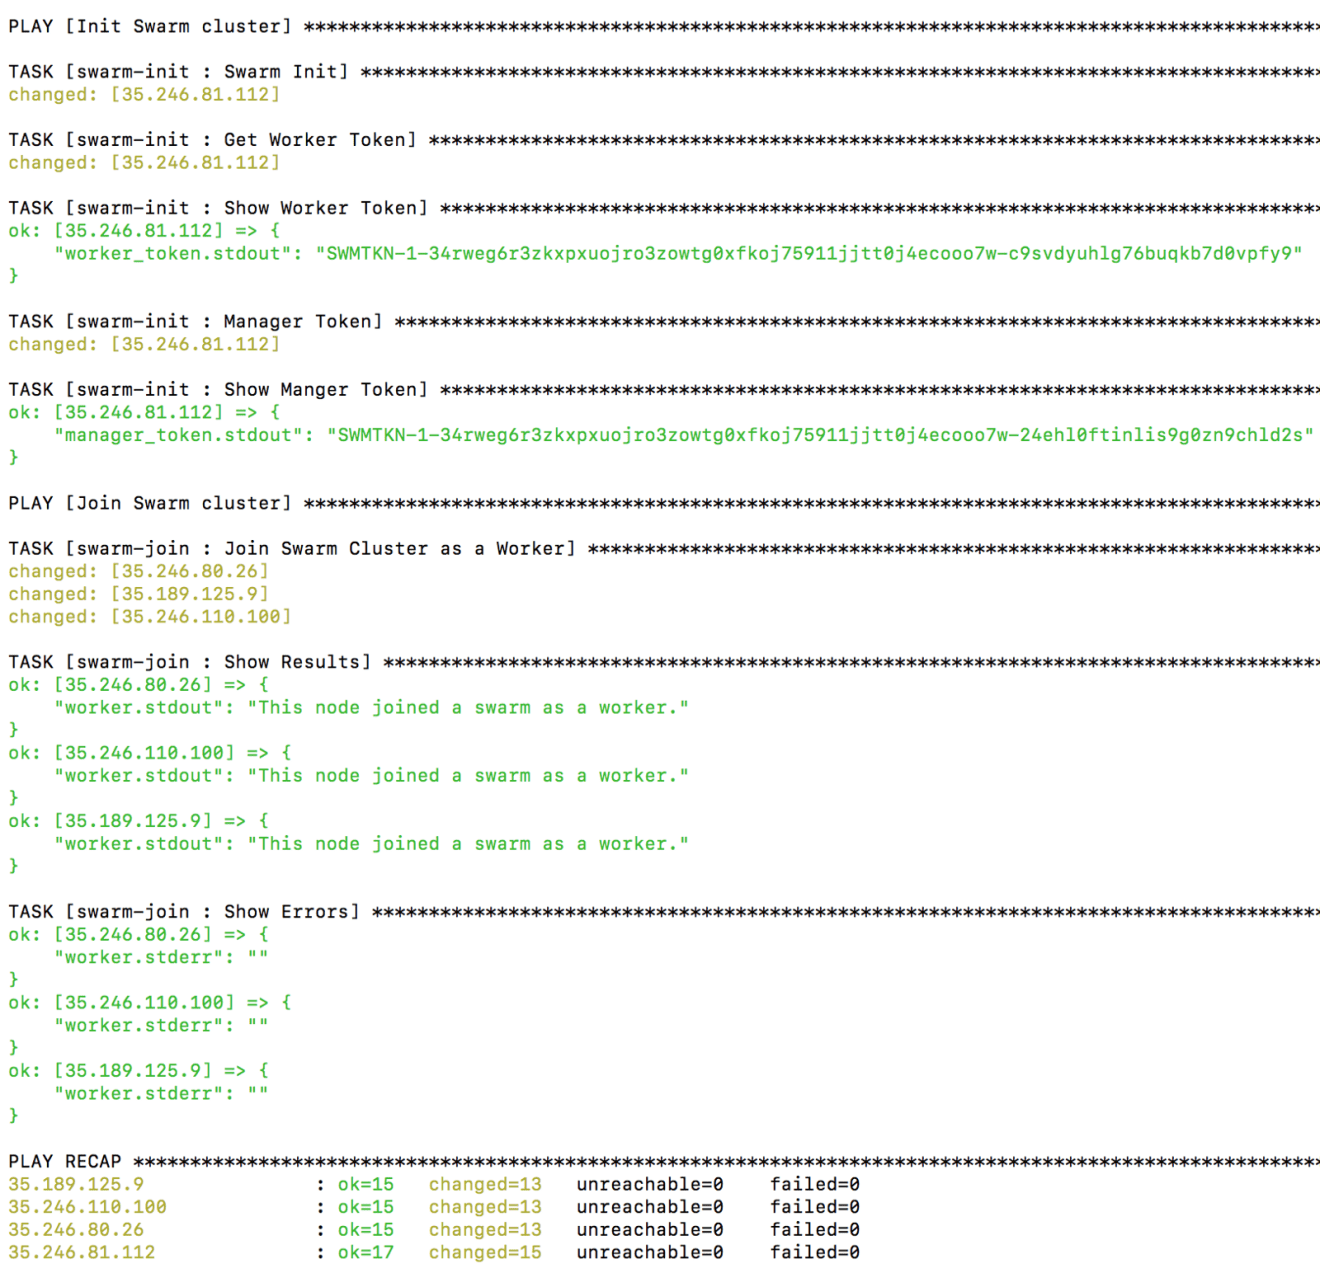
7. Create your Swarm cluster with Ansible
Now our instances are created, we need to turn them to a Swarm cluster with Ansible. Issue the following command:
1
ansible-playbook -i inventory main.yml
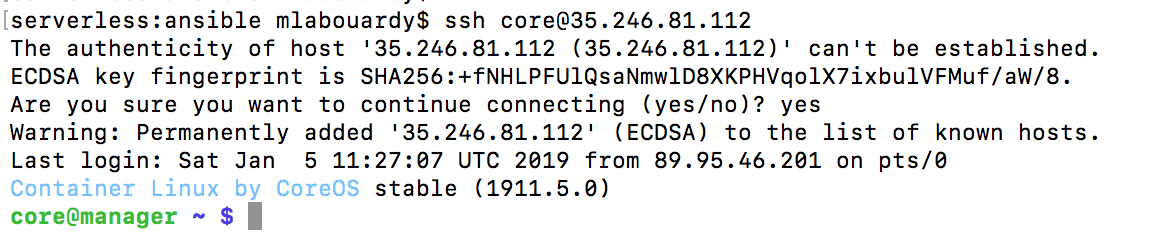
Next, SSH to the manager instance using it’s public IP address:
If you run docker node ls, you will get a list of nodes in the swarm:
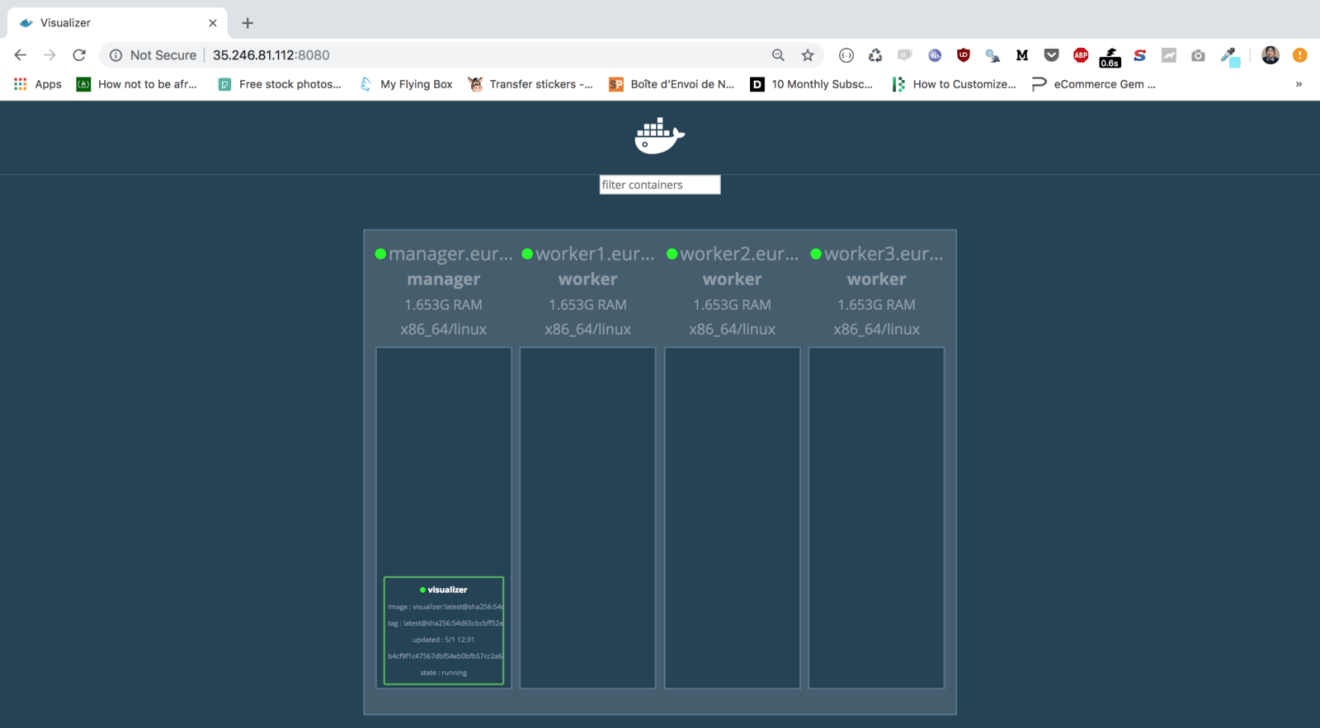
Deploy the visualizer service with the following command:
1 2 3
docker service create --name=visualizer --publish=8080:8080/tcp \ --constraint=node.role==manager --mount=type=bind,src=/var/run/docker.sock,dst=/var/run/docker.sock \ dockersamples/visualizer
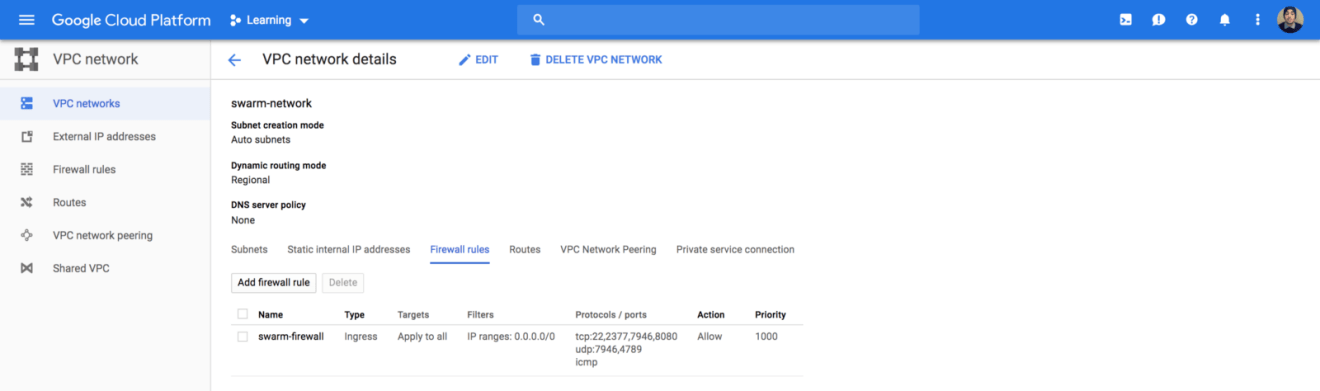
8. Update your network rules
The service is exposed on port 8080 of the instance. Therefore, we need to allow inbound traffic on that port, you can use Terraform to update the existing firewall rules:
resource "google_compute_network" "swarm" { name = "swarm-network" }
Run terraform apply again to create the new ingress rule, it will detect the changes and ask you to confirm it:
If you point your favorite browser to your http://instance_ip:8080, the following dashboard will be displayed which confirms our cluster is fully setup:
In an upcoming post, we will see how we can take this further by creating a production-ready Swarm cluster on GCP inside a VPC — and how to provision Swarm managers and workers on-demand using instance groups based on increases or decreases in load.
We will also learn how to bake a CoreOS machine image with Python preinstalled with Packer, and how to use Terraform and Jenkins to automate the infrastructure deployment!
Drop your comments, feedback, or suggestions below — or connect with me directly on Twitter @mlabouardy.
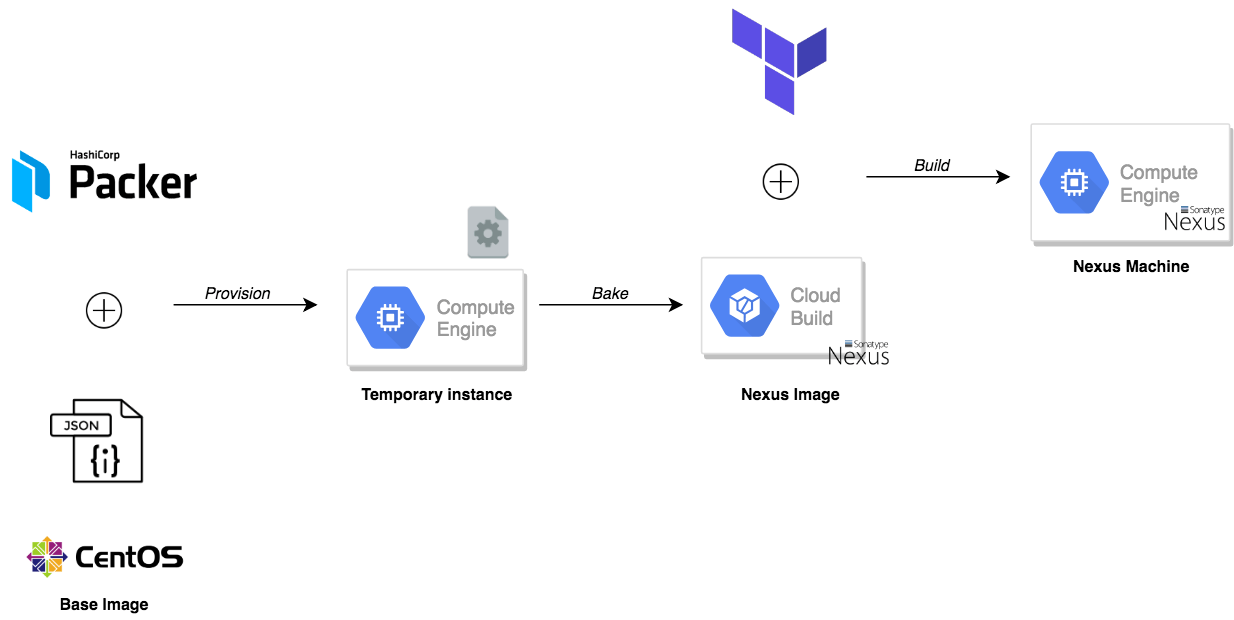
In this post, I will walk you through how to deploy Sonatype Nexus OSS 3 on Google Cloud Platform and how to create a private Docker hosted repository to store your Docker images and other build artifacts (maven, npm and pypi, etc). To achieve this, we need to bake our machine image using Packer to create a gold image with Nexus preinstalled and configured. Terraform will be used to deploy a Google compute instance based on the baked image. The following schema describes the build workflow:
PS : All the templates used in this tutorial, can be found on my GitHub.
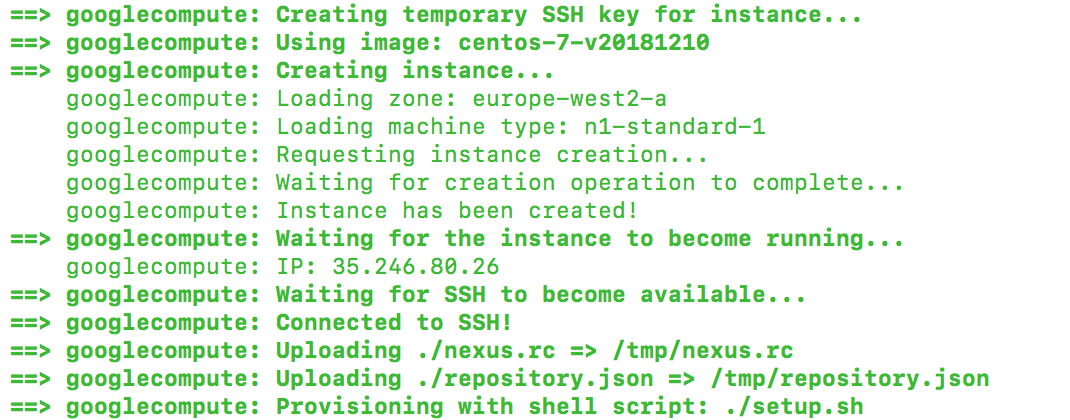
To get started, we need to create the machine image to be used with Google Compute Engine (GCE). Packer will create a temporary instance based on the CentOS image and use a shell script to provision the instance:
The shell script, will install the latest stable version of Nexus OSS based on their official documentation and wait for the service to be up and running, then it will use the Scripting API to post a groovy script:
Once the template files are defined, issue packer build command to bake our machine image:
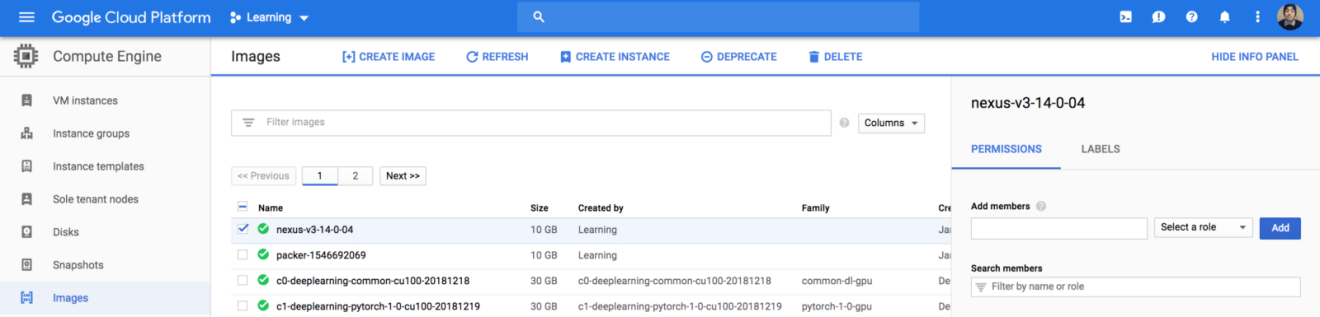
If you head back to Images section from Compute Engine dashboard, a new image called nexus should be created:
Now we are ready to deploy Nexus, we will create a Nexus server based on the machine image we baked with Packer. The template file is self-explanatory, it creates a set of firewall rules to allow inbound traffic on port 8081 (Nexus GUI) and 22 (SSH) from anywhere, and creates a google compute instance based on the Nexus image:
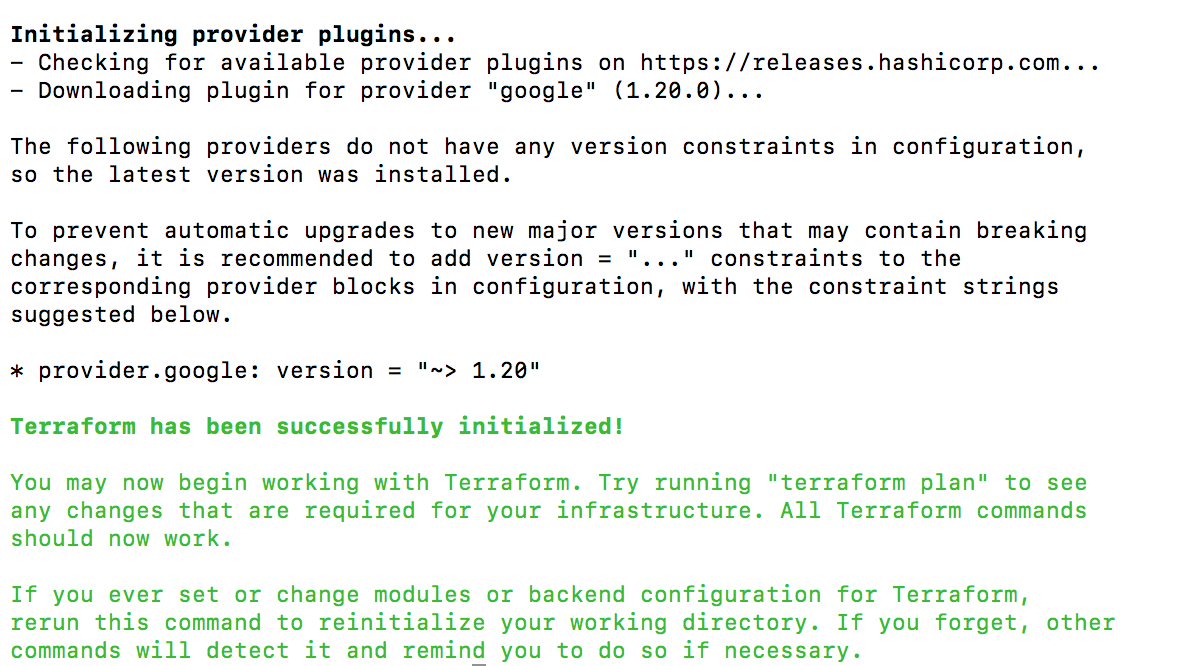
On the terminal, run the terraform init command to download and install the Google provider, shown as follows:
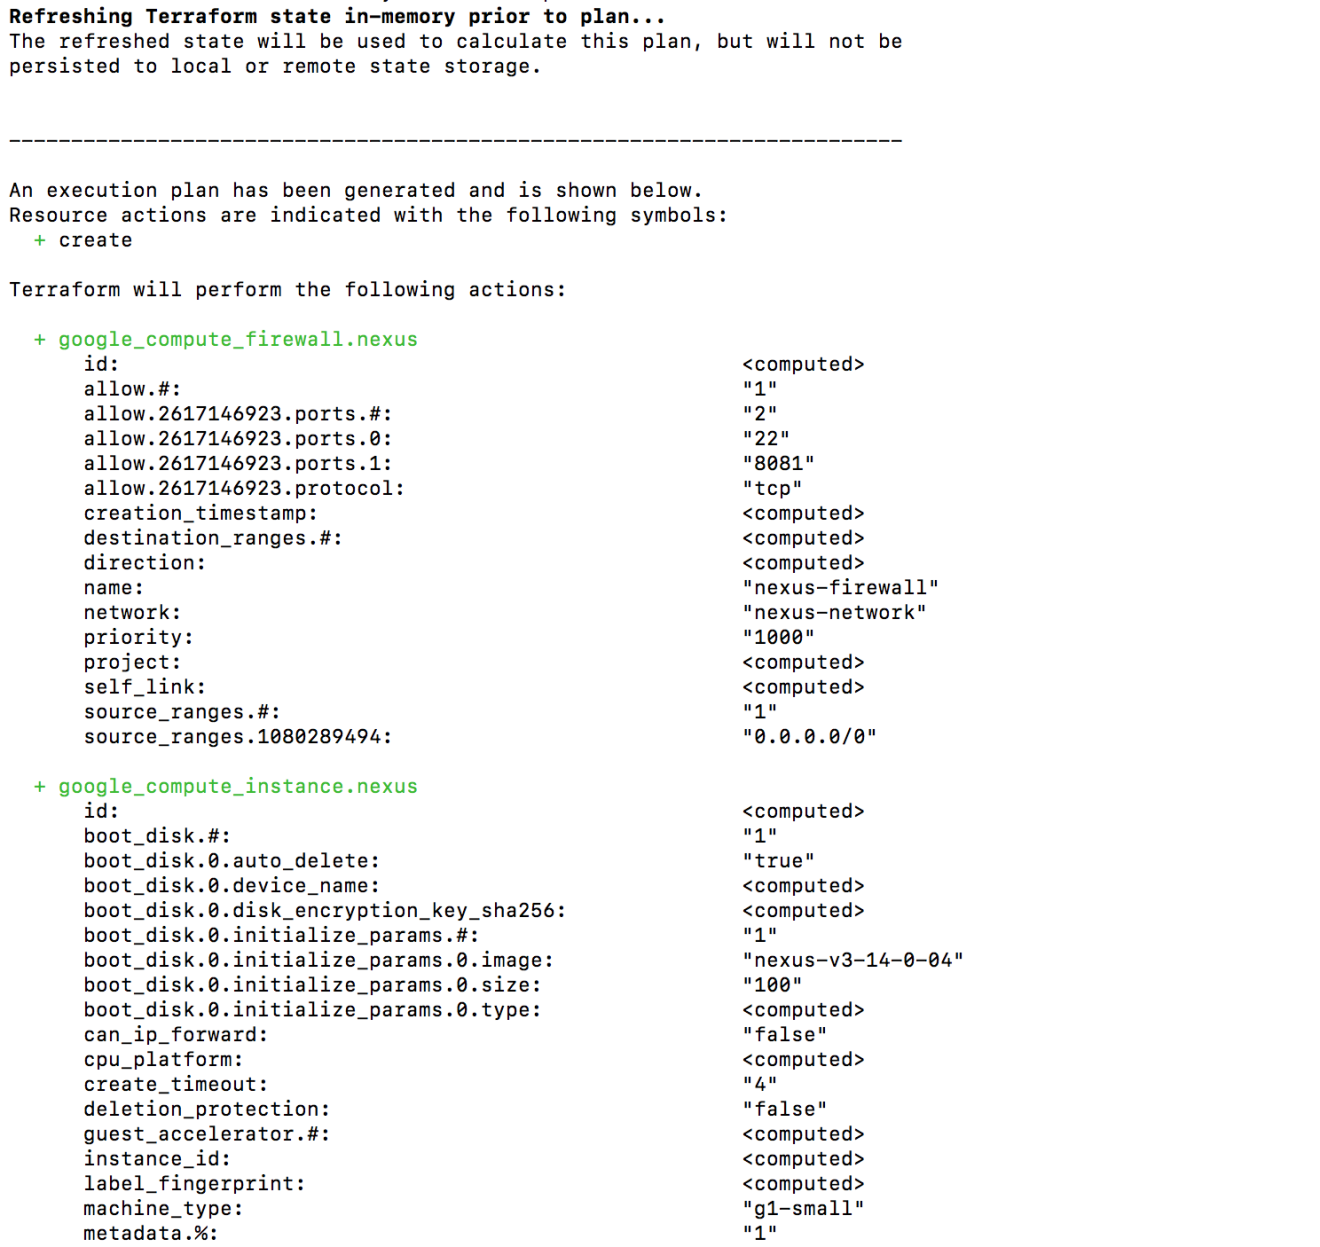
Create an execution plan (dry run) with the terraform plan command. It shows you things that will be created in advance, which is good for debugging and ensuring that you’re not doing anything wrong, as shown in the next screenshot:
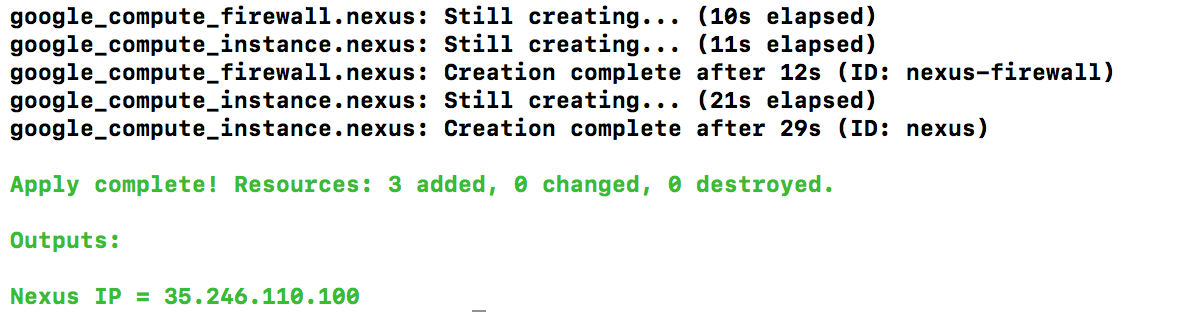
When you’re ready, go ahead and apply the changes by issuing terraform apply:
Terraform will create the needed resources and display the public ip address of the nexus instance on the output section. Jump back to GCP Console, your nexus instance should be created:
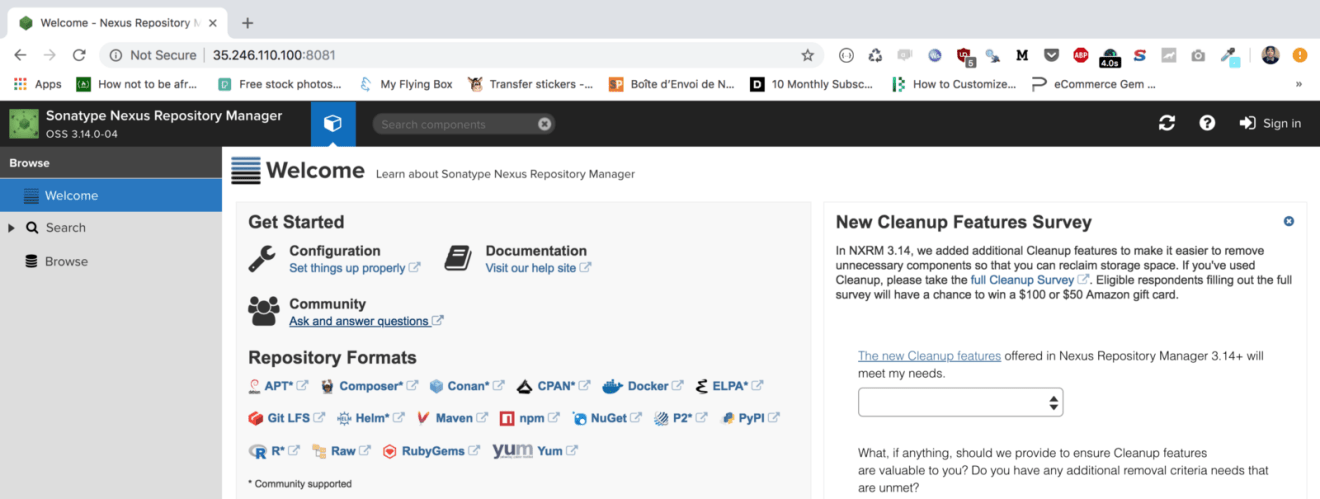
If you point your favorite browser to http://instance_ip:8081, you should see the Sonatype Nexus Repository Manager interface:
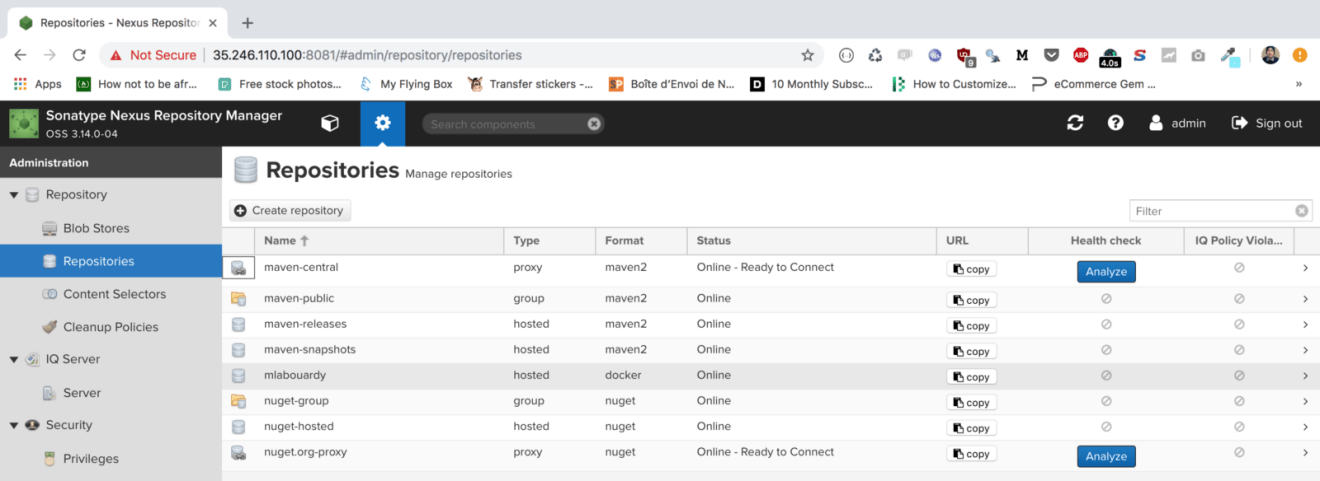
Click the “Sign in” button in the upper right corner and use the username “admin” and the password “admin123”. Then, click on the cogwheel to go to the server administration and configuration section. Navigate to “Repositories”, our private Docker repository should be created as follows:
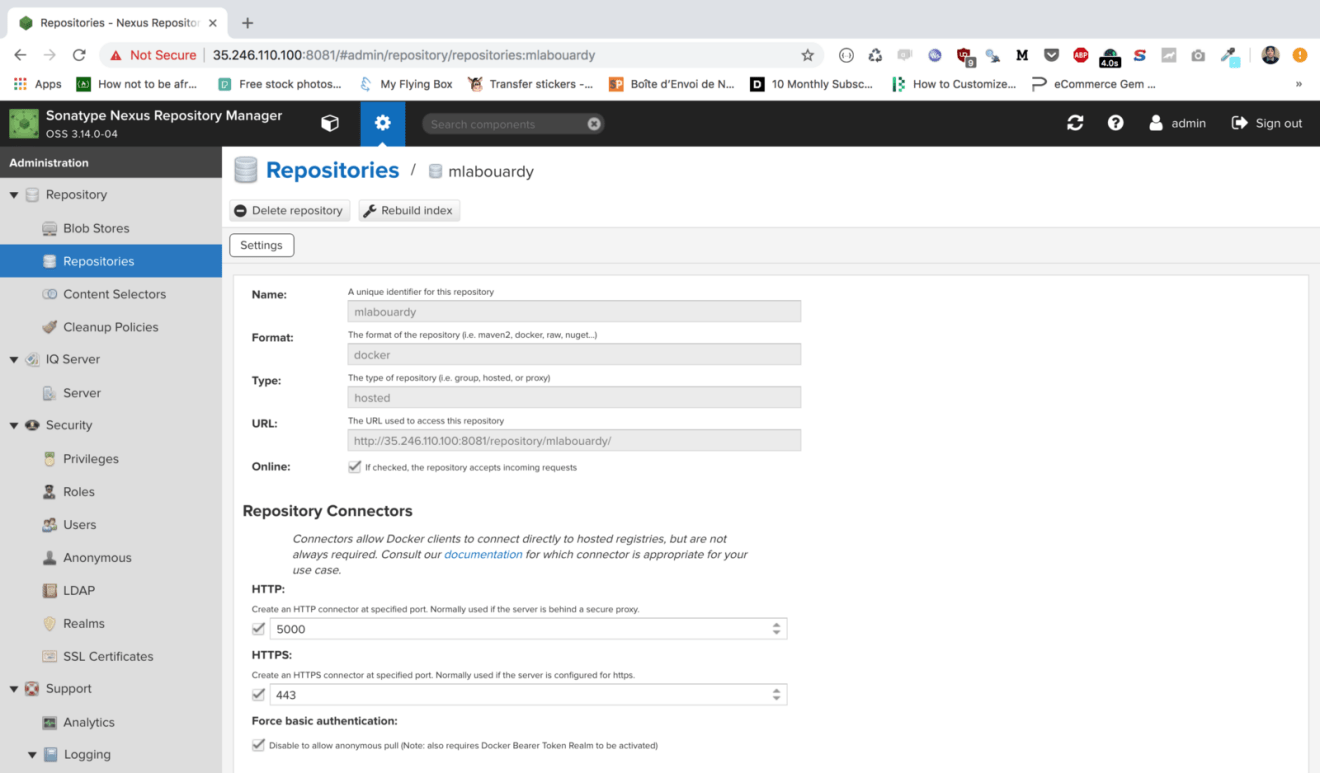
The docker repository is published as expected on port 5000:
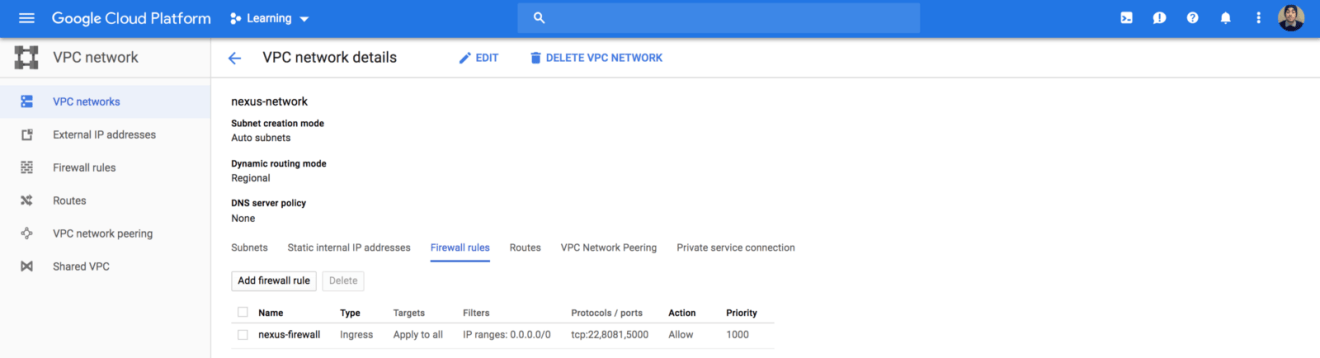
Hence, we need to allow inbound traffic on that port, so update the firewall rules accordingly:
1 2 3 4 5 6 7 8 9 10 11 12 13 14 15
resource "google_compute_firewall" "nexus" { name = "nexus-firewall" network = "${google_compute_network.nexus.name}"
resource "google_compute_network" "nexus" { name = "nexus-network" }
Issue terrafrom apply command to apply the changes:
Your private docker registry is ready to work at instance_ip:5000, let’s test it by pushing a docker image.
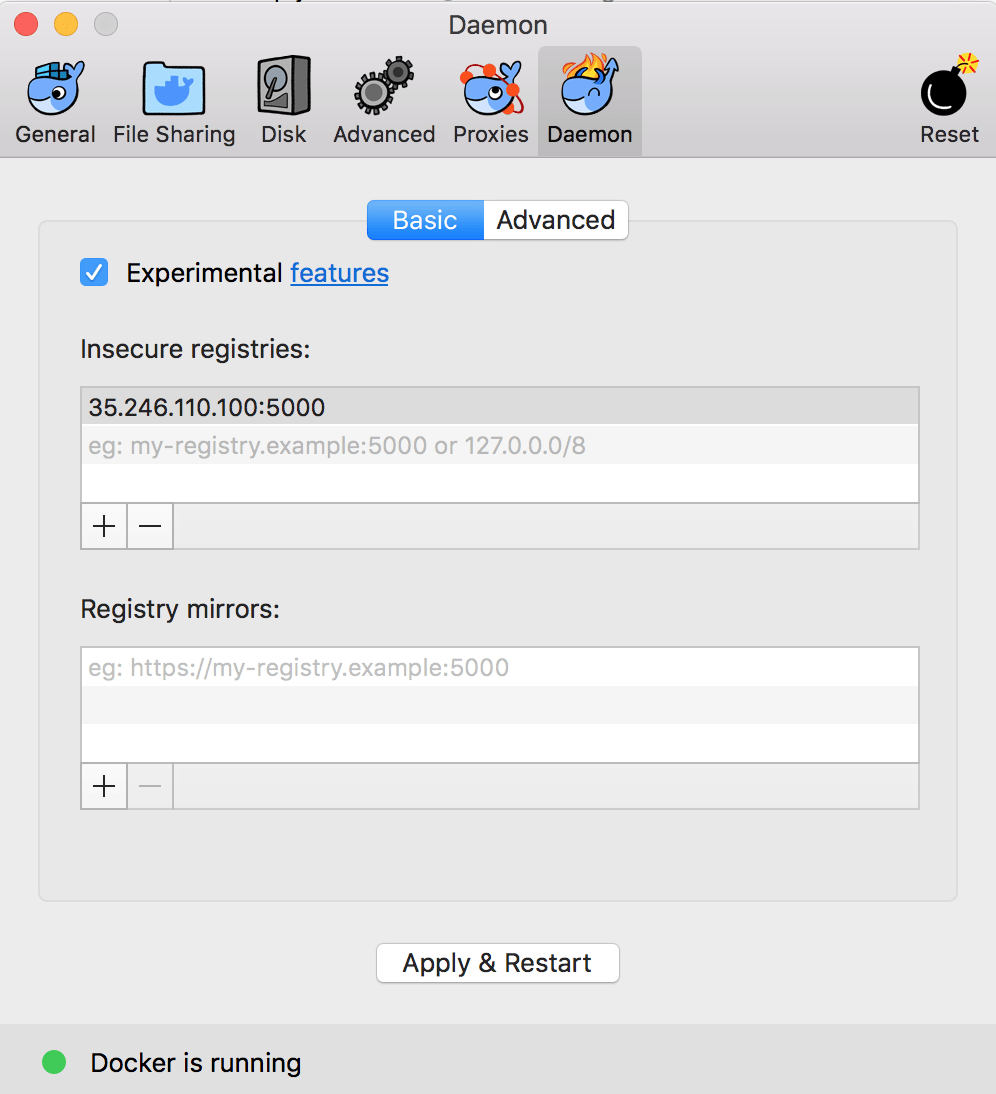
Since we have exposed the private Docker registry on a plain HTTP endpoint, we need to configure the Docker daemon that will act as client to the private Docker registry as to allow for insecure connections.
On Windows or Mac OS X: Click on the Docker icon in the tray to open Preferences. Click on the Daemon tab and add the IP address on which the Nexus GUI is exposed along with the port number 5000 in Insecure registries section. Don’t forget to Apply & Restart for the changes to take effect and you’re ready to go.
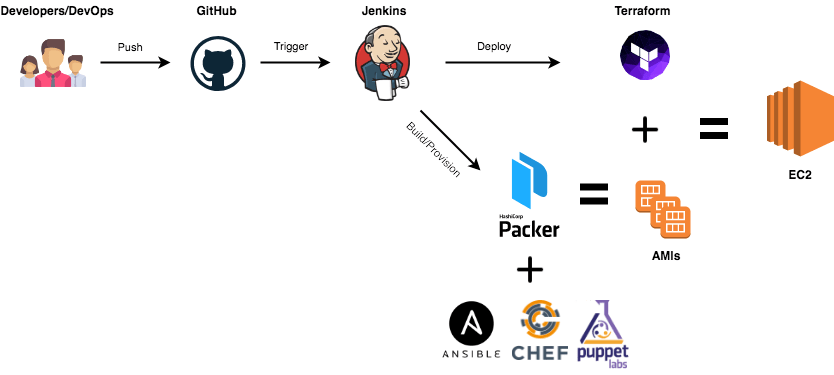
When dealing with Hybrid or multi-cloud environments, you would need to have an identical machine images for multiple platforms from a single source configuration. That’s were Packer comes into play.
To get started, find the appropriate package for your system and download Packer:
With Packer installed, let’s just dive right into it and bake our AMI with a preinstalled Docker Engine in order to build a Swarm or Kubernetes cluster and avoid cold-start of node machines.
Packer is template-driven, templates are written in JSON format:
variables: Custom variables that can be overriden during runtime by using the -var flag. In the above snippet, we’re specifying the AWS region.
builders: You can specify multiple builders depending on the target platforms (EC2, VMware, Google Cloud, Docker …).
provisioners: You can pass a shell script or use configuration managements tools like Ansible, Chef, Puppet or Salt to provision the AMI and install all required packages and softwares.
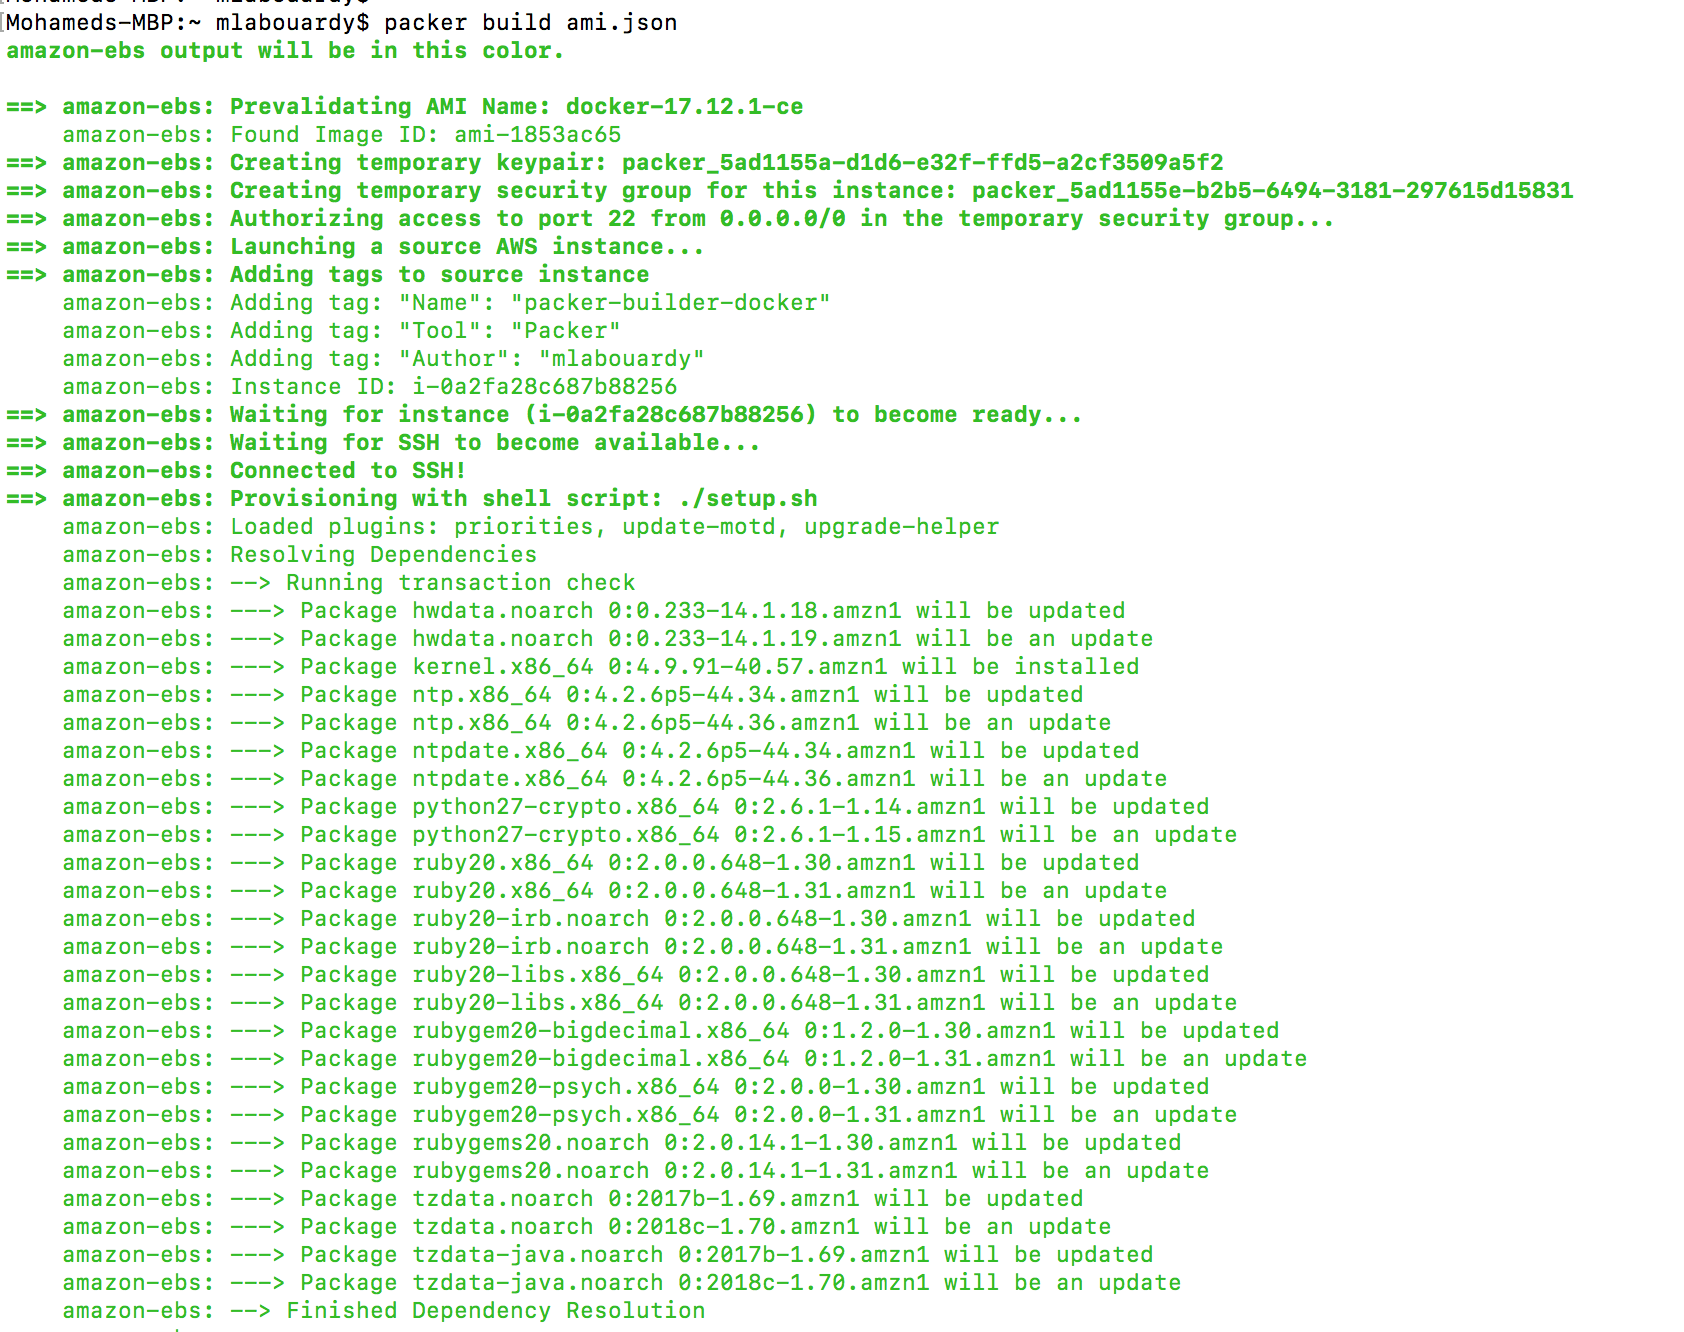
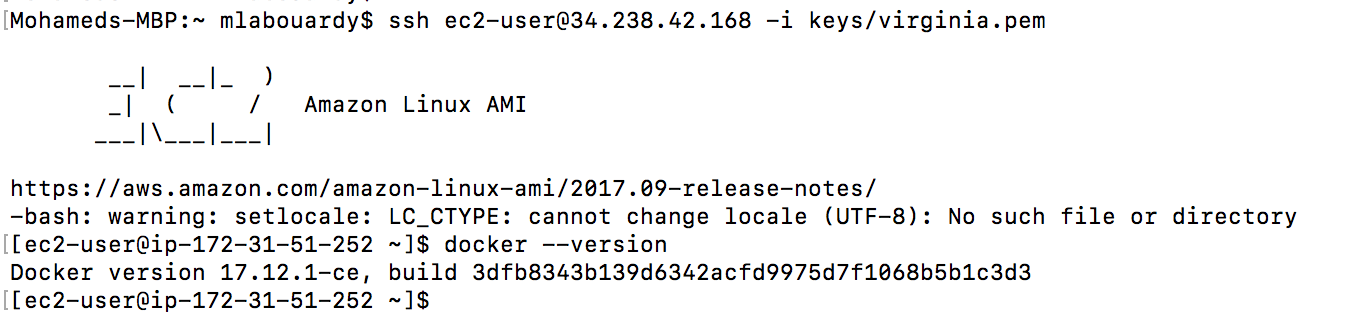
Packer will use an existing Amazon Linux Image “Gold Image” from the marketplace and install the latest Docker community edition using the following Bash script:
Then, connect to your instance via SSH and type the following command to verify Docker latest release is installed:
Simple right ? Well, you can go further and setup a CI/CD pipeline to build your AMIs on every push, recreate your EC2 instances with the new AMIs and rollback in case of failure.
Drop your comments, feedback, or suggestions below — or connect with me directly on Twitter @mlabouardy.
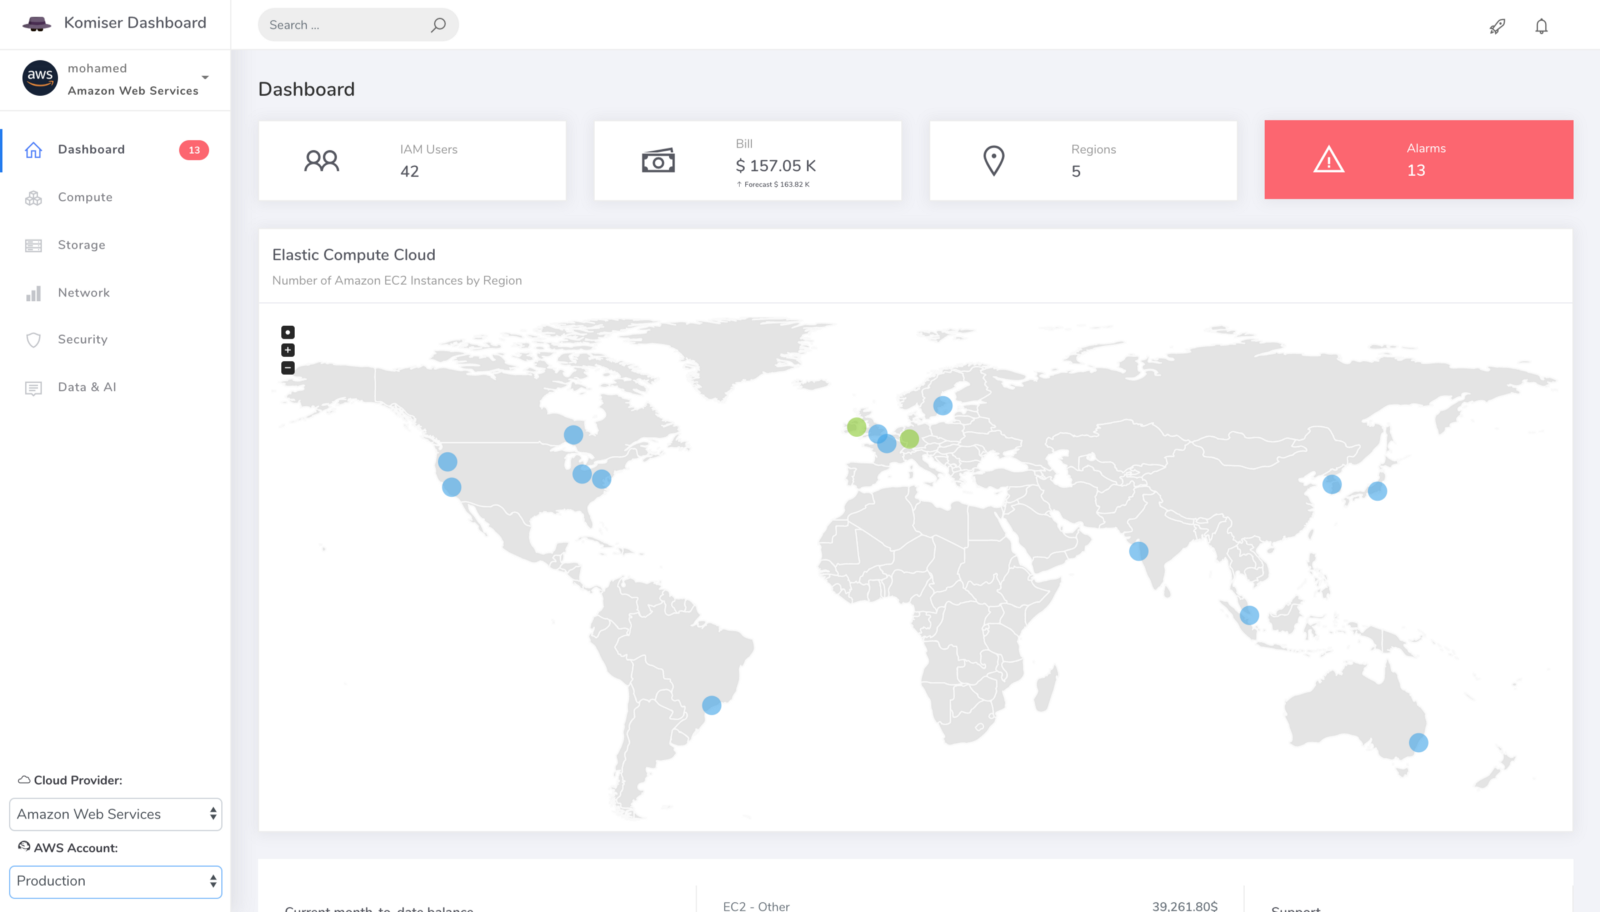
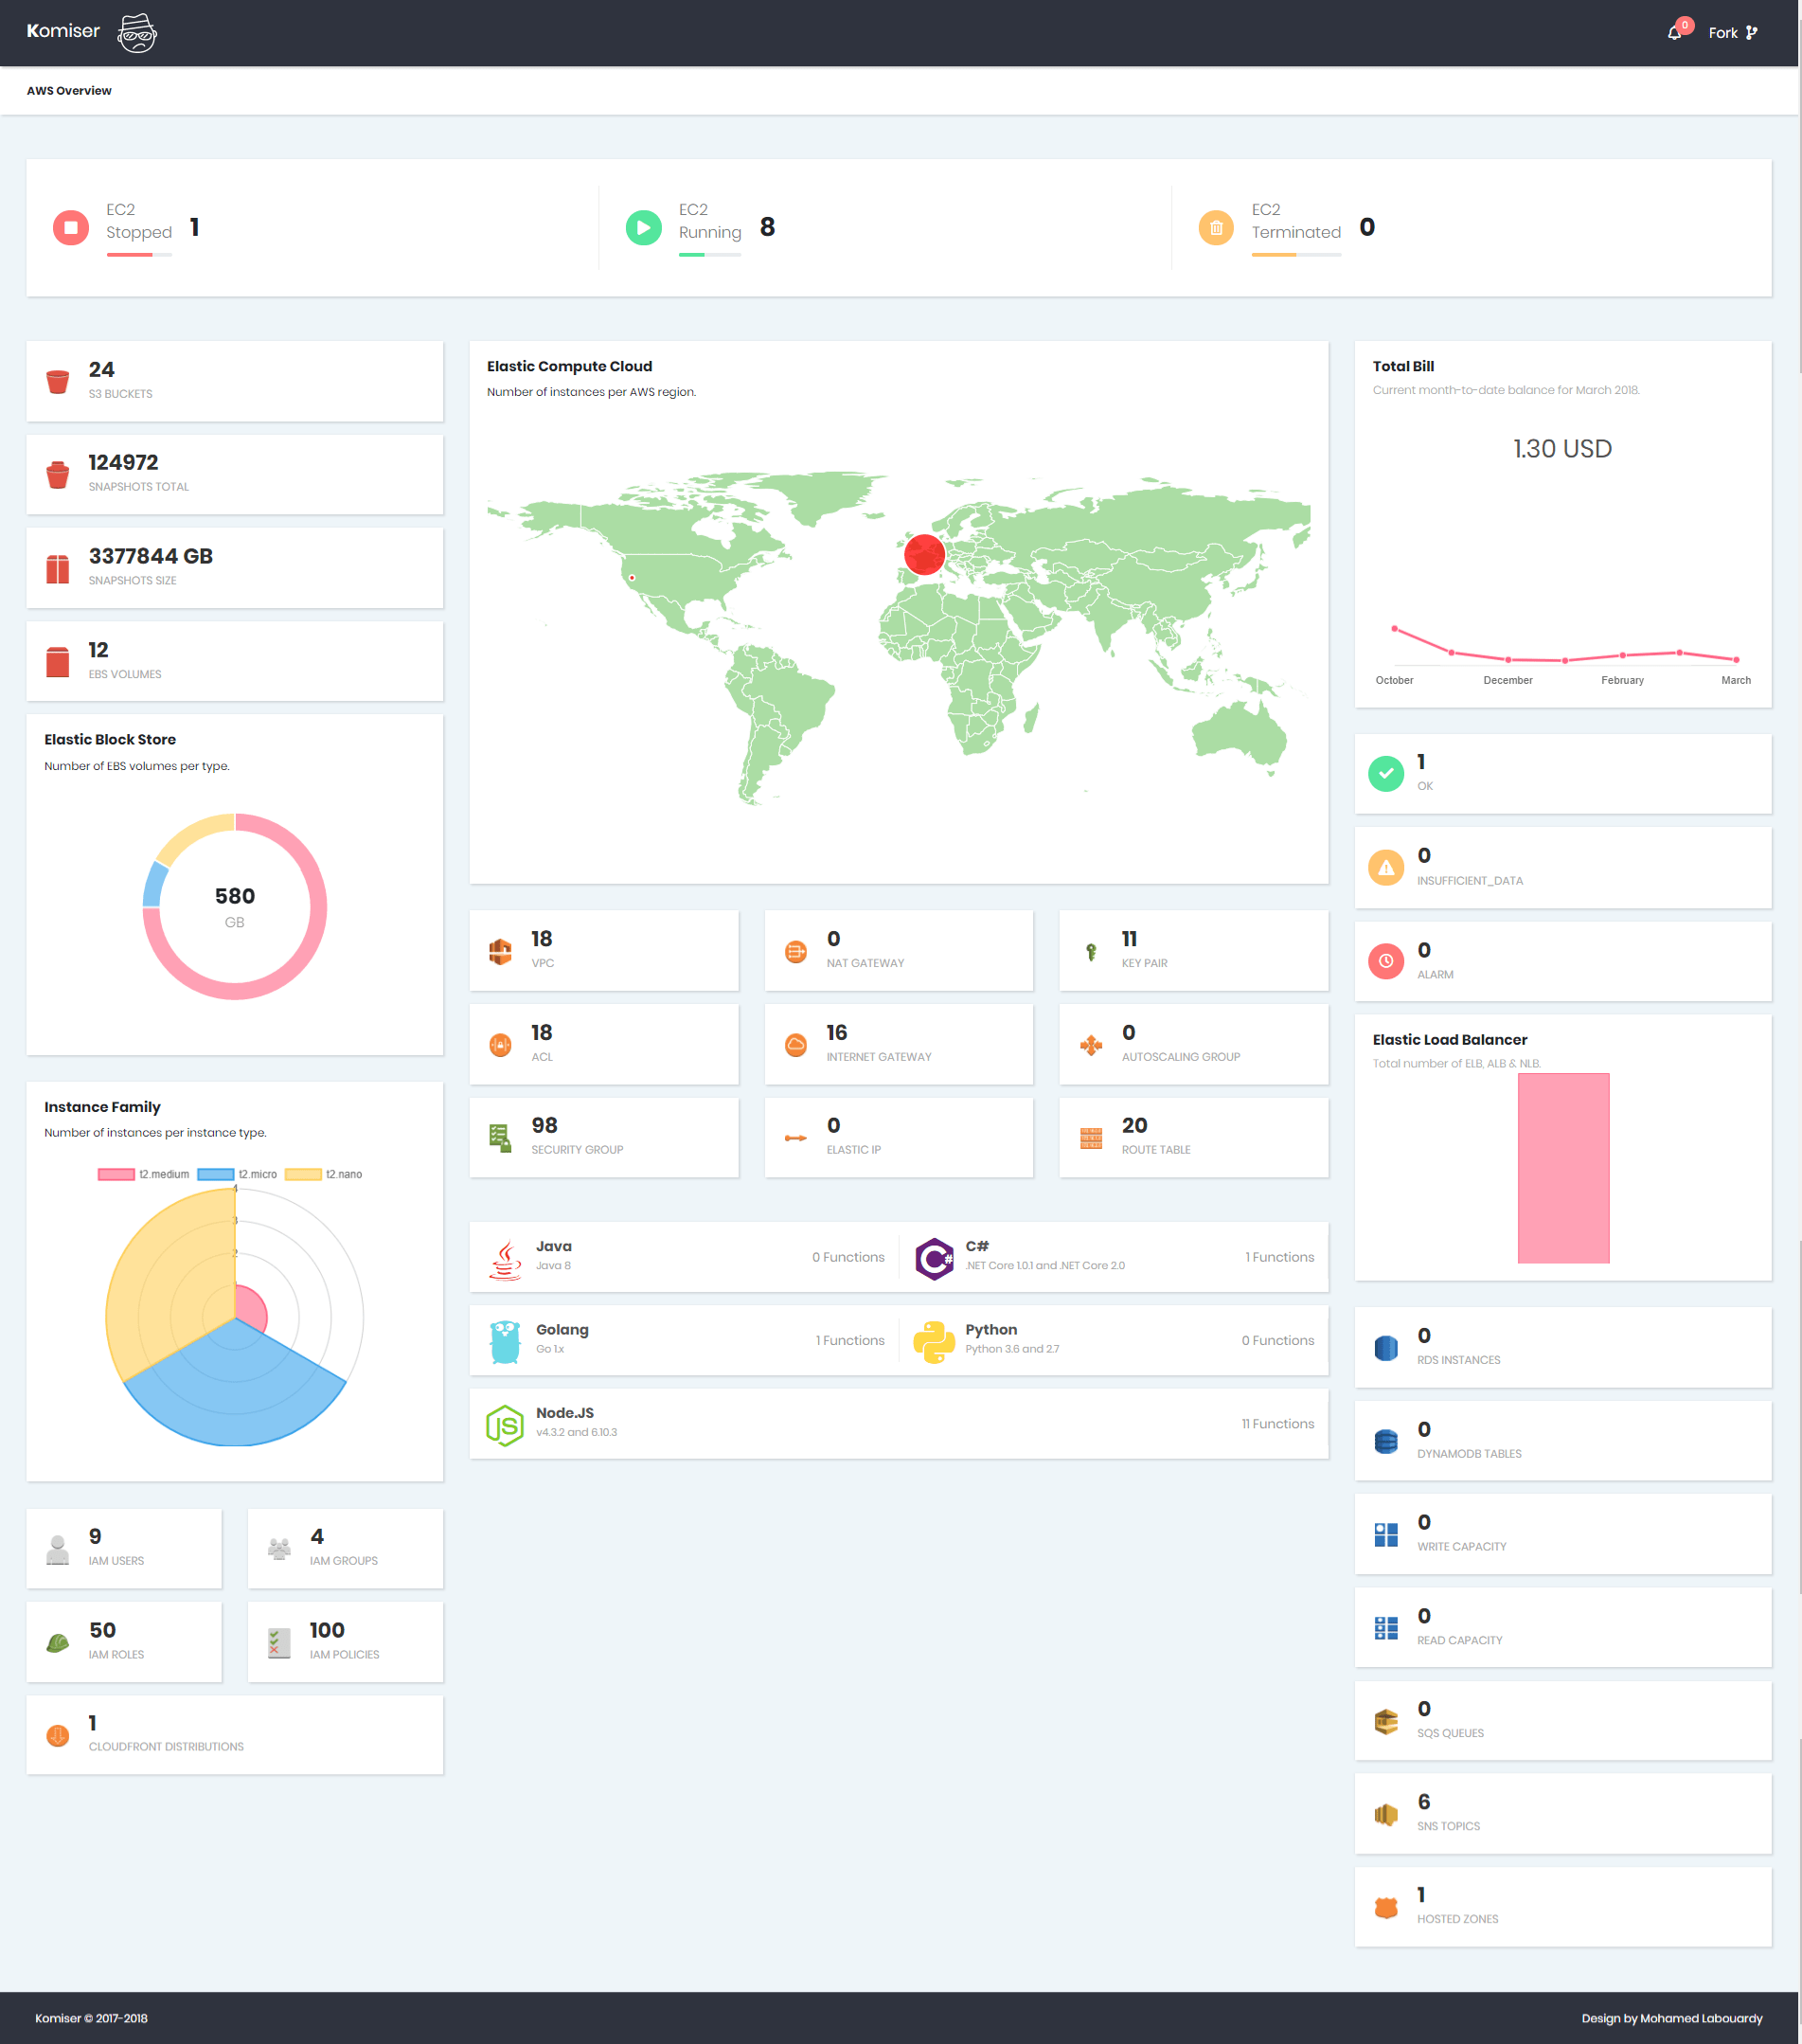
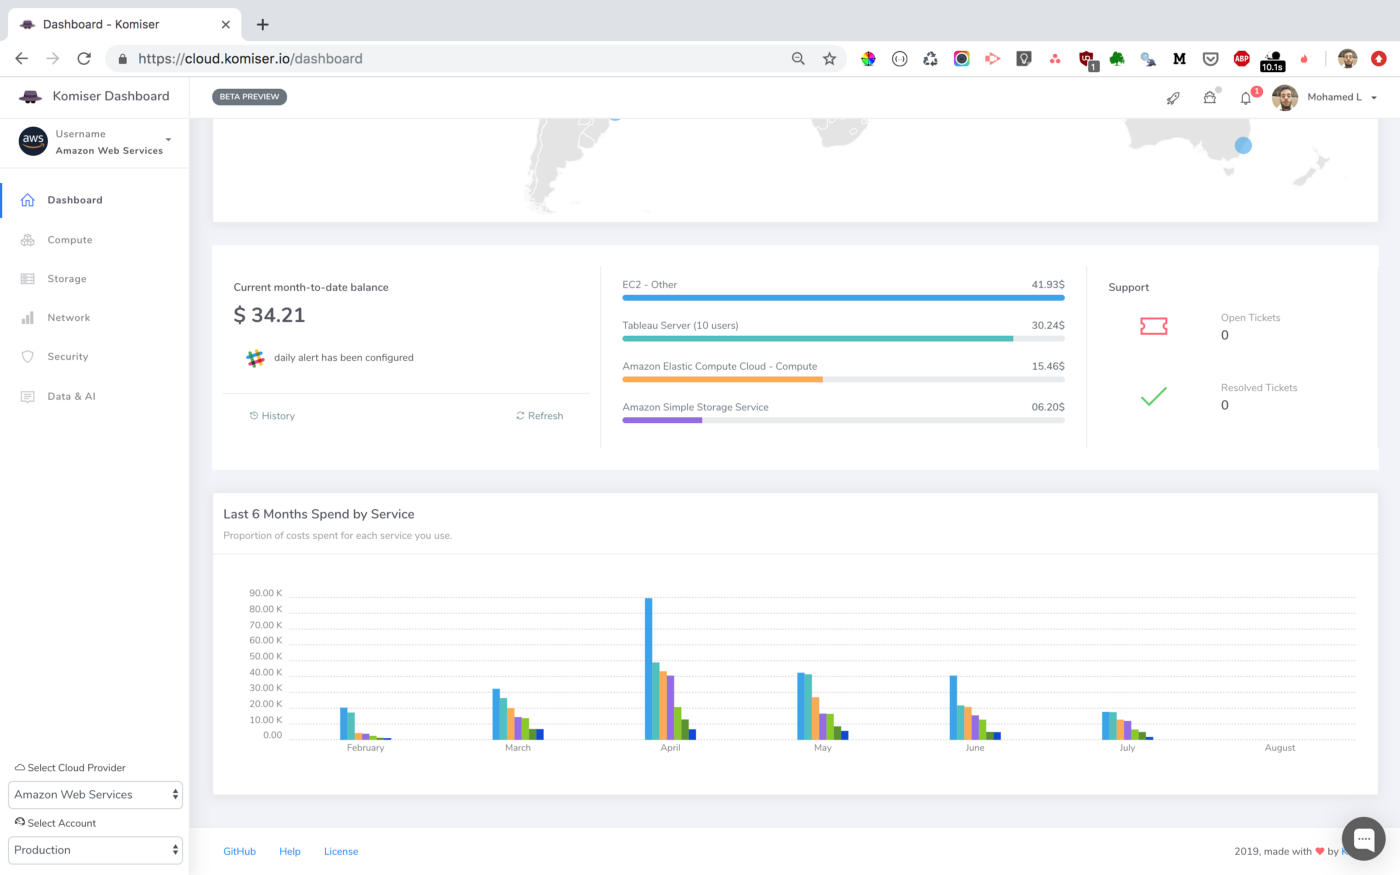
In order to build HA & Resilient applications in AWS, you need to assume that everything will fail. Therefore, you always design and deploy your application in multiple AZ & regions. So you end up with many unused AWS resources (Snapshots, ELB, EC2, Elastic IP, etc) that could cost you a fortune.
One pillar of AWS Well-Architected Framework is Cost optimization. That’s why you need to have a global overview of your AWS Infrastructure. Fortunately, AWS offers many fully-managed services like CloudWatch, CloudTrail, Trusted Advisor & AWS Config to help you achieve that. But, they require a deep understanding of AWS Platform and they are not straighforward.
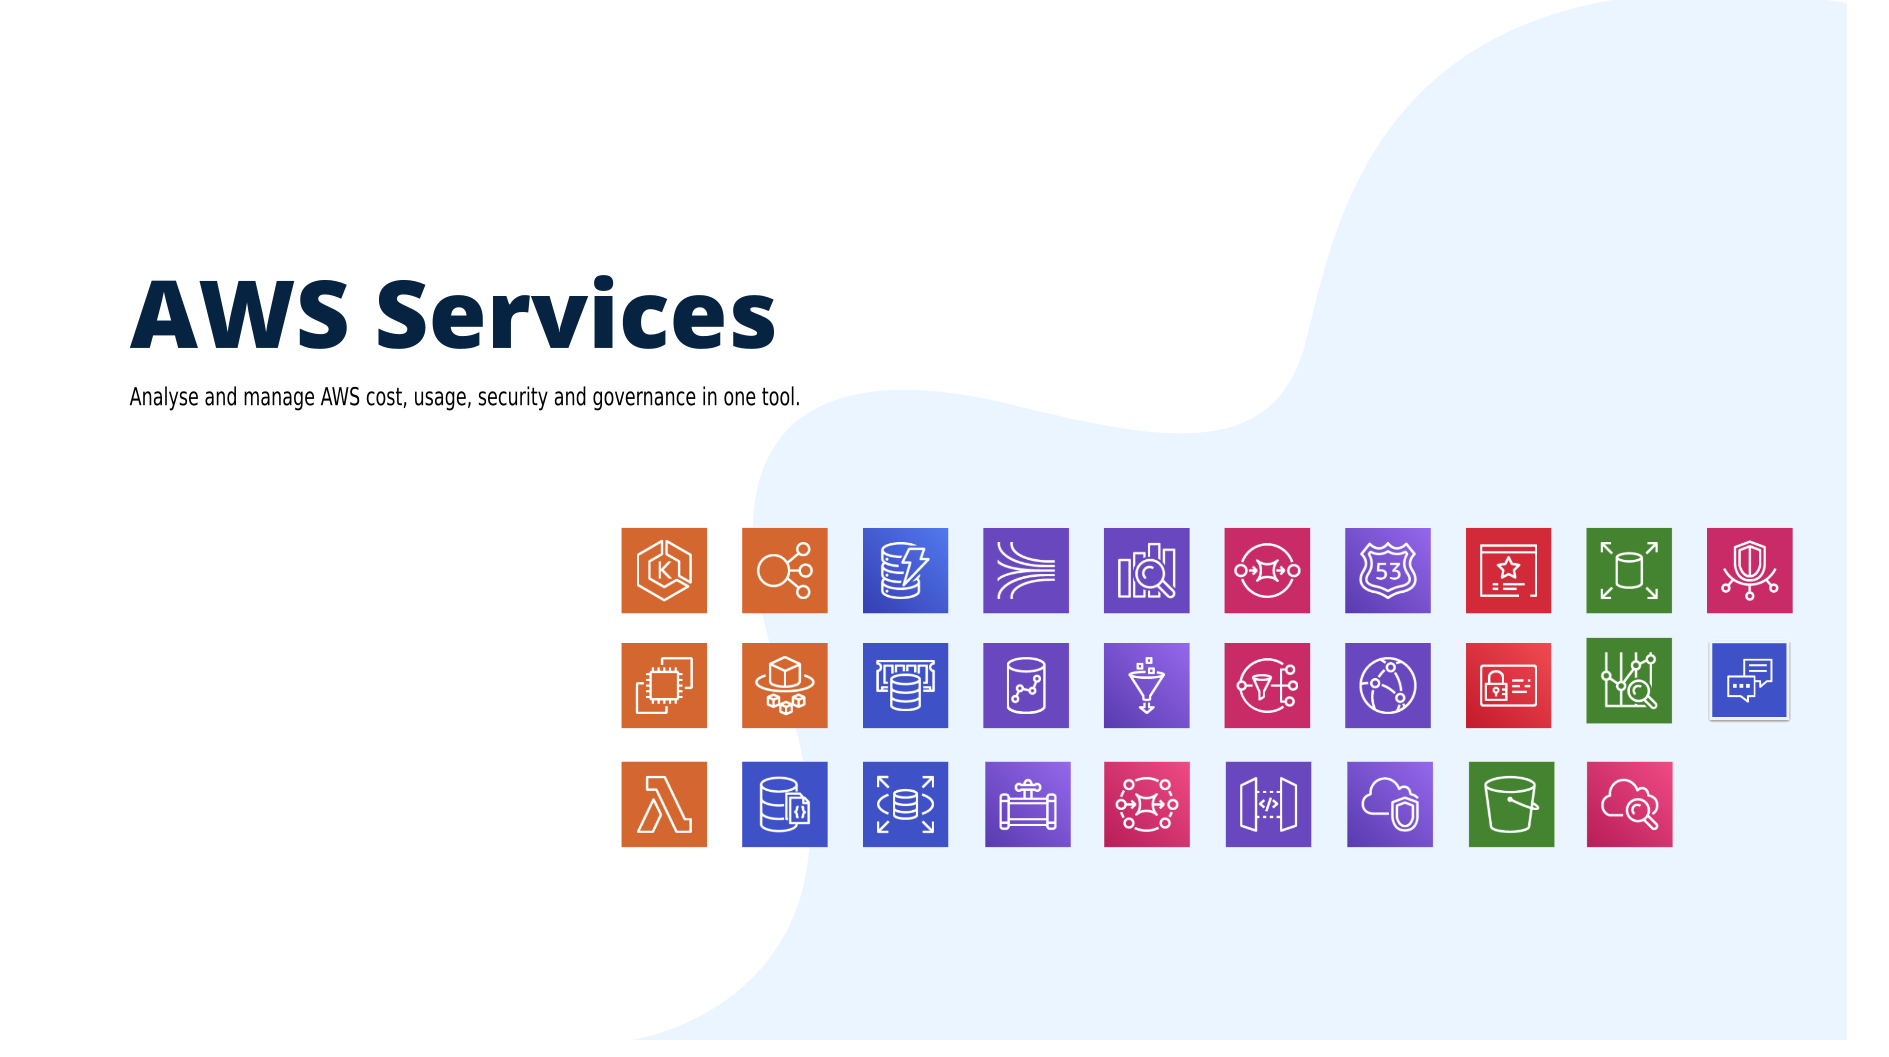
That’s why I came up with Komiser a tool that simplifies the process by querying the AWS API to fetch information about almost all critical services of AWS like EC2, RDS, ELB, S3, Lambda … in real-time in a single Dashboard.
Note: To prevent excedding AWS API rate limit for requests, the response is cached in in-memory cache by default for 30 minutes.
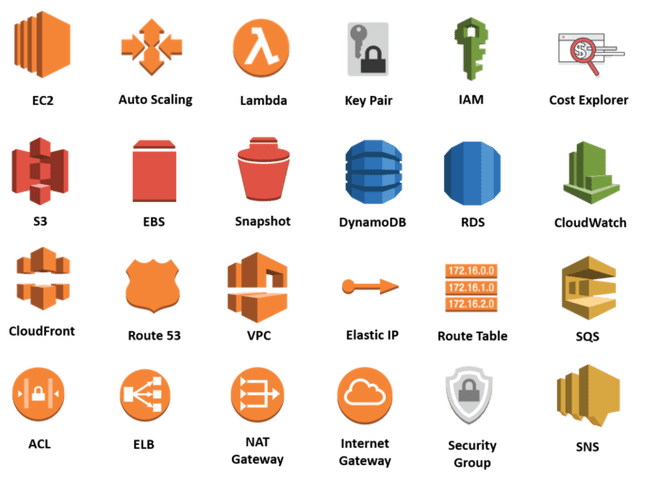
Komiser supported AWS Services:
Compute:
Running/Stopped/Terminated EC2 instances
Current EC2 instances per region
EC2 instances per family type
Lambda Functions per runtime environment
Disassociated Elastic IP addresses
Total number of Key Pairs
Total number of Auto Scaling Groups
Network & Content Delivery:
Total number of VPCs
Total number of Network Access Control Lists
Total number of Security Groups
Total number of Route Tables
Total number of Internet Gateways
Total number of Nat Gateways
Elastic Load Balancers per family type (ELB, ALB, NLB)
Management Tools:
CloudWatch Alarms State
Billing Report (Up to 6 months)
Database:
DynamoDB Tables
DynamoDB Provisionned Throughput
RDS DB instances
Messaging:
SQS Queues
SNS Topics
Storage:
S3 Buckets
EBS Volumes
EBS Snapshots
Security Identity & Compliance:
IAM Roles
IAM Policies
IAM Groups
IAM Users
1 – Configuring Credentials
Komiser needs your AWS credentials to authenticate with AWS services. The CLI supports multiple methods of supporting these credentials. By default the CLI will source credentials automatically from its default credential chain. The common items in the credentials chain are the following:
Environment Credentials
AWS_ACCESS_KEY_ID
AWS_SECRET_ACCESS_KEY
AWS_DEFAULT_REGION
Shared Credentials file (~/.aws/credentials)
EC2 Instance Role Credentials
To get started, create a new IAM user, and assign to it this following IAM policy:
Note: The Komiser CLI is updated frequently with support for new AWS services. To see if you have the latest version, see the project Github repository.
After you install the Komiser CLI, you may need to add the path to the executable file to your PATH variable.
Not long ago, I had to migrate Jenkins jobs from an old server to a new one. That’s where StackOverflow comes into the play, below the most voted answers I found:
Jenkins CLI
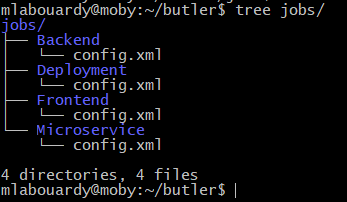
Copy the jobs directory
Jenkins Remote API
Jenkins Job Import Plugin
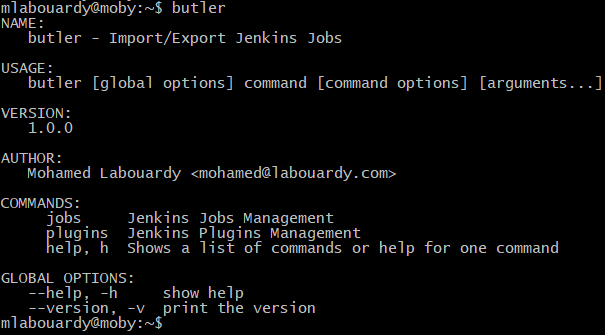
In spite of their advantages, those solutions comes with their downsides especially if you have a large number of jobs to move or no access root to the server. But, guess what ? I didn’t stop there. I have came up with a CLI to make your life easier and export/import not only Jenkins jobs but also plugins like a boss.
To get started, find the appropriate package for your system and download it. For linux:
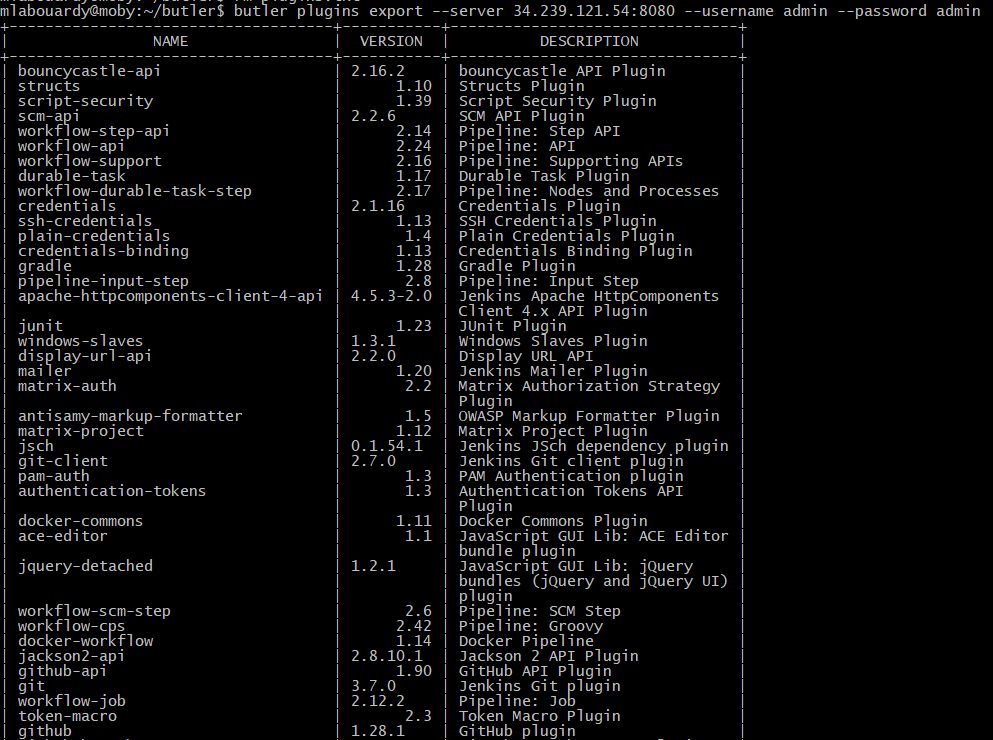
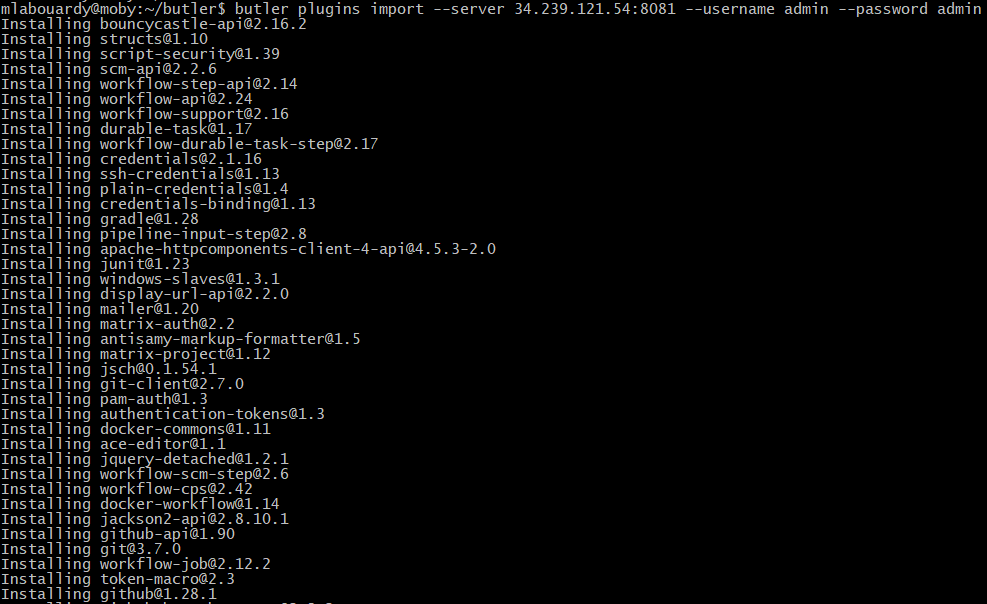
As shown above, butler will dump a list of plugins installed to stdout and a new file plugins.txt will be generated, with list of installed Jenkins plugins with name and version pairs:
Many of us, are using Nexus as a repository to publish Docker Images. Typically we build images tagged with the commit hash (or using semver ideally) after SCM change automatically in CI and we push them to registry. As result there are many “unneeded” & “old” images that in our case take significant amount of disk space.
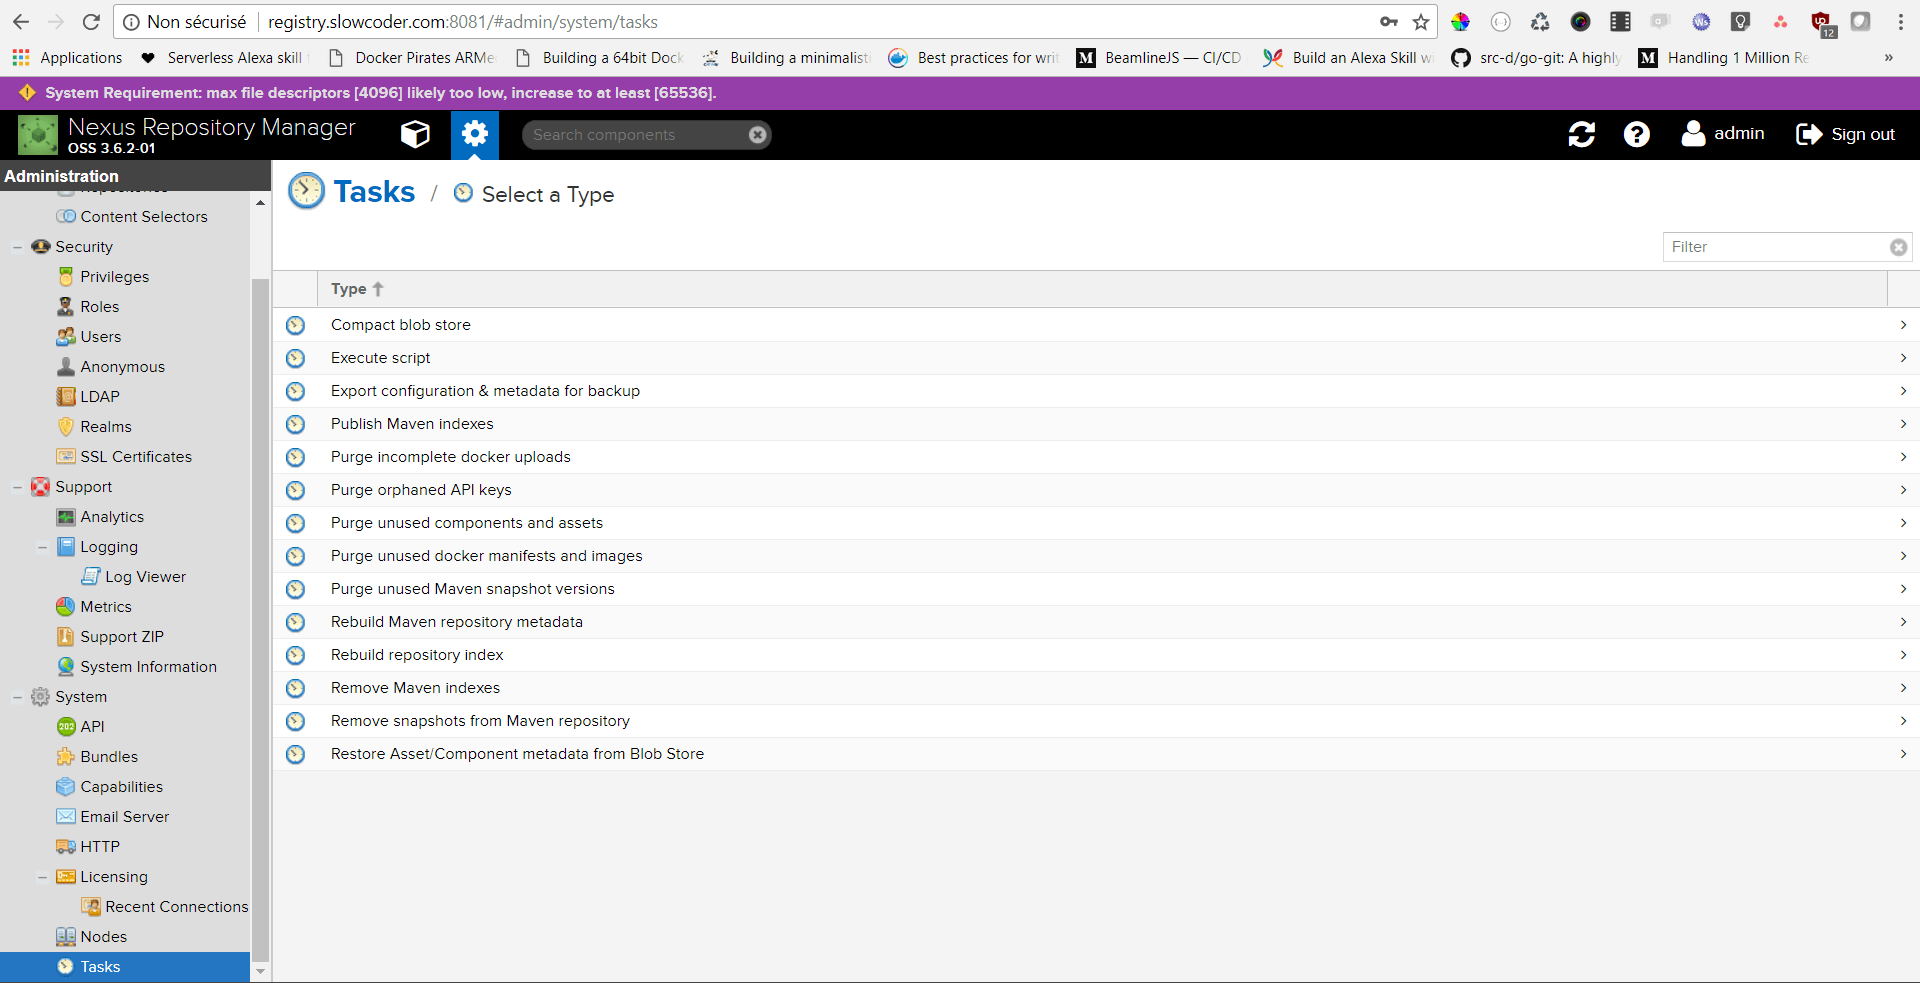
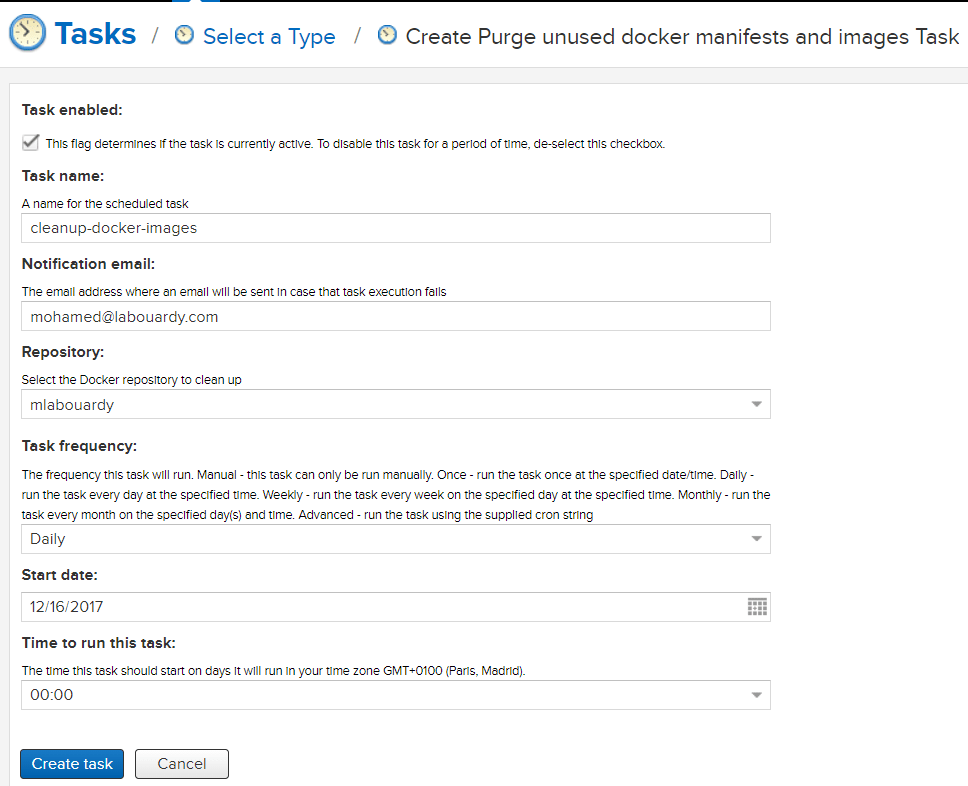
I looked around the graphical interface of Nexus and there’s apparently nothing to remove several Docker images at the same time. Or even, a scheduled task to clean up old hosted Docker images, and to also clean up layers which are no longer used by any hosted images.
So I have come up with a simple bash script which uses Docker Registry API to purge Docker images and keep the last X images and delete all other. But, is there a better solution ? YES ! I built a Nexus CLI.
To install Nexus CLI, find the appropriate package for your system and download it. For linux:
After downloading Nexus CLI. Add the execution permission to the binary:
1
chmod +x nexus-cli
Note: For Windows make sure that nexus-cli binary is available on the PATH. This page contains instructions for setting the PATH on Windows.
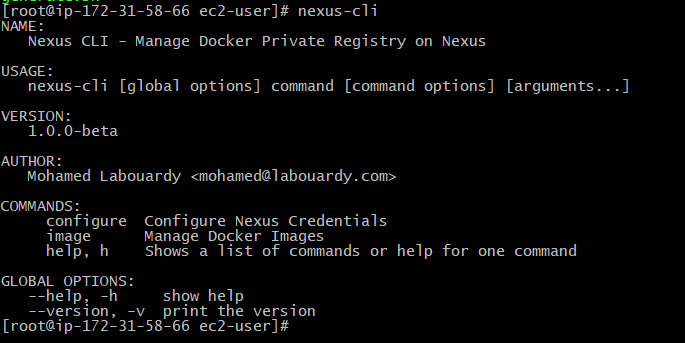
After installing, verify the installation worked, by opening a new terminal session and checking if nexus-cli is available :
Once done, configure the Nexus credentials:
1
nexus-cli configure
Through nexus-cli configure, the Nexus CLI will prompt you for four pieces of information. The Username and Password are your account credentials. Nexus Hostname & Docker repository name.
That should be it. Try out the following command from your cmd prompt and, if you have any images, you should see them listed
1
nexus-cli image ls
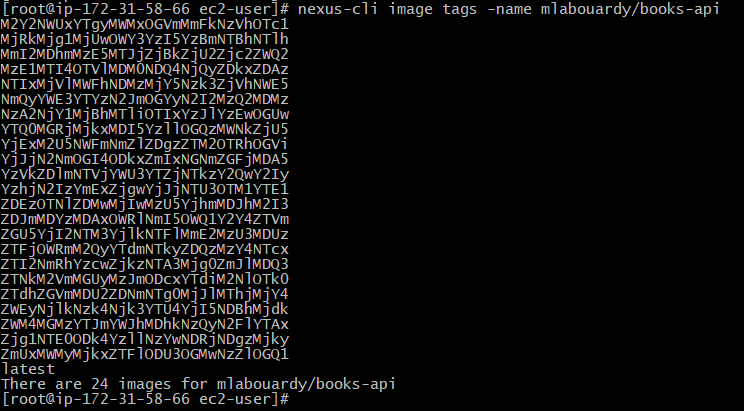
Display image tags:
1
nexus-cli image tags -name IMAGE_NAME
Image description:
1
nexus-cli image info -name IMAGE_NAME -tag TAG
To remove a specific image:
1
nexus-cli image delete -name IMAGE_NAME -tag TAG
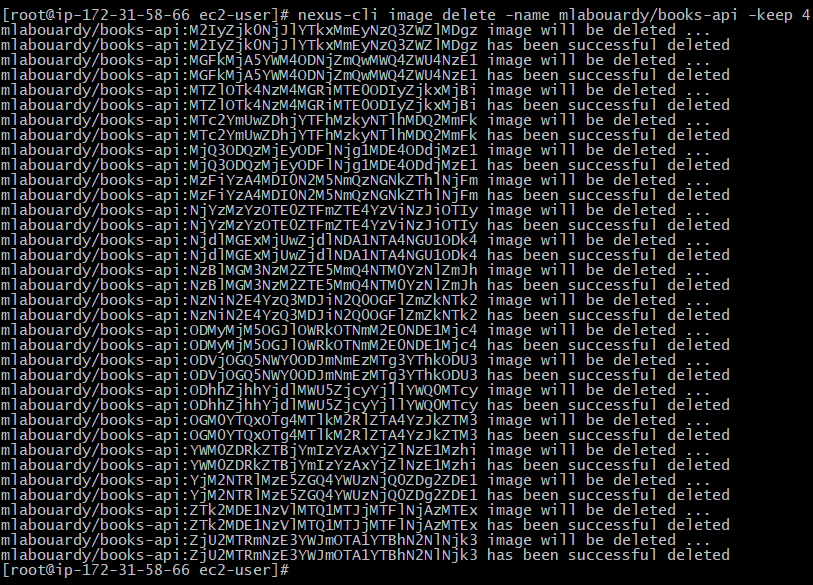
To keep only the last X images and delete all other:
1
nexus-cli image delete -name IMAGE_NAME -keep X
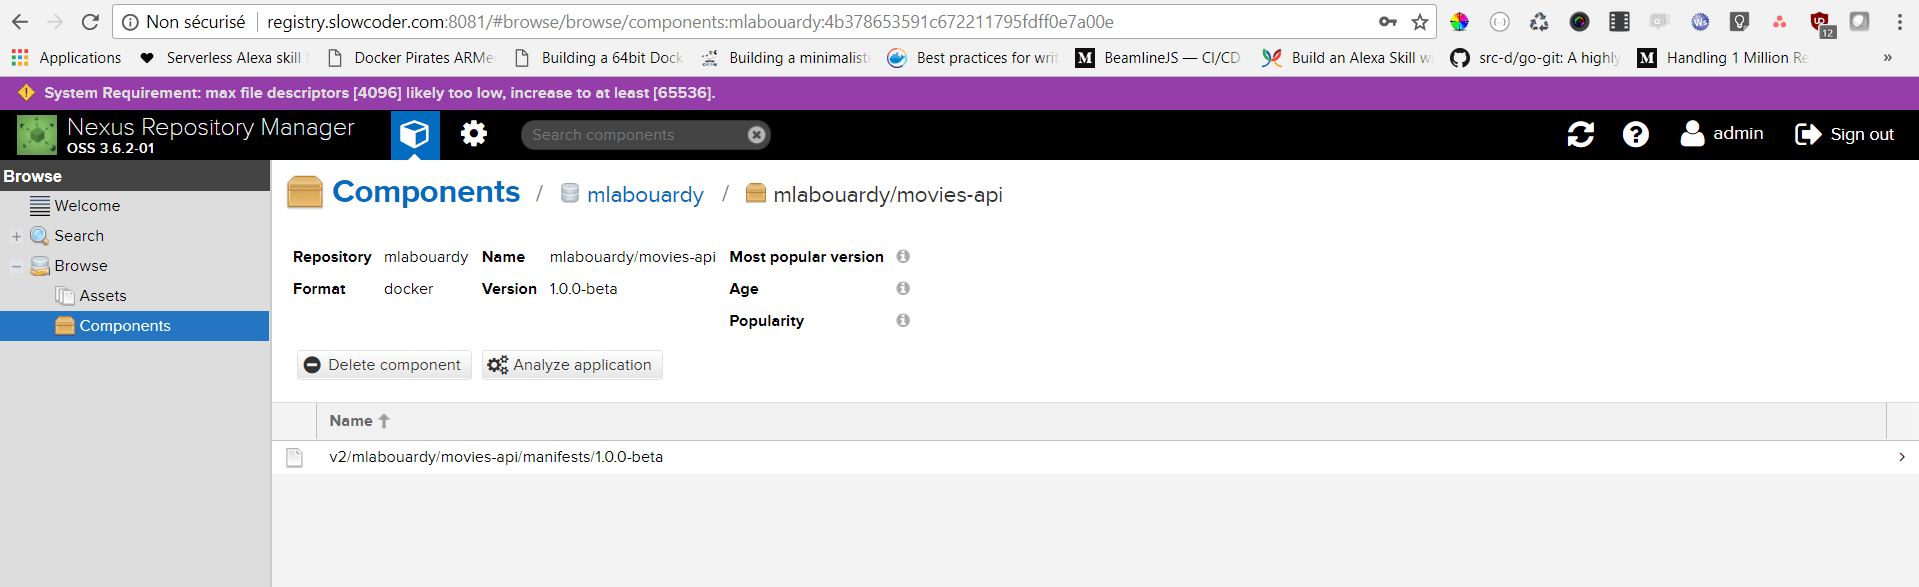
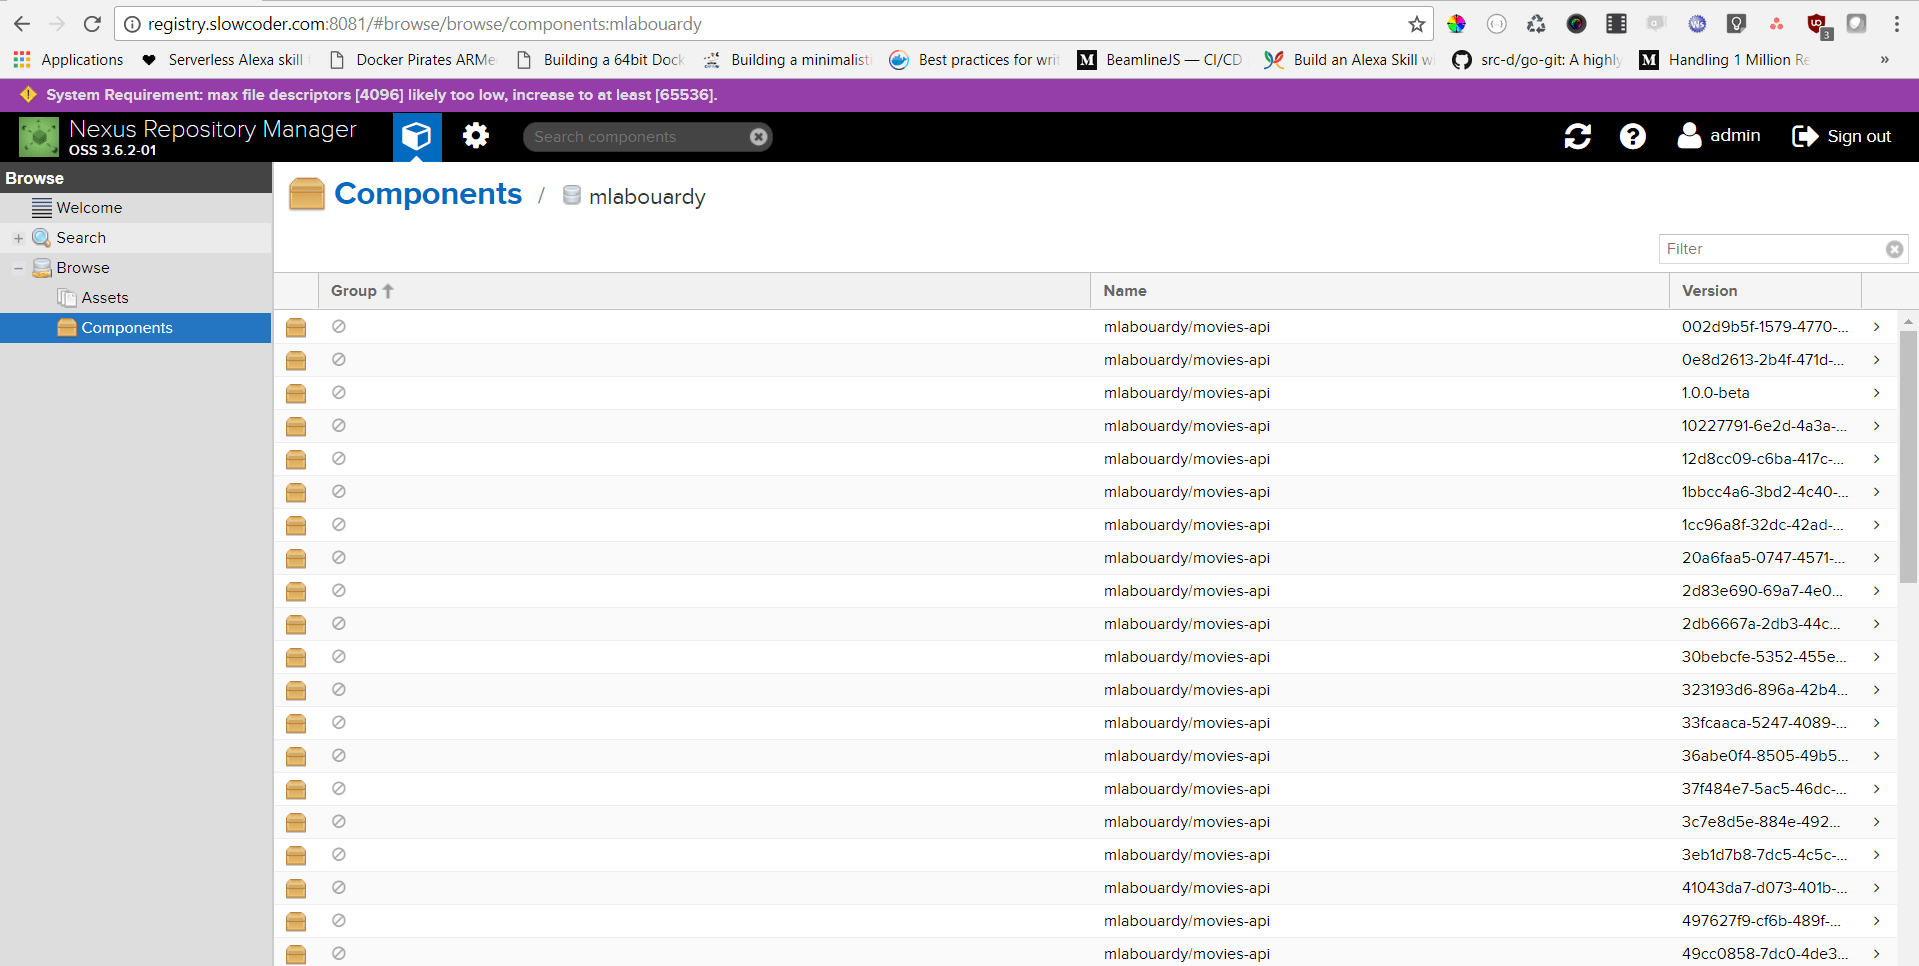
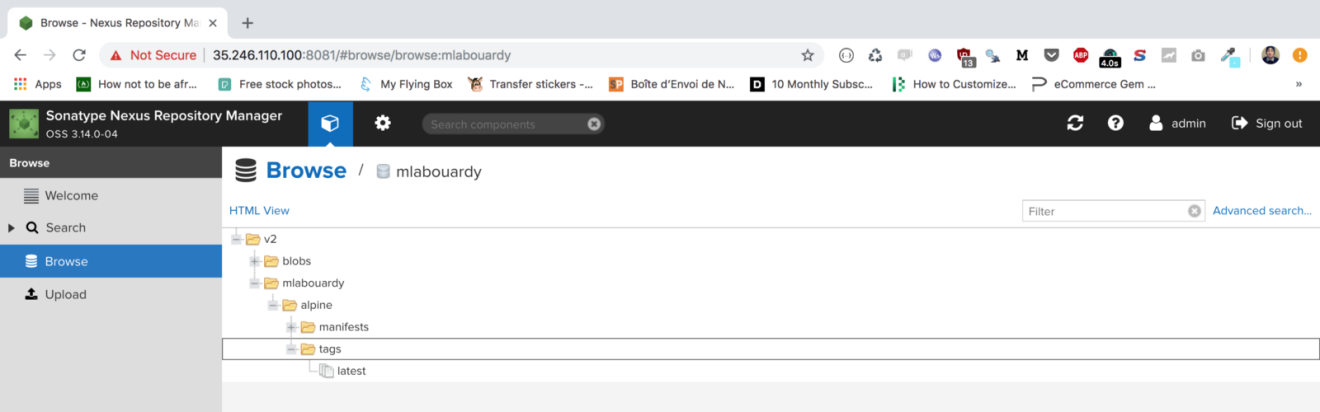
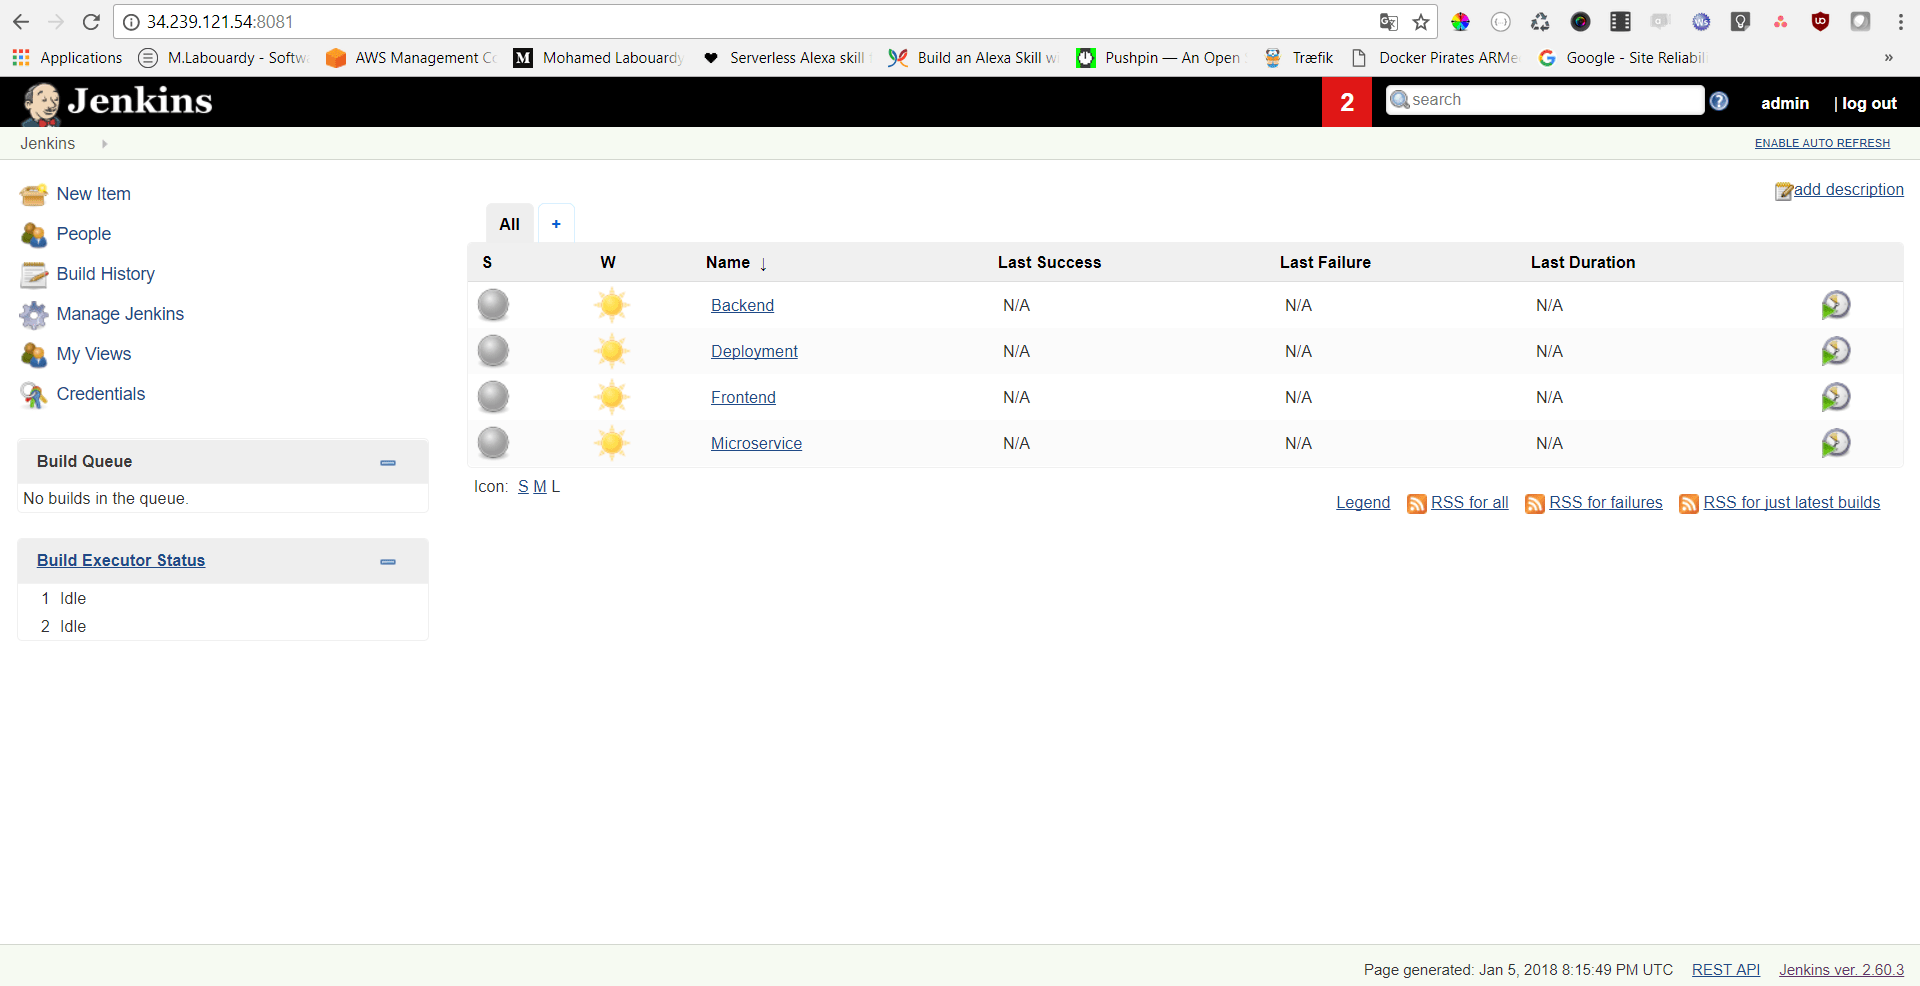
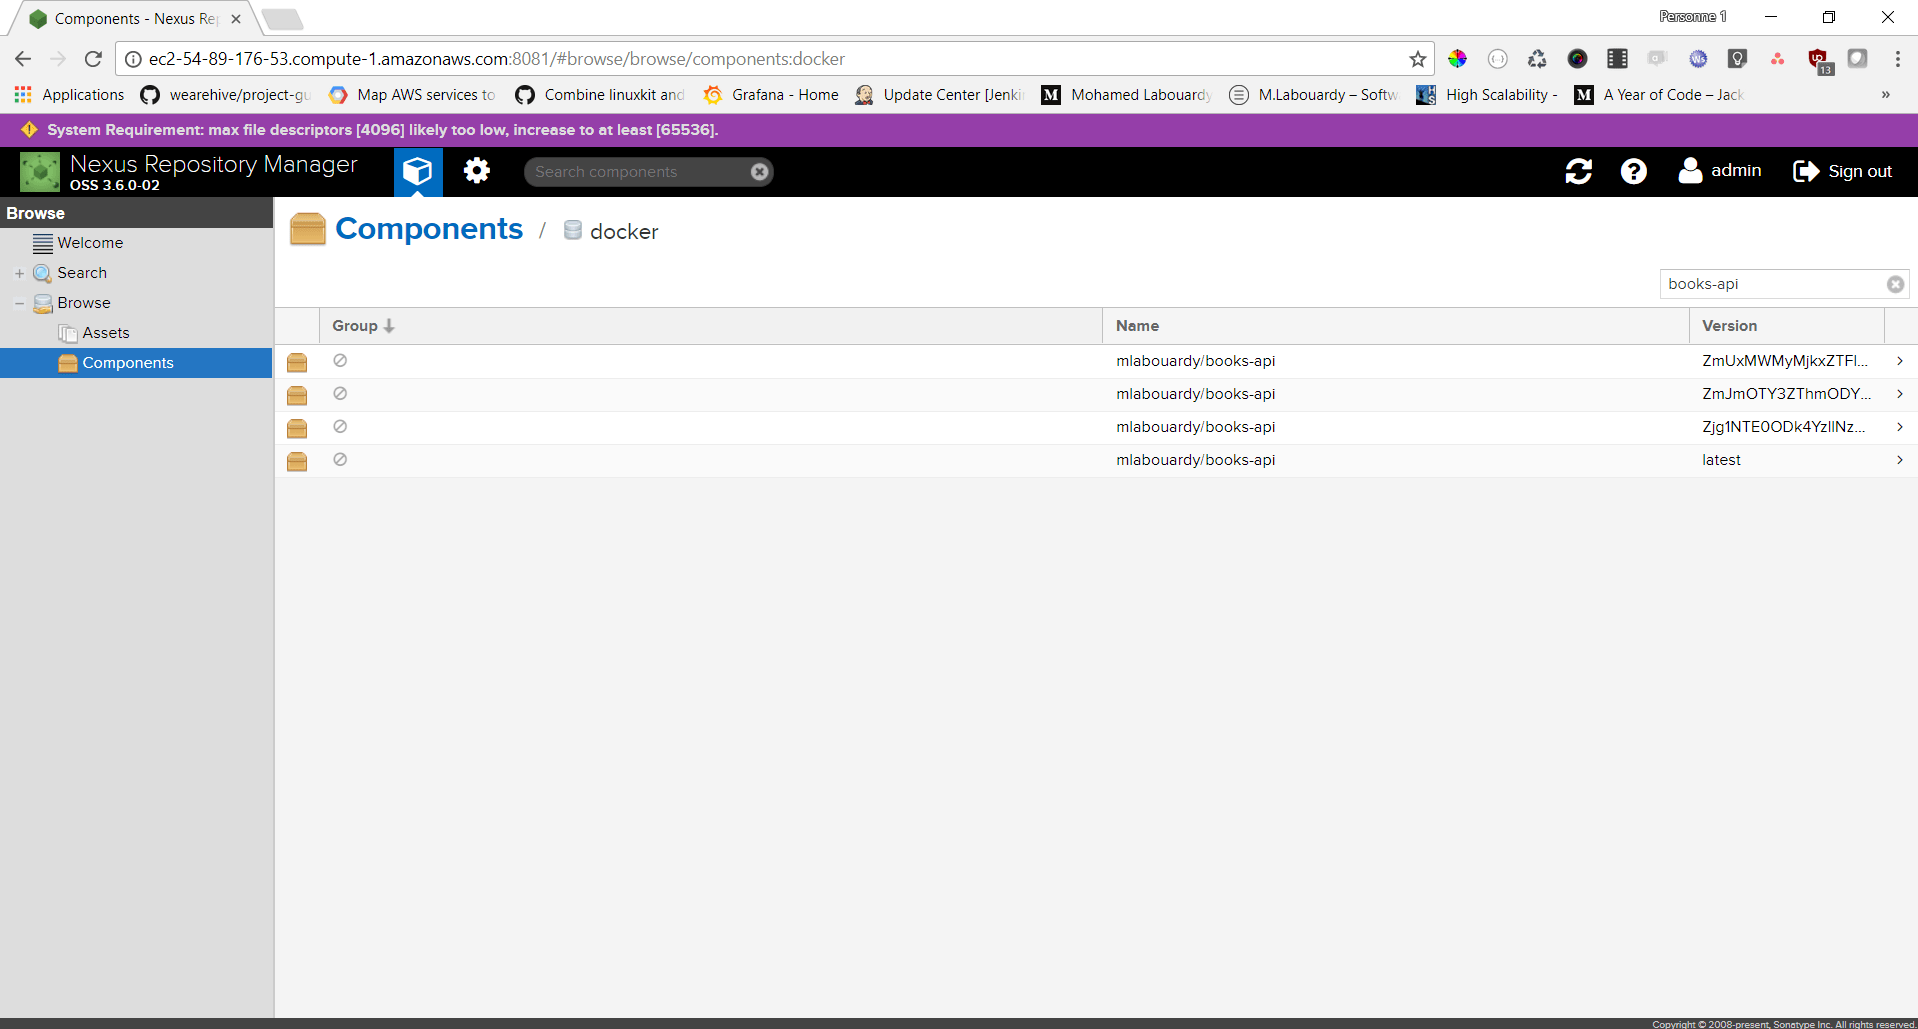
That’s it ! Let’s go back to Nexus Dashboard:
As you can see, Nexus kept only the last 4 images and deleted the others.
The CLI is still in its early stages, so you are welcome to contribute to the project in GitHub.
Drop your comments, feedback, or suggestions below — or connect with me directly on Twitter @mlabouardy.