Docker Swarm Networking and Dynamic Reverse Proxy

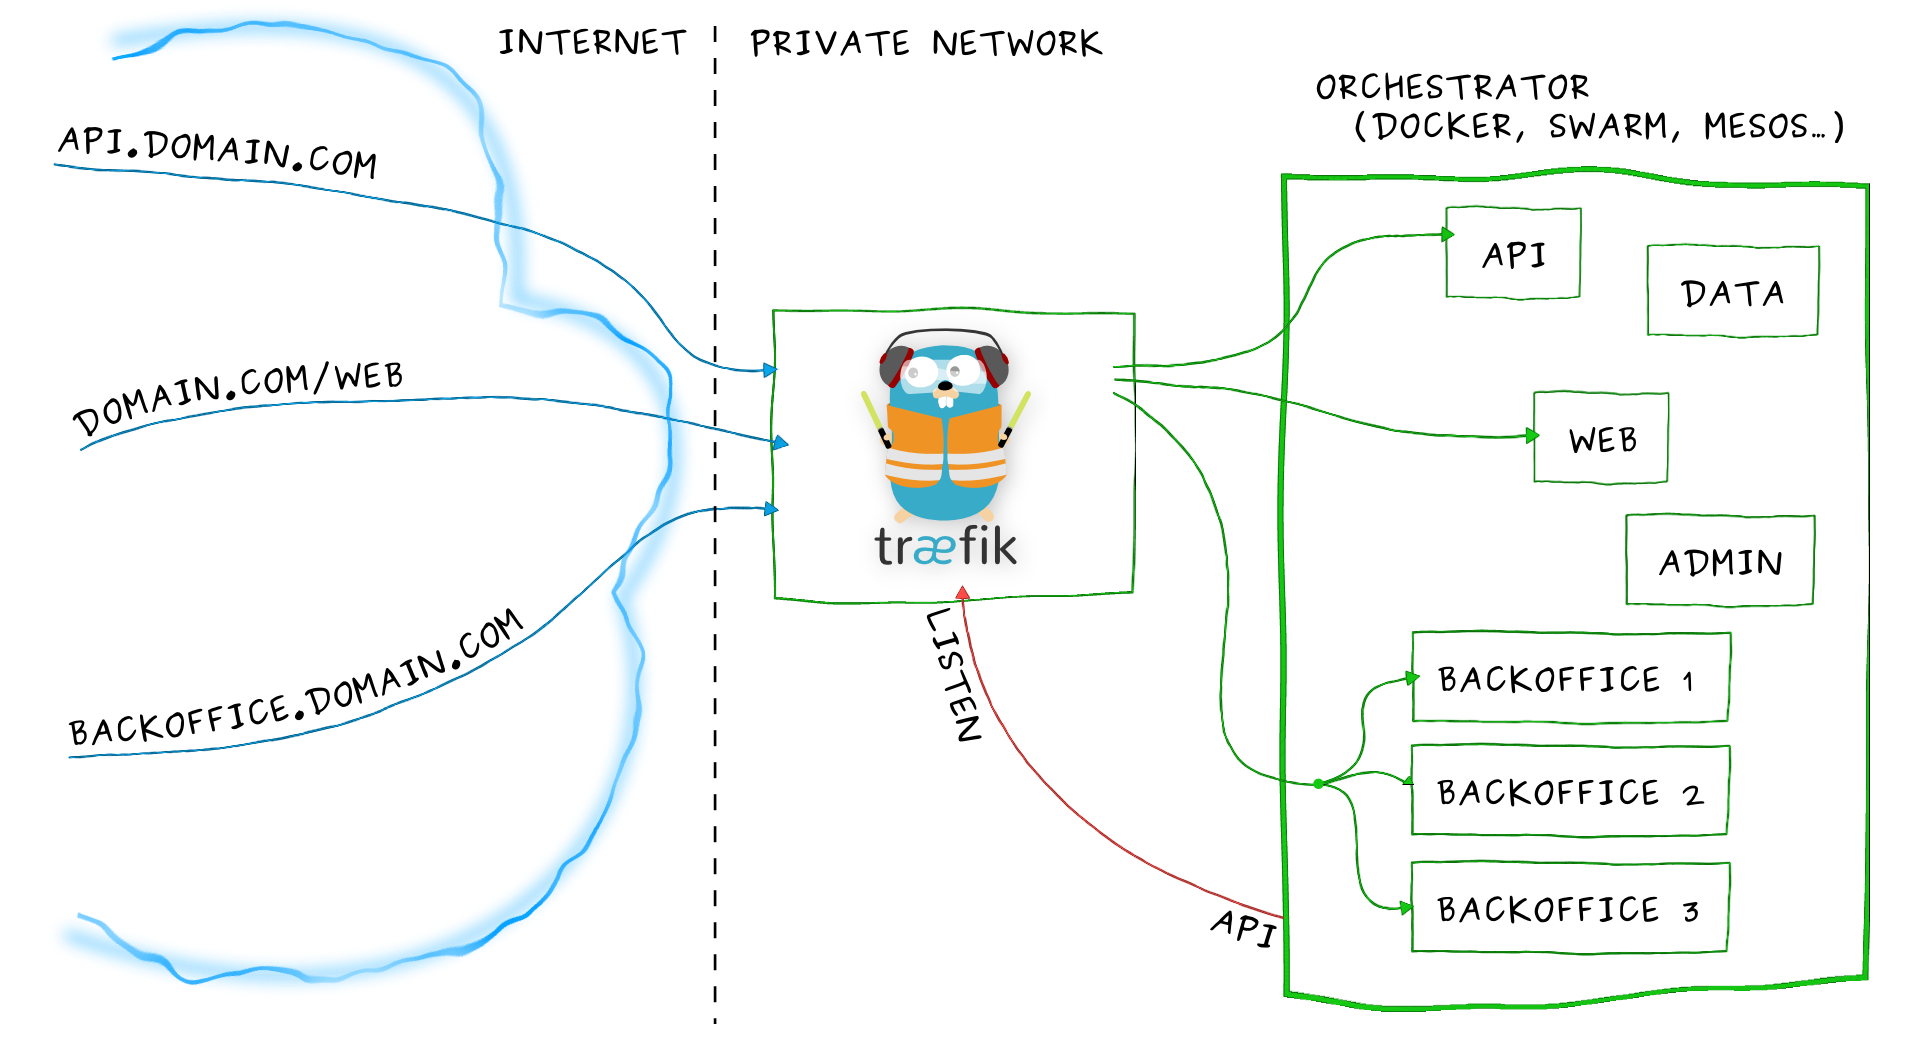
This post will show you how to setup a Swarm Cluster, deploy a couple of microservices, and create a Reverse Proxy Service (with Traefik) in charge of routing requests on their base URLs.


If you haven’t already, create a Swarm cluster, you could use the shell script below to setup a cluster with 3 nodes (1 Manager & 2 Workers)

1
2
3
4
5
6
7
8
9
10
11
12
13
14
15
16
17
18
19
20
21
22
#!/bin/sh

for i in 1 2 3; do
docker-machine create -d virtualbox node-$i
done

eval $(docker-machine env node-1)

docker swarm init --advertise-addr $(docker-machine ip node-1)

TOKEN=$(docker swarm join-token -q worker)

for i in 2 3; do
eval $(docker-machine env node-$i)
docker swarm join --token $TOKEN $(docker-machine ip node-1):2377
done

echo "Swarm cluster has been successfuly created !";

eval $(docker-machine env node-1)

docker node ls

Issue the following command to execute the script:

1
2
chmod +x setup.sh
./setup.sh

The output of the above command is as follows:


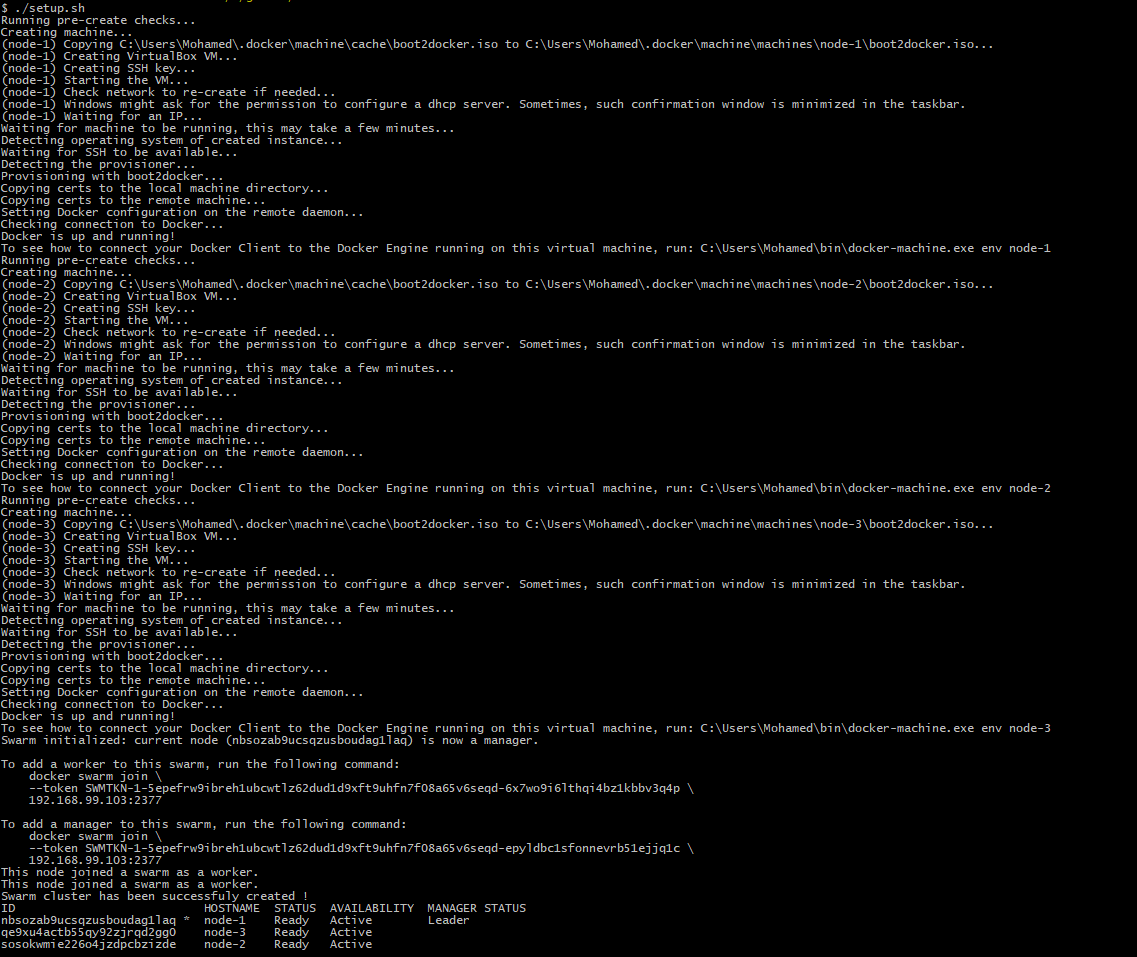
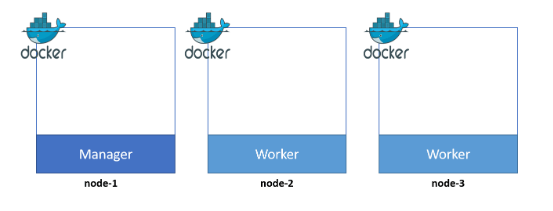
At this moment, we have 3 nodes:


Our example microservice application consists of two parts. The Books API and the Movies API. For both parts I have prepared images for you that can be pulled from the DockerHub.

The Dockerfiles for both images can be found on my Github.

Create docker-compose.yml file with the following content:

1
2
3
4
5
6
7
8
9
10
11
12
13
14
15
16
17
18
19
20
21
22
23
24
25
26
27
28
29
30
31
32
33
34
35
36
37
38
39
40
41
42
43
44
45
46
47
48
49
50
51
52
53
version: "3.3"

services:
traefik:
image: traefik:1.4
ports:
- 80:80
- 8080:8080
networks:
- traefik-net
volumes:
- /var/run/docker.sock:/var/run/docker.sock
configs:
- source: traefik-config
target: /etc/traefik/traefik.toml
deploy:
placement:
constraints:
- node.role == manager

books:
image: mlabouardy/books-api
networks:
- traefik-net
deploy:
placement:
constraints:
- node.role == worker
labels:
- "traefik.port=5000"
- "traefik.backend=books"
- "traefik.frontend.rule=Path:/books"

movies:
image: mlabouardy/movies-api
networks:
- traefik-net
deploy:
placement:
constraints:
- node.role == worker
labels:
- "traefik.port=5000"
- "traefik.backend=movies"
- "traefik.frontend.rule=Path:/movies"

networks:
traefik-net:
driver: overlay

configs:
traefik-config:
file: config.toml
  • We use an overlay network named traefik-net, on which we add the services we want to expose to Traefik.
  • We use constraints to deploy the APIs on workers & Traefik on Swarm manager.
  • Traefik container is configured to listen on port 80 for the standard HTTP traffic, but also exposes port 8080 for a web dashboard.
  • The use of docker socket (/var/run/docker.sock) allows Traefik to listen to Docker Daemon events, and reconfigure itself when containers are started/stopped.
  • The label traefik.frontend.rule is used by Træfik to determine which container to use for which Request Path.
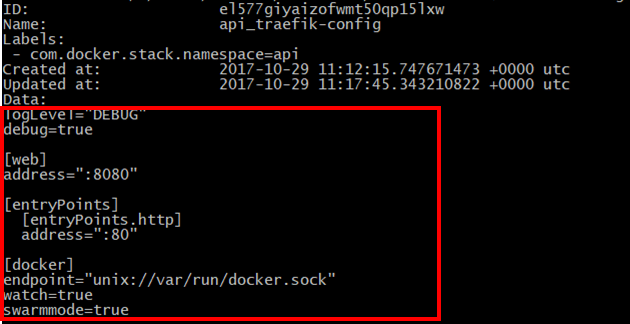
  • The configs part create a configuration file for Traefik from config.toml (it enables the Docker backend)
1
2
3
4
5
6
7
8
9
10
logLevel="DEBUG"
debug=true

[web]
address=":8080"

[docker]
endpoint="unix://var/run/docker.sock"
watch=true
swarmmode=true

In order to deploy our stack, we should execute the following command:

1
docker stack deploy --compose-file docker-compose.yml api

Let’s check the overlay network:

1
docker network ls


Traefik configuration:

1
docker config ls


To display the configuration content:

1
docker config inspect api_traefik-config --pretty


And finally, to list all the services:

1
docker stack ps api


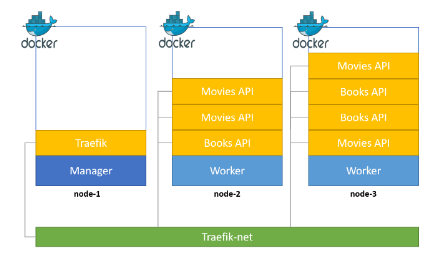
In the list of above, you can see that the 3 containers are being running on node-1, node-2 & node-3 :


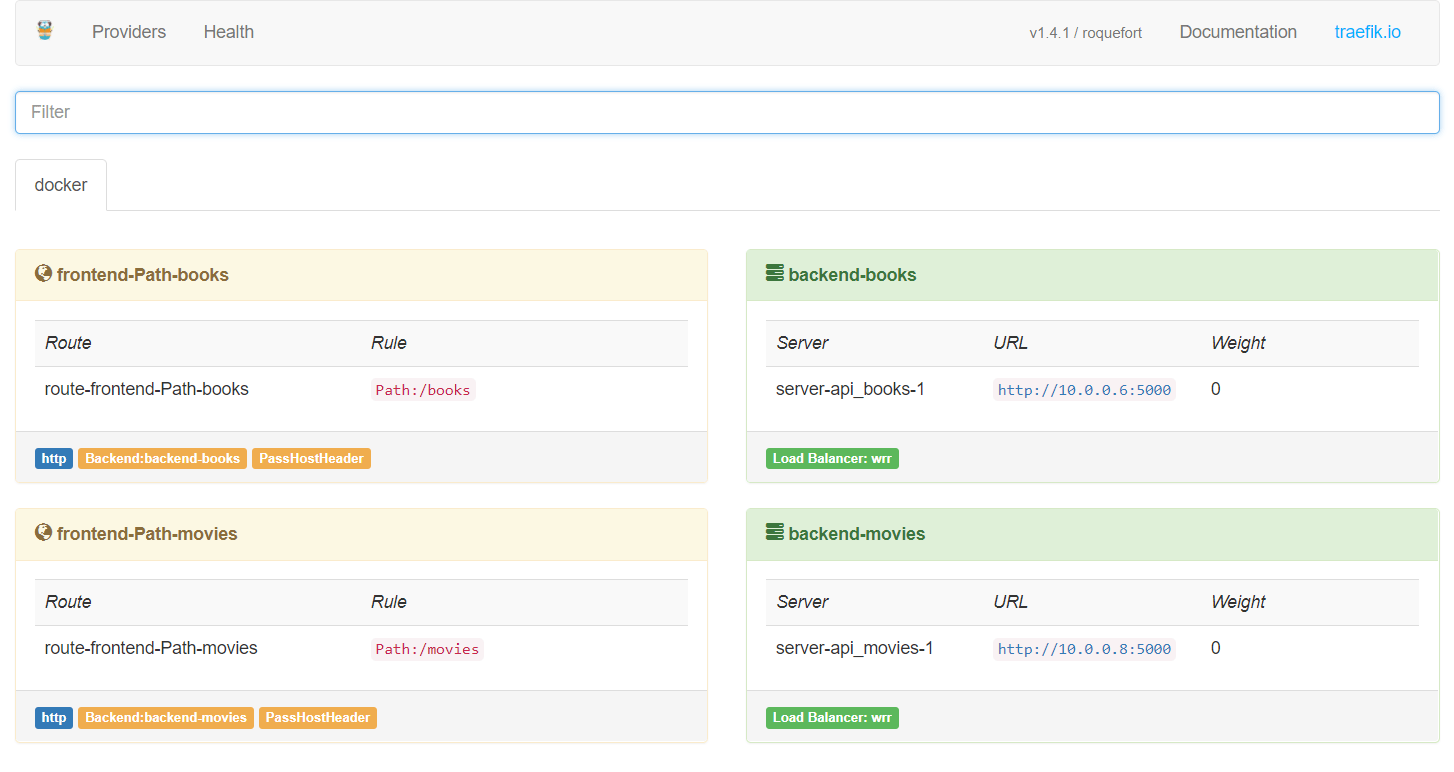
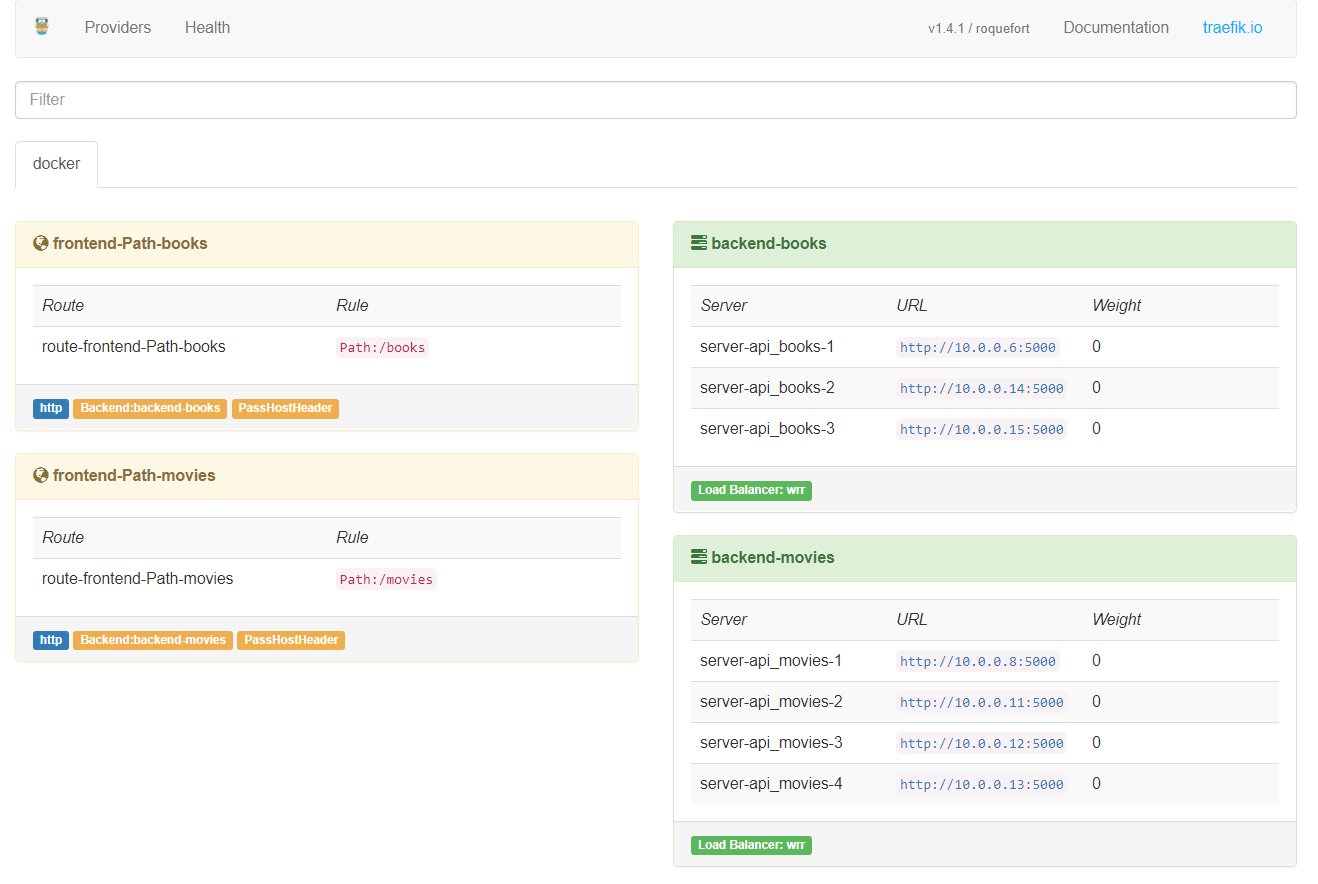
If you point your favorite browser (not you IE 😂) to the Traefik Dashboard URL (http://MANAGER_NODE_IP:8080) you should see that the frontends and backends are well defined:


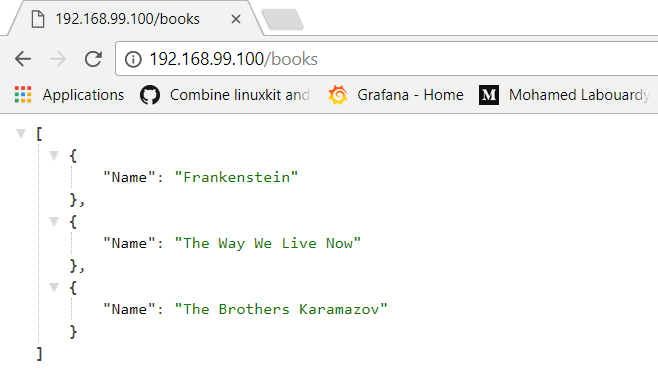
If you check http://MANAGER_NODE_IP/books, you will get a list of books


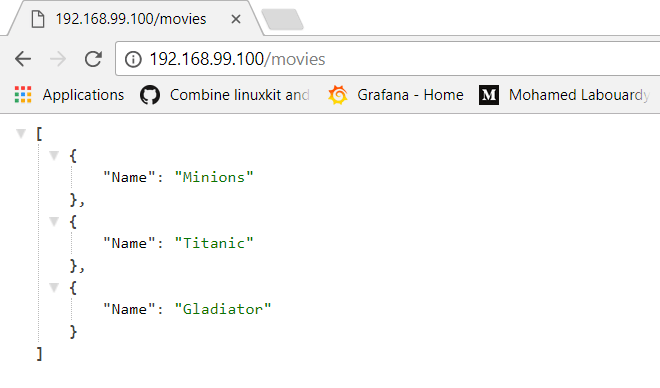
If you replace the base URL with /movies:


What happens if we want to scale out the books & movies APIs. With the docker service scale command:


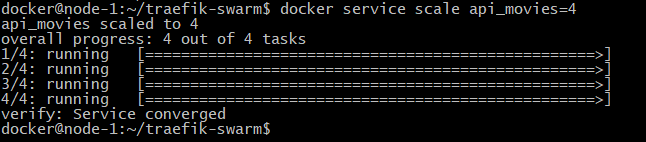
We can confirm that:


Obviously Traefik did recognise that we started more containers and made them available to the right frontend automatically:


In the diagram below, you will find that the manager has decied to schedule the new containers on node-2 (3 of them) and node-3 (4 of them) using the Round Robin strategy


Drop your comments, feedback, or suggestions below — or connect with me directly on Twitter @mlabouardy.

Preventing race conditions in Docker

It’s easy to get race conditions with Compose & Docker. Take for example, if you have a common pattern when you have the application server depends on the database, but since the database server didn’t have time to configure itself and application has already started it would just failed connecting for it.

A race condition example with NodeJS app & MySQL:

1
2
3
4
5
6
7
8
9
10
11
12
13
14
15
16
17
18
19
20
21
22
23
24
25
var MySQL = require('mysql'),
express = require('express'),
app = express();

var connection = MySQL.createConnection({
host : process.env.MYSQL_HOST || 'localhost',
user : process.env.MYSQL_USER || '',
password : process.env.MYSQL_PASSWORD || ''
});

connection.connect(function(err){
if(err){
console.log('error connecting:', err.stack);
process.exit(1);
}
console.log('connected as id:', connection.threadId);
})

app.get('/', function(req, res){
res.send('Hello world :)');
})

app.listen(3000, function(){
console.log('Server started ....');
})

To build the application container, I used the following Dockerfile:

1
2
3
4
5
6
7
8
9
10
11
12
FROM node:8.7.0
MAINTAINER mlabouardy <mohamed@labouardy.com>

WORKDIR /app

RUN npm install mysql express

COPY server.js .

EXPOSE 3000

CMD node server.js

To deploy the stack, I used docker-compose:

1
2
3
4
5
6
7
8
9
10
11
12
13
14
15
16
17
18
19
20
21
22
23
24
version: "3.0"

services:
mysql:
image: mysql:5.6
environment:
- MYSQL_ROOT_PASSWORD=root
networks:
- db-net

app:
build: .
ports:
- 3000:3000
environment:
- MYSQL_HOST=mysql
- MYSQL_USER=root
- MYSQL_PASSWORD=root
networks:
- db-net

networks:
db-net:
driver: bridge

Let’s build the image:

1
docker-compose build


Then, create the containers:

1
docker-compose up -d 


Let’s see the status:

1
docker-compose ps


The application failed to start, lets see why ?

1
docker-compose logs -f app


RACE CONDITION ! The application container come up before the DB and tried to connect to MySQL database and fail with a database connection error. To avoid that, There are many solutions:

  • Adding a mechanism in the code to wait for DB to be up and setup before starting to connect to it
  • Using restart policy – Docker Docs
  • Holding the container until the database is up and running

I will go with the 3rd solution, an open source tool called Dockerize, the advantage of this tool is that’s its pretty fast to just look over the opening the socket until it’s getting open and then launch the web app.

Note: Dockerize gives you the ability to wait for services on a specified protocol (file, tcp, tcp4, tcp6, http, https and unix)

So just update the Dockerfile to install Dockerize:

1
2
3
4
5
6
7
8
9
10
11
12
13
14
15
16
17
18
19
FROM node:8.7.0
MAINTAINER mlabouardy <mohamed@labouardy.com>

RUN apt-get update && apt-get install -y wget

ENV DOCKERIZE_VERSION v0.5.0
RUN wget https://github.com/jwilder/dockerize/releases/download/$DOCKERIZE_VERSION/dockerize-linux-amd64-$DOCKERIZE_VERSION.tar.gz \
&& tar -C /usr/local/bin -xzvf dockerize-linux-amd64-$DOCKERIZE_VERSION.tar.gz \
&& rm dockerize-linux-amd64-$DOCKERIZE_VERSION.tar.gz

WORKDIR /app

RUN npm install mysql express

COPY server.js .

EXPOSE 3000

CMD dockerize -wait tcp://mysql:3306 -timeout 1m && node server.js

Then, build the new image:


1
2
docker-compose up -d
docker-compose ps


1
docker-compose logs -f app


Its working !

Drop your comments, feedback, or suggestions below — or connect with me directly on Twitter @mlabouardy.

Setup Docker Swarm on AWS using Ansible & Terraform

This post is part of “IaC” series explaining how to use Infrastracture as Code concepts with Terraform. In this part, I will show you how to setup a Swarm cluster on AWS using Ansible & Terraform as shown in the diagram below (1 Master and 2 Workers) in less than 1 min ⏱:


All the templates and playbooks used in this tutorial, can be found on my GitHub](https://github.com/mlabouardy/terraform-aws-labs/tree/master/docker-swarm-cluster). 😎

Note: I did some tutorials about how to get started with Terraform on AWS, so make sure you read it before you go through this post.

1 – Setup EC2 Cluster using Terraform

1.1 – Global Variables

This file contains environment specific configuration like region name, instance type …

1
2
3
4
5
6
7
8
9
10
11
12
13
14
15
16
17
18
19
20
21
22
23
24
variable "aws_region" {
description = "AWS region on which we will setup the swarm cluster"
default = "us-east-1"
}

variable "ami" {
description = "Amazon Linux AMI"
default = "ami-4fffc834"
}

variable "instance_type" {
description = "Instance type"
default = "t2.micro"
}

variable "key_path" {
description = "SSH Public Key path"
default = "/home/core/.ssh/id_rsa.pub"
}

variable "bootstrap_path" {
description = "Script to install Docker Engine"
default = "install-docker.sh"
}

1.2 – Config AWS as Provider

1
2
3
provider "aws" {
region = "${var.aws_region}"
}

1.3 – Security Group

This SG allows all the inbound/outbound traffic:

1
2
3
4
5
6
7
8
9
10
11
12
13
14
15
16
17
18
19
20
21
22
23
24
25
26
resource "aws_security_group" "default" {
name = "sgswarmcluster"

# Allow all inbound
ingress {
from_port = 0
to_port = 65535
protocol = "tcp"
cidr_blocks = ["0.0.0.0/0"]
}

egress {
from_port = 0
to_port = 65535
protocol = "tcp"
cidr_blocks = ["0.0.0.0/0"]
}

# Enable ICMP
ingress {
from_port = -1
to_port = -1
protocol = "icmp"
cidr_blocks = ["0.0.0.0/0"]
}
}

1.4 – EC2 Instances

1
2
3
4
5
6
7
8
9
10
11
12
13
14
15
16
17
18
19
20
21
22
23
24
25
26
27
28
29
30
31
32
33
34
35
36
37
38
39
40
resource "aws_key_pair" "default"{
key_name = "clusterkp"
public_key = "${file("${var.key_path}")}"
}

resource "aws_instance" "master" {
ami = "${var.ami}"
instance_type = "${var.instance_type}"
key_name = "${aws_key_pair.default.id}"
user_data = "${file("${var.bootstrap_path}")}"
vpc_security_group_ids = ["${aws_security_group.default.id}"]

tags {
Name = "master"
}
}

resource "aws_instance" "worker1" {
ami = "${var.ami}"
instance_type = "${var.instance_type}"
key_name = "${aws_key_pair.default.id}"
user_data = "${file("${var.bootstrap_path}")}"
vpc_security_group_ids = ["${aws_security_group.default.id}"]

tags {
Name = "worker 1"
}
}

resource "aws_instance" "worker2" {
ami = "${var.ami}"
instance_type = "${var.instance_type}"
key_name = "${aws_key_pair.default.id}"
user_data = "${file("${var.bootstrap_path}")}"
vpc_security_group_ids = ["${aws_security_group.default.id}"]

tags {
Name = "worker 2"
}
}

Bootstrap script to install latest version of Docker:

1
2
3
4
5
#!/bin/sh
yum update
yum install -y docker
service docker start
usermod -aG docker ec2-user

2 – Transform to Swarm Cluster with Ansible

The playbook is self explanatory:

1
2
3
4
5
6
7
8
9
10
11
12
13
14
15
16
17
18
19
20
21
22
23
24
25
26
27
28
29
30
31
32
33
34
35
36
37
38
39
40
---
- name: Init Swarm Master
hosts: masters
gather_facts: False
remote_user: ec2-user
tasks:
- name: Swarm Init
command: docker swarm init --advertise-addr {{ inventory_hostname }}

- name: Get Worker Token
command: docker swarm join-token worker -q
register: worker_token

- name: Show Worker Token
debug: var=worker_token.stdout

- name: Master Token
command: docker swarm join-token manager -q
register: master_token

- name: Show Master Token
debug: var=master_token.stdout

- name: Join Swarm Cluster
hosts: workers
remote_user: ec2-user
gather_facts: False
vars:
token: "{{ hostvars[groups['masters'][0]]['worker_token']['stdout'] }}"
master: "{{ hostvars[groups['masters'][0]]['inventory_hostname'] }}"
tasks:
- name: Join Swarm Cluster as a Worker
command: docker swarm join --token {{ token }} {{ master }}:2377
register: worker

- name: Show Results
debug: var=worker.stdout

- name: Show Errors
debug: var=worker.stderr

Now we defined all the required templates and playbook, we only need to type 2 commands to bring up the swarm cluster:

1
2
terraform apply
ansible -i hosts playbook.yml

Note: Make sure to update the hosts file with the public ip of each EC2 instance.

Setting up the Swarm cluster in action is show below 😃 :

Drop your comments, feedback, or suggestions below — or connect with me directly on Twitter @mlabouardy.

Your browser is out-of-date!

Update your browser to view this website correctly. Update my browser now

×