Deploy a Jenkins Cluster on AWS

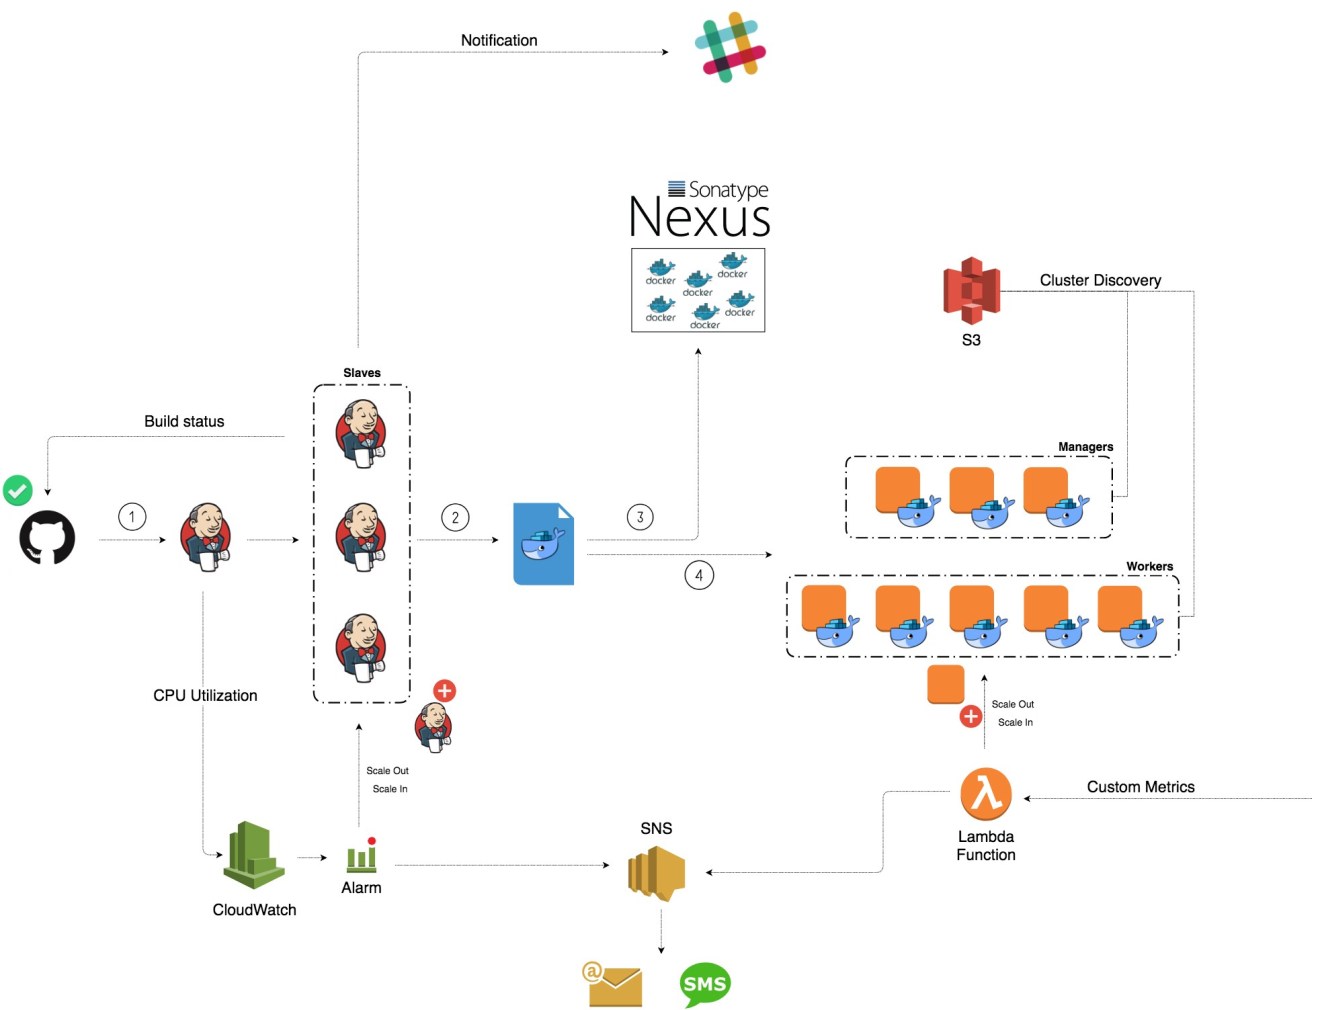
Few months ago, I gave a talk at Nexus User Conference 2018 on how to build a fully automated CI/CD platform on AWS using Terraform, Packer & Ansible. I illustrated how concepts like infrastructure as code, immutable infrastructure, serverless, cluster discovery, etc can be used to build a highly available and cost-effective pipeline. The platform I built is given in the following diagram:


The platform has a Jenkins cluster with a dedicated Jenkins master and workers inside an autoscaling group. Each push event to the code repository will trigger the Jenkins master which will schedule a new build on one of the available slaves. The slave will be responsible of running the unit and pre-integration tests, building the Docker image, storing the image to a private registry and deploying a container based on that image to Docker Swarm cluster.


On this post, I will walk through how to deploy the Jenkins cluster on AWS using top trending automation tools.

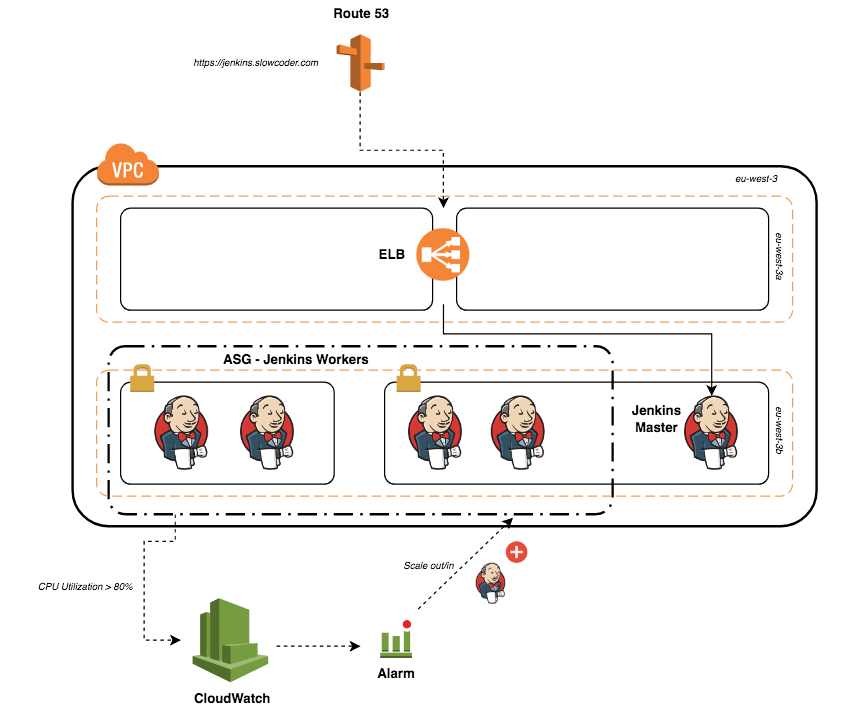
The cluster will be deployed into a VPC with 2 public and 2 private subnets across 2 availability zones. The stack will consists of an autoscaling group of Jenkins workers in a private subnets and a private instance for the Jenkins master sitting behind an elastic Load balancer. To add or remove Jenkins workers on-demand, the CPU utilisation of the ASG will be used to trigger a scale out (CPU > 80%) or scale in (CPU < 20%) event. (See figure below)


To get started, we will create 2 AMIs (Amazon Machine Image) for our instances. To do so, we will use Packer, which allows you to bake your own image.

The first AMI will be used to create the Jenkins master instance. The AMI uses the Amazon Linux Image as a base image and for provisioning part it uses a simple shell script:

1
2
3
4
5
6
7
8
9
10
11
12
13
14
15
16
17
18
19
20
21
22
23
24
25
26
27
28
29
30
31
32
33
34
35
36
37
{
"variables" : {
"region" : "eu-west-3",
"source_ami" : "ami-0ebc281c20e89ba4b"
},
"builders" : [
{
"type" : "amazon-ebs",
"profile" : "default",
"region" : "{{user `region`}}",
"instance_type" : "t2.micro",
"source_ami" : "{{user `source_ami`}}",
"ssh_username" : "ec2-user",
"ami_name" : "jenkins-master-2.107.2",
"ami_description" : "Amazon Linux Image with Jenkins Server",
"run_tags" : {
"Name" : "packer-builder-docker"
},
"tags" : {
"Tool" : "Packer",
"Author" : "mlabouardy"
}
}
],
"provisioners" : [
{
"type" : "file",
"source" : "COPY FILES",
"destination" : "COPY FILES"
},
{
"type" : "shell",
"script" : "./setup.sh",
"execute_command" : "sudo -E -S sh '{{ .Path }}'"
}
]
}

The shell script will be used to install the necessary dependencies, packages and security patches:

1
2
3
4
5
6
7
8
9
10
11
12
13
14
15
16
17
18
19
20
21
22
23
24
25
26
27
28
29
30
31
32
33
34
35
36
37
38
39
40
41
42
#!/bin/bash

echo "Install Jenkins stable release"
yum remove -y java
yum install -y java-1.8.0-openjdk
wget -O /etc/yum.repos.d/jenkins.repo http://pkg.jenkins-ci.org/redhat-stable/jenkins.repo
rpm --import https://jenkins-ci.org/redhat/jenkins-ci.org.key
yum install -y jenkins
chkconfig jenkins on

echo "Install Telegraf"
wget https://dl.influxdata.com/telegraf/releases/telegraf-1.6.0-1.x86_64.rpm -O /tmp/telegraf.rpm
yum localinstall -y /tmp/telegraf.rpm
rm /tmp/telegraf.rpm
chkconfig telegraf on
mv /tmp/telegraf.conf /etc/telegraf/telegraf.conf
service telegraf start

echo "Install git"
yum install -y git

echo "Setup SSH key"
mkdir /var/lib/jenkins/.ssh
touch /var/lib/jenkins/.ssh/known_hosts
chown -R jenkins:jenkins /var/lib/jenkins/.ssh
chmod 700 /var/lib/jenkins/.ssh
mv /tmp/id_rsa /var/lib/jenkins/.ssh/id_rsa
chmod 600 /var/lib/jenkins/.ssh/id_rsa

echo "Configure Jenkins"
mkdir -p /var/lib/jenkins/init.groovy.d
mv /tmp/basic-security.groovy /var/lib/jenkins/init.groovy.d/basic-security.groovy
mv /tmp/disable-cli.groovy /var/lib/jenkins/init.groovy.d/disable-cli.groovy
mv /tmp/csrf-protection.groovy /var/lib/jenkins/init.groovy.d/csrf-protection.groovy
mv /tmp/disable-jnlp.groovy /var/lib/jenkins/init.groovy.d/disable-jnlp.groovy
mv /tmp/jenkins.install.UpgradeWizard.state /var/lib/jenkins/jenkins.install.UpgradeWizard.state
mv /tmp/node-agent.groovy /var/lib/jenkins/init.groovy.d/node-agent.groovy
chown -R jenkins:jenkins /var/lib/jenkins/jenkins.install.UpgradeWizard.state
mv /tmp/jenkins /etc/sysconfig/jenkins
chmod +x /tmp/install-plugins.sh
bash /tmp/install-plugins.sh
service jenkins start

It will install the latest stable version of Jenkins and configure its settings:

  • Create a Jenkins admin user.
  • Create a SSH, GitHub and Docker registry credentials.
  • Install all needed plugins (Pipeline, Git plugin, Multi-branch Project, etc).
  • Disable remote CLI, JNLP and unnecessary protocols.
  • Enable CSRF (Cross Site Request Forgery) protection.
  • Install Telegraf agent for collecting resource and Docker metrics.

The second AMI will be used to create the Jenkins workers, similarly to the first AMI, it will be using the Amazon Linux Image as a base image and a script to provision the instance:

1
2
3
4
5
6
7
8
9
10
11
12
13
14
15
16
17
18
19
20
21
22
23
#!/bin/bash

echo "Install Java JDK 8"
yum remove -y java
yum install -y java-1.8.0-openjdk

echo "Install Docker engine"
yum update -y
yum install docker -y
usermod -aG docker ec2-user
service docker start

echo "Install git"
yum install -y git

echo "Install Telegraf"
wget https://dl.influxdata.com/telegraf/releases/telegraf-1.6.0-1.x86_64.rpm -O /tmp/telegraf.rpm
yum localinstall -y /tmp/telegraf.rpm
rm /tmp/telegraf.rpm
chkconfig telegraf on
usermod -aG docker telegraf
mv /tmp/telegraf.conf /etc/telegraf/telegraf.conf
service telegraf start

A Jenkins worker requires the Java JDK environment and Git to be installed. In addition, the Docker community edition (building Docker images) and a data collector (monitoring) will be installed.

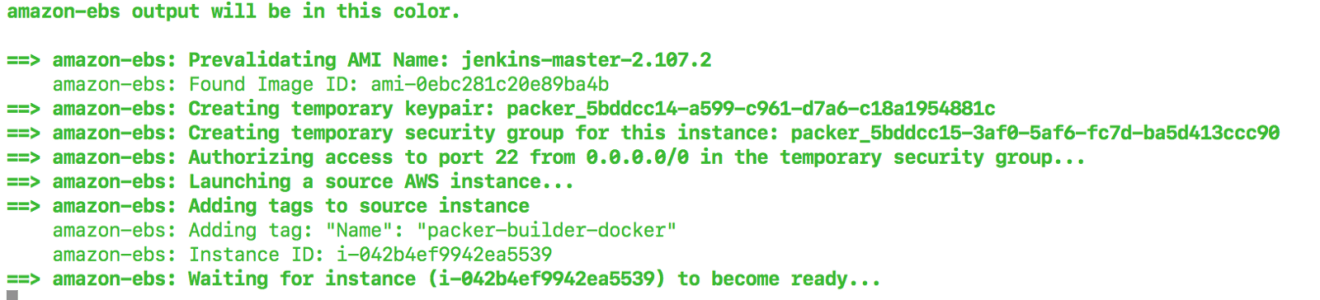
Now our Packer template files are defined, issue the following commands to start baking the AMIs:

1
2
3
4
5
# validate packer template
packer validate ami.json

# build ami
packer build ami.json

Packer will launch a temporary EC2 instance from the base image specified in the template file and provision the instance with the given shell script. Finally, it will create an image from the instance. The following is an example of the output:


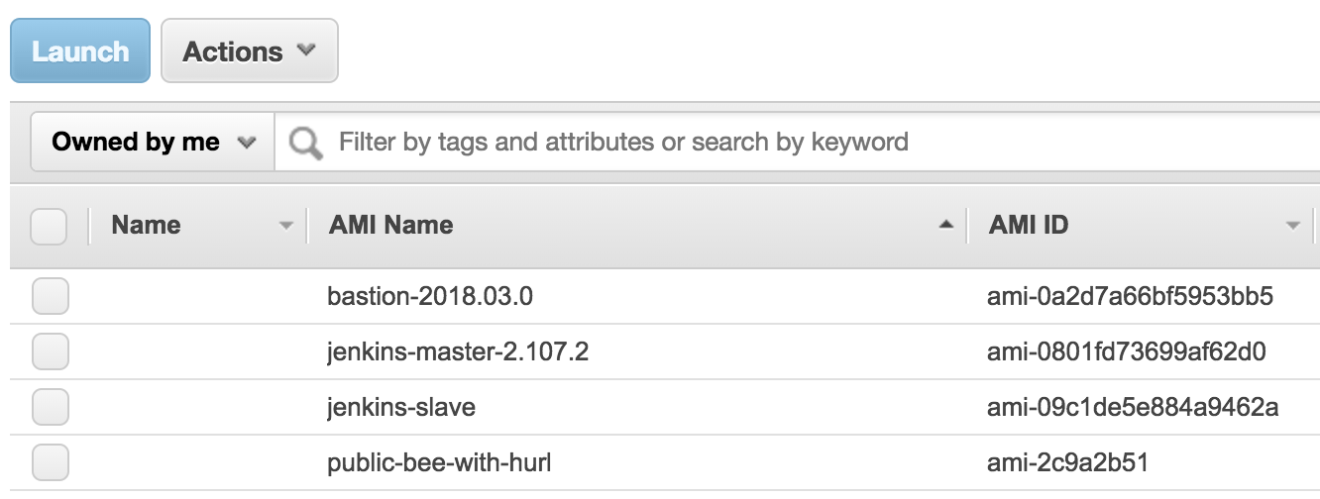
Sign in to AWS Management Console, navigate to “EC2 Dashboard” and click on “AMI”, 2 new AMIs should be created as below:


Now our AMIs are ready to use, let’s deploy our Jenkins cluster to AWS. To achieve that, we will use an infrastructure as code tool called Terraform, it allows you to describe your entire infrastructure in templates files.

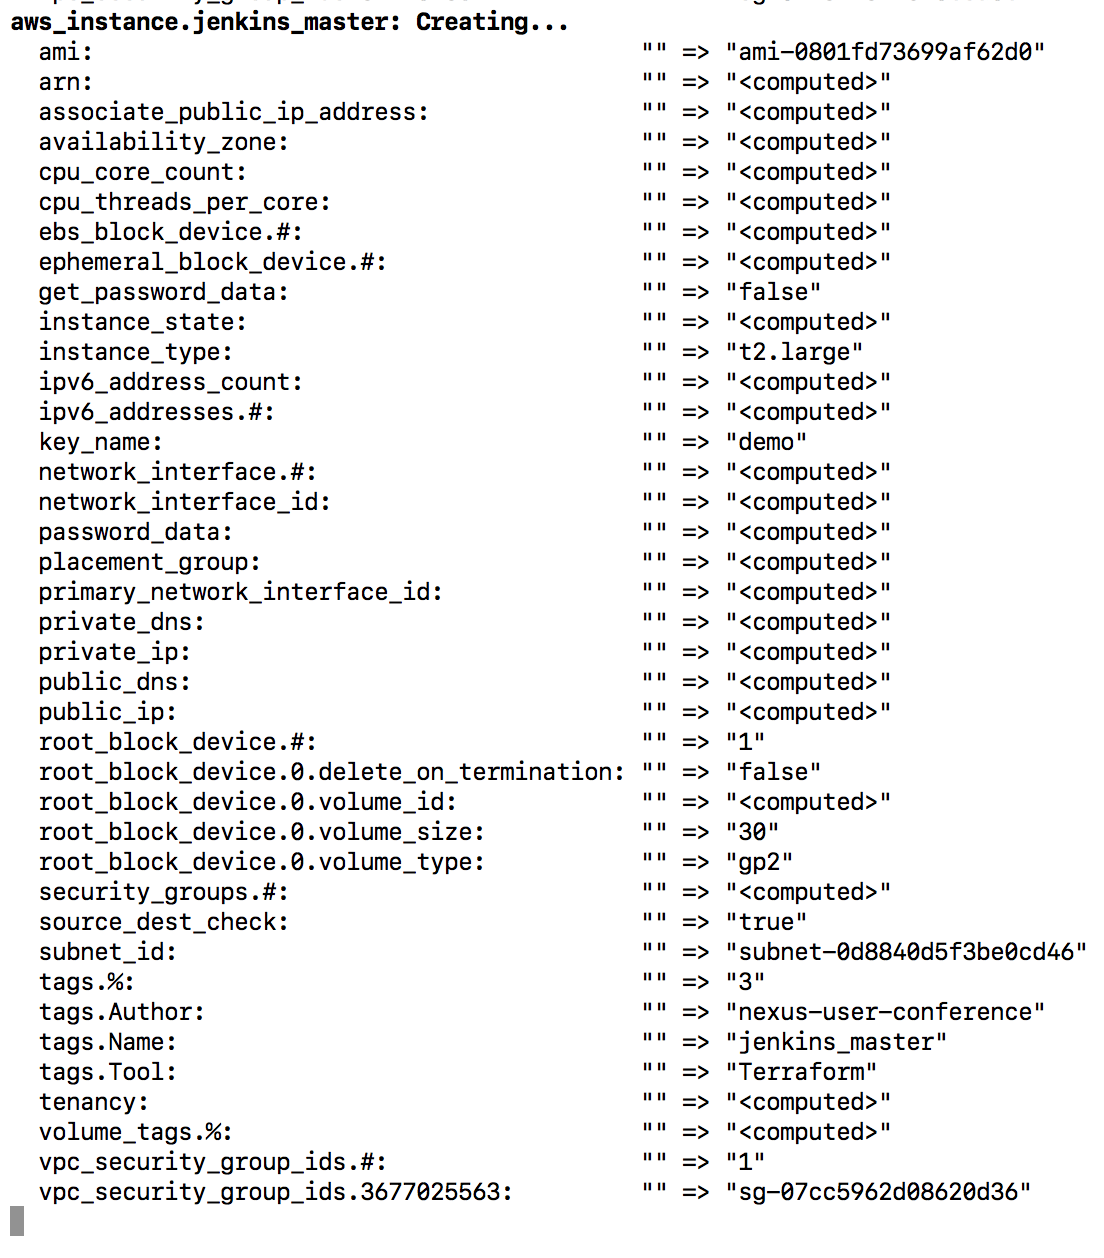
I have divided each component of my infrastructure to a template file. The following template file is responsible of creating an EC2 instance from the Jenkins master’s AMI built earlier:

1
2
3
4
5
6
7
8
9
10
11
12
13
14
15
16
17
18
19
resource "aws_instance" "jenkins_master" {
ami = "${data.aws_ami.jenkins-master.id}"
instance_type = "${var.jenkins_master_instance_type}"
key_name = "${var.key_name}"
vpc_security_group_ids = ["${aws_security_group.jenkins_master_sg.id}"]
subnet_id = "${element(var.vpc_private_subnets, 0)}"

root_block_device {
volume_type = "gp2"
volume_size = 30
delete_on_termination = false
}

tags {
Name = "jenkins_master"
Author = "mlabouardy"
Tool = "Terraform"
}
}

Another template file used as a reference to each AMI built with Packer:

1
2
3
4
5
6
7
8
9
10
11
12
13
14
15
16
17
18
19
data "aws_ami" "jenkins-master" {
most_recent = true
owners = ["self"]

filter {
name = "name"
values = ["jenkins-master-2.107.2"]
}
}

data "aws_ami" "jenkins-slave" {
most_recent = true
owners = ["self"]

filter {
name = "name"
values = ["jenkins-slave"]
}
}

The Jenkins workers (aka slaves) will be inside an autoscaling group of a minimum of 3 instances. The instances will be created from a launch configuration based on the Jenkins slave’s AMI:

1
2
3
4
5
6
7
8
9
10
11
12
13
14
15
16
17
18
19
20
21
22
23
24
25
26
27
28
29
30
31
32
33
34
35
36
37
38
39
40
41
42
43
44
45
46
47
48
49
50
51
52
// Jenkins slaves launch configuration
resource "aws_launch_configuration" "jenkins_slave_launch_conf" {
name = "jenkins_slaves_config"
image_id = "${data.aws_ami.jenkins-slave.id}"
instance_type = "${var.jenkins_slave_instance_type}"
key_name = "${var.key_name}"
security_groups = ["${aws_security_group.jenkins_slaves_sg.id}"]
user_data = "${data.template_file.user_data_slave.rendered}"

root_block_device {
volume_type = "gp2"
volume_size = 30
delete_on_termination = false
}

lifecycle {
create_before_destroy = true
}
}

// ASG Jenkins slaves
resource "aws_autoscaling_group" "jenkins_slaves" {
name = "jenkins_slaves_asg"
launch_configuration = "${aws_launch_configuration.jenkins_slave_launch_conf.name}"
vpc_zone_identifier = "${var.vpc_private_subnets}"
min_size = "${var.min_jenkins_slaves}"
max_size = "${var.max_jenkins_slaves}"

depends_on = ["aws_instance.jenkins_master", "aws_elb.jenkins_elb"]

lifecycle {
create_before_destroy = true
}

tag {
key = "Name"
value = "jenkins_slave"
propagate_at_launch = true
}

tag {
key = "Author"
value = "mlabouardy"
propagate_at_launch = true
}

tag {
key = "Tool"
value = "Terraform"
propagate_at_launch = true
}
}

To leverage the power of automation, we will make the worker instance join the cluster automatically (cluster discovery) using Jenkins RESTful API:

1
2
3
4
5
6
7
8
9
10
11
12
13
14
15
16
17
18
19
20
21
22
23
24
25
26
27
#!/bin/bash

JENKINS_URL="${jenkins_url}"
JENKINS_USERNAME="${jenkins_username}"
JENKINS_PASSWORD="${jenkins_password}"
TOKEN=$(curl -u $JENKINS_USERNAME:$JENKINS_PASSWORD ''$JENKINS_URL'/crumbIssuer/api/xml?xpath=concat(//crumbRequestField,":",//crumb)')
INSTANCE_NAME=$(curl -s 169.254.169.254/latest/meta-data/local-hostname)
INSTANCE_IP=$(curl -s 169.254.169.254/latest/meta-data/local-ipv4)
JENKINS_CREDENTIALS_ID="${jenkins_credentials_id}"

sleep 60

curl -v -u $JENKINS_USERNAME:$JENKINS_PASSWORD -H "$TOKEN" -d 'script=
import hudson.model.Node.Mode
import hudson.slaves.*
import jenkins.model.Jenkins
import hudson.plugins.sshslaves.SSHLauncher
DumbSlave dumb = new DumbSlave("'$INSTANCE_NAME'",
"'$INSTANCE_NAME'",
"/home/ec2-user",
"3",
Mode.NORMAL,
"slaves",
new SSHLauncher("'$INSTANCE_IP'", 22, SSHLauncher.lookupSystemCredentials("'$JENKINS_CREDENTIALS_ID'"), "", null, null, "", "", 60, 3, 15),
RetentionStrategy.INSTANCE)
Jenkins.instance.addNode(dumb)
' $JENKINS_URL/script

At boot time, the user-data script above will be invoked and the instance private IP address will be retrieved from the instance meta-data and a groovy script will be executed to make the node join the cluster:

1
2
3
4
5
6
7
8
9
10
data "template_file" "user_data_slave" {
template = "${file("scripts/join-cluster.tpl")}"

vars {
jenkins_url = "http://${aws_instance.jenkins_master.private_ip}:8080"
jenkins_username = "${var.jenkins_username}"
jenkins_password = "${var.jenkins_password}"
jenkins_credentials_id = "${var.jenkins_credentials_id}"
}
}

Moreover, to be able to scale out and scale in instances on demand, I have defined 2 CloudWatch metric alarms based on the CPU utilisation of the autoscaling group:

1
2
3
4
5
6
7
8
9
10
11
12
13
14
15
16
17
18
19
20
21
22
23
24
25
26
27
28
29
30
31
32
33
34
35
36
37
38
39
40
41
42
43
44
45
46
47
48
49
50
51
52
53
// Scale out
resource "aws_cloudwatch_metric_alarm" "high-cpu-jenkins-slaves-alarm" {
alarm_name = "high-cpu-jenkins-slaves-alarm"
comparison_operator = "GreaterThanOrEqualToThreshold"
evaluation_periods = "2"
metric_name = "CPUUtilization"
namespace = "AWS/EC2"
period = "120"
statistic = "Average"
threshold = "80"

dimensions {
AutoScalingGroupName = "${aws_autoscaling_group.jenkins_slaves.name}"
}

alarm_description = "This metric monitors ec2 cpu utilization"
alarm_actions = ["${aws_autoscaling_policy.scale-out.arn}"]
}

resource "aws_autoscaling_policy" "scale-out" {
name = "scale-out-jenkins-slaves"
scaling_adjustment = 1
adjustment_type = "ChangeInCapacity"
cooldown = 300
autoscaling_group_name = "${aws_autoscaling_group.jenkins_slaves.name}"
}

// Scale In
resource "aws_cloudwatch_metric_alarm" "low-cpu-jenkins-slaves-alarm" {
alarm_name = "low-cpu-jenkins-slaves-alarm"
comparison_operator = "LessThanOrEqualToThreshold"
evaluation_periods = "2"
metric_name = "CPUUtilization"
namespace = "AWS/EC2"
period = "120"
statistic = "Average"
threshold = "20"

dimensions {
AutoScalingGroupName = "${aws_autoscaling_group.jenkins_slaves.name}"
}

alarm_description = "This metric monitors ec2 cpu utilization"
alarm_actions = ["${aws_autoscaling_policy.scale-in.arn}"]
}

resource "aws_autoscaling_policy" "scale-in" {
name = "scale-in-jenkins-slaves"
scaling_adjustment = -1
adjustment_type = "ChangeInCapacity"
cooldown = 300
autoscaling_group_name = "${aws_autoscaling_group.jenkins_slaves.name}"
}

Finally, an Elastic Load Balancer will be created in front of the Jenkins master’s instance and a new DNS record pointing to the ELB domain will be added to Route 53:

1
2
3
4
5
6
7
8
9
10
11
resource "aws_route53_record" "jenkins_master" {
zone_id = "${var.hosted_zone_id}"
name = "jenkins.slowcoder.com"
type = "A"

alias {
name = "${aws_elb.jenkins_elb.dns_name}"
zone_id = "${aws_elb.jenkins_elb.zone_id}"
evaluate_target_health = true
}
}

Once the stack is defined, provision the infrastructure with terraform apply command:

1
2
3
4
5
6
7
8
# Install the AWS provider plugin
terraform int

# Dry-run check
terraform plan

# Provision the infrastructure
terraform apply --var-file=variables.tfvars

The command takes an additional parameter, a variables file with the AWS credentials and VPC settings (You can create a new VPC with Terraform from here):

1
2
3
4
5
6
7
8
9
10
11
12
13
14
15
16
17
18
19
20
21
22
23
24
25
region = ""

aws_profile = ""

shared_credentials_file = ""

key_name = ""

hosted_zone_id = ""

bastion_sg_id = ""

jenkins_username = ""

jenkins_password = ""

jenkins_credentials_id = ""

vpc_id = ""

vpc_private_subnets = []

vpc_public_subnets = []

ssl_arn = ""

Terraform will display an execution plan (list of resources that will be created in advance), type yes to confirm and the stack will be created in few seconds:


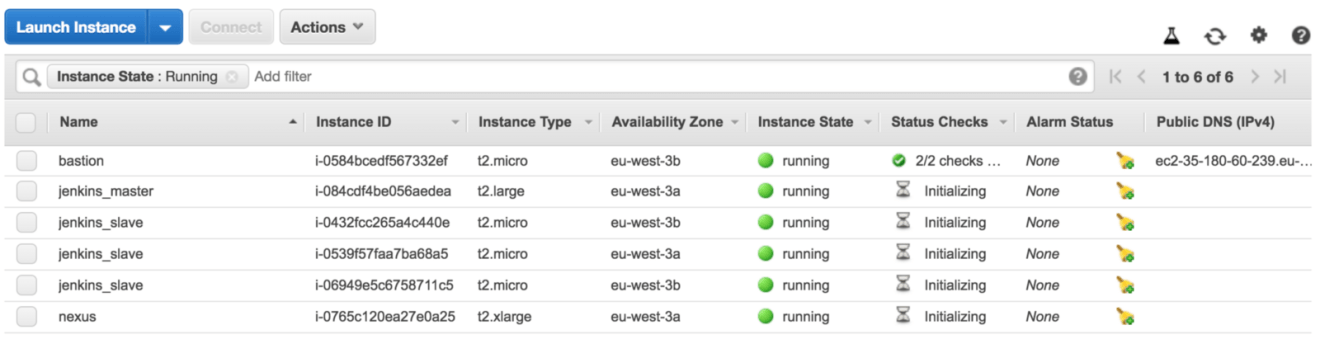
Jump back to EC2 dashboards, a list of EC2 instances will created:


In the terminal session, under the Outputs section, the Jenkins URL will be displayed:


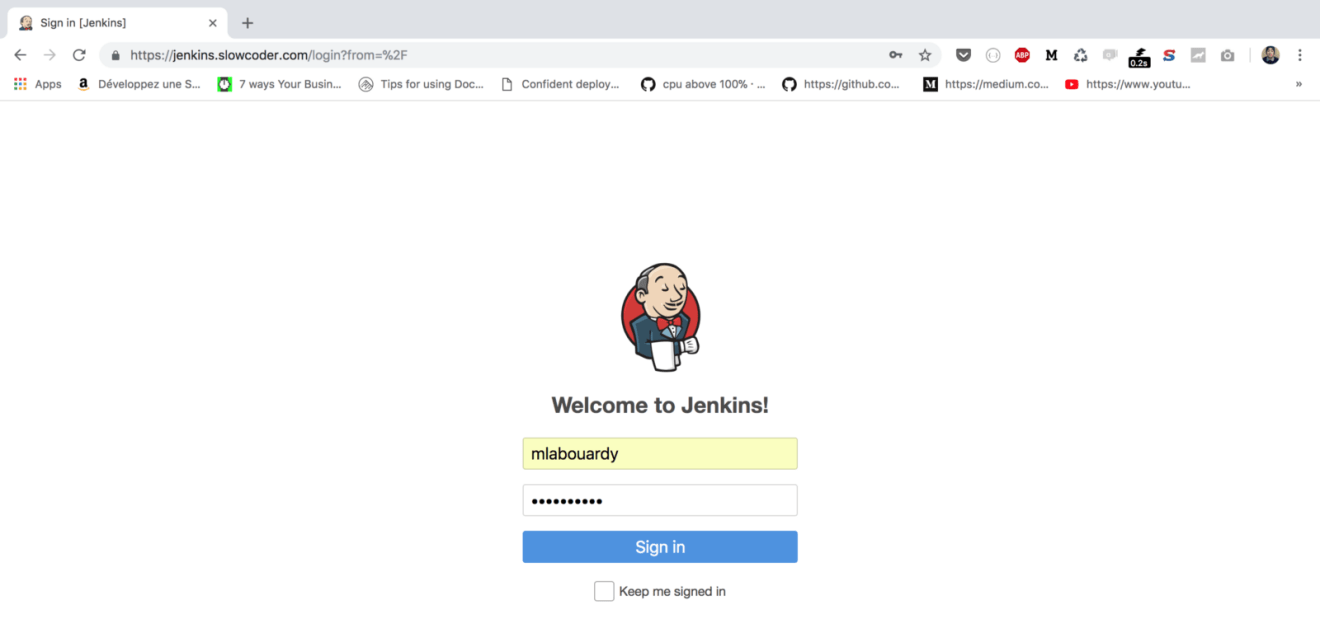
Point your favorite browser to the URL displayed, the Jenkins login screen will be displayed. Sign in using the credentials provided while baking the Jenkins master’s AMI:


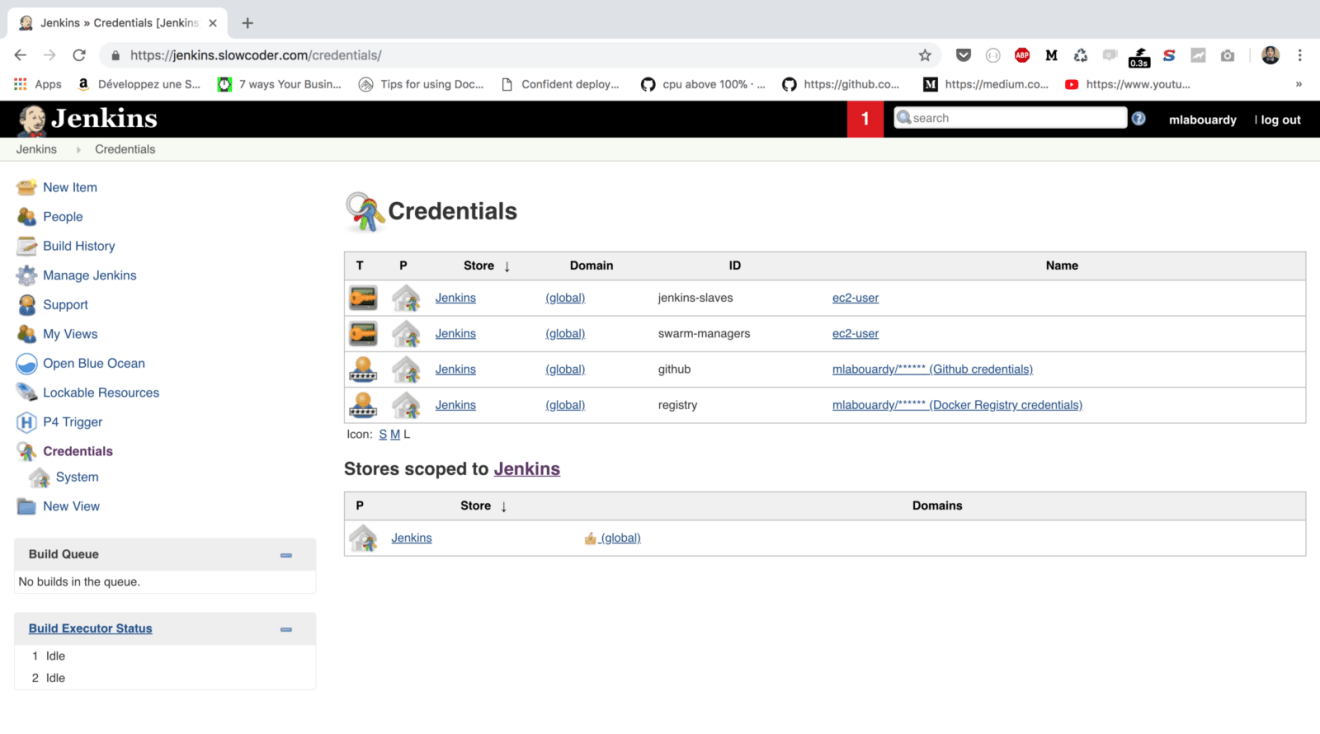
If you click on “Credentials” from the navigation pane, a set of credentials should be created out of the box:


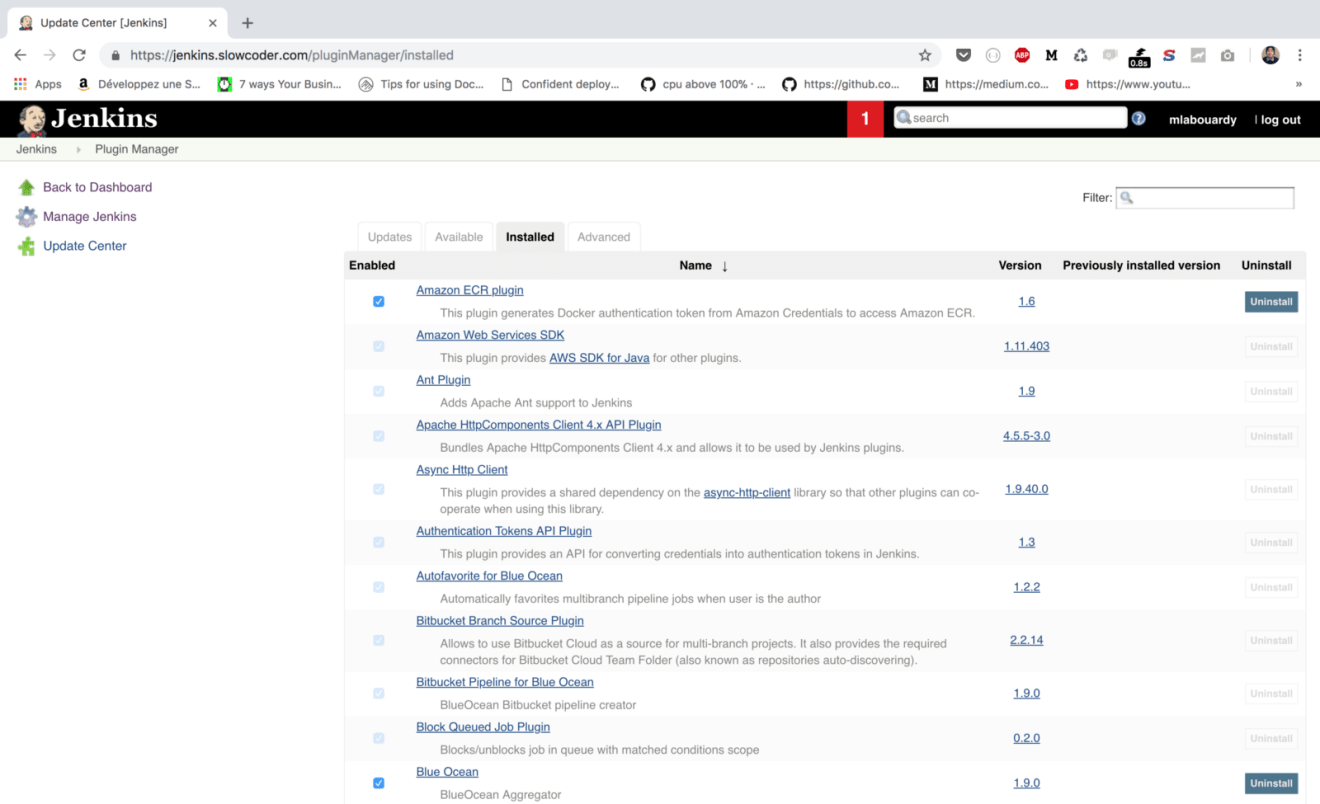
The same goes for “Plugins”, a list of needed packages will be installed also:


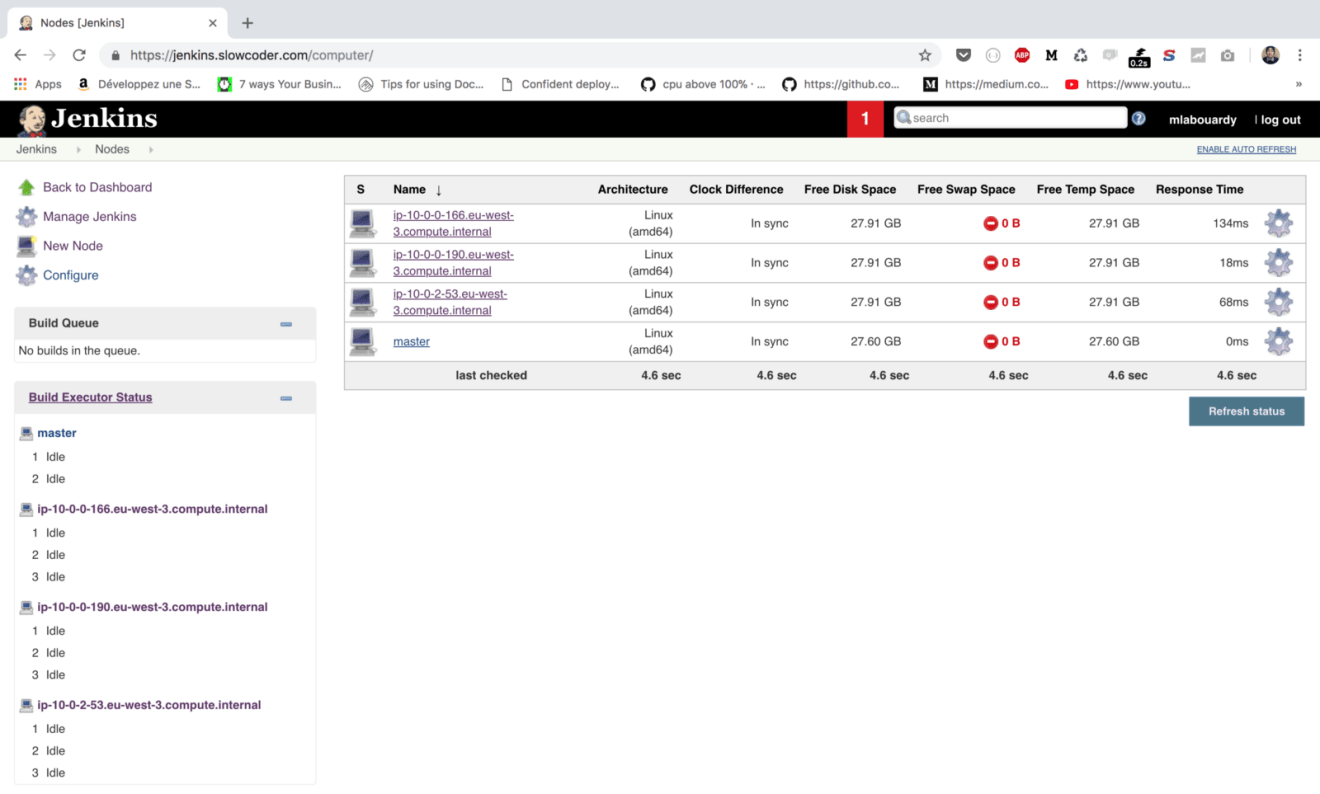
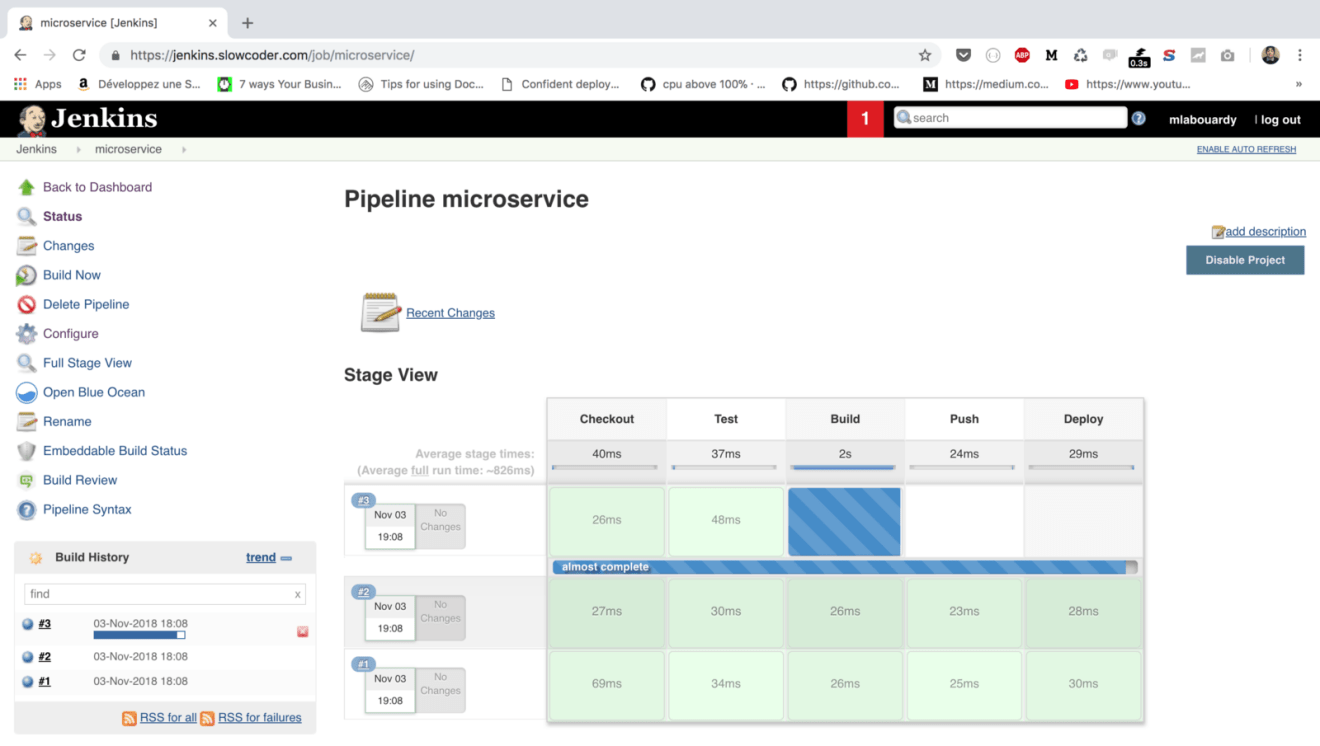
Once the Autoscaling group finished creating the EC2 instances, the instances will join the cluster automatically as you can see in the following screenshot:


You should now be ready to create your own CI/CD pipeline !


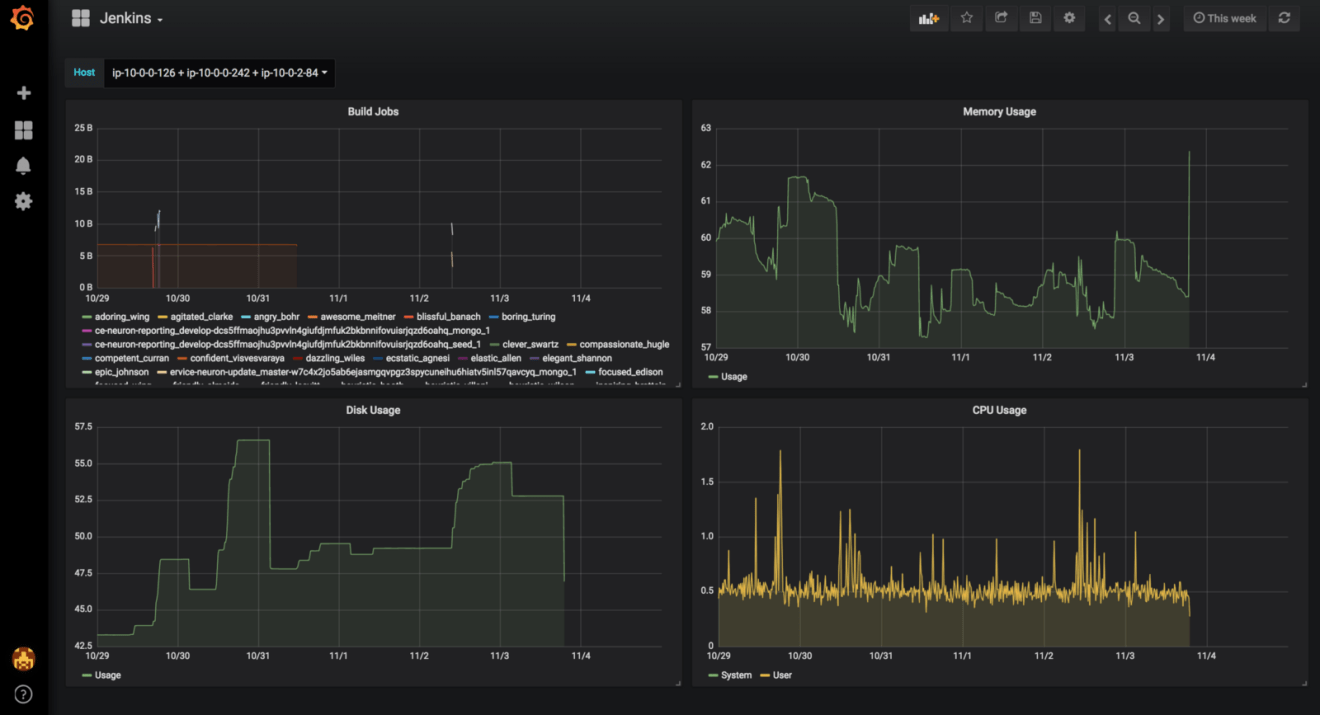
You can take this further and build a dynamic dashboard in your favorite visualisation tool like Grafana to monitor your cluster resource usage based on the metrics collected by the agent installed on each EC2 instance:


Drop your comments, feedback, or suggestions below — or connect with me directly on Twitter @mlabouardy.

Comments

Your browser is out-of-date!

Update your browser to view this website correctly. Update my browser now

×